

A Practical Guide to Commercial Ice Machine Repair
When your ice machine goes down, it’s never just a minor hiccup. It’s a full-blown operational crisis that hits your bottom line, hard and fast. Drink sales grind to a halt, the kitchen struggles, and customer satisfaction starts to nosedive. The real challenge isn't just getting it fixed; it's understanding the financial damage every minute of downtime is causing your business.
The Real Cost of a Broken Ice Machine
A dead ice machine sends ripples of chaos through your entire operation, and it goes way beyond serving a warm soda. For a busy coffee shop, that’s a direct hit to high-margin iced lattes and cold brews. In a restaurant, it can shut down the bar and throw a wrench in the kitchen’s prep and preservation workflow.
This isn't just a hypothetical problem. Many quick-service restaurants have found that a single day of unexpected ice machine failure can cost them an average of $1,000 in lost sales and wasted labor. For owners who get this, managing equipment costs is non-negotiable. It's why many savvy operators use lease-to-own options to keep cash flow steady, avoiding the sudden financial gut-punch of a full replacement, which can run anywhere from $3,000 to $10,000.
The Big Question: Repair or Replace?
Sooner or later, every owner faces that tough call: pour more money into an ice machine repair, or cut your losses and buy a new one? There’s a practical rule of thumb that I’ve seen used across the industry for years, and it’s a lifesaver for making this decision. It's called the 50% rule.
The 50% rule is simple: If the estimated cost of a repair is more than half the price of a new, comparable machine, it’s almost always smarter to replace it.
Think about it. An older unit needing a massive repair is just a ticking time bomb. You might fix the immediate problem, but you’re not addressing the underlying wear and tear on all the other parts. Sticking to this rule helps you avoid getting trapped in a frustrating cycle of endless repairs and mounting downtime.
A Realistic Look at Repair Costs
Knowing what you might be up against financially helps you budget and apply that 50% rule with confidence. The final bill can swing wildly depending on what’s broken, the cost of parts, and whether you call in a pro.
Here’s a breakdown of what you can generally expect:
- Minor Fixes: Simple stuff like a bad thermostat, a clogged water line, or a faulty water inlet valve are usually quick jobs. Expect to pay somewhere between $150 and $400.
- Moderate Repairs: When you get into components like the water pump, a fan motor, or the control board, things get more involved. These repairs typically land in the $400 to $800 range.
- Major Overhauls: This is where things get really painful. The most expensive repairs involve the heart of the machine—the refrigeration system. A compressor replacement can easily cost $1,000 to $2,500 or more, and fixing an evaporator is often just as pricey. These are the moments when the 50% rule is your best friend.
To give you a clearer picture of this financial decision, I've put together a table comparing common repair scenarios against the benefits of upgrading.
Repair Vs Replace Cost Analysis
This table offers a comparative look at common repair costs versus the long-term value of replacing an aging or inefficient ice machine, factoring in energy savings and warranty benefits.
| Repair Scenario | Estimated DIY/Pro Cost | Considerations for Replacement | Long-Term Benefit of New Unit |
|---|---|---|---|
| Faulty Thermostat/Valve | $150 - $400 | Machine is less than 5 years old and otherwise reliable. | Not applicable; repair is cost-effective. |
| Water Pump or Fan Motor | $400 - $800 | Unit is over 7 years old or has had previous major repairs. | Improved energy efficiency, reduced utility bills. |
| Control Board Failure | $500 - $900 | Repair cost is approaching 40-50% of a new unit's price. | New manufacturer's warranty, predictable costs. |
| Compressor Replacement | $1,000 - $2,500+ | Repair exceeds the 50% rule; unit is out of warranty. | Greater reliability, avoiding future downtime. |
| Evaporator Repair | $1,200 - $2,800+ | Machine has consistent issues with ice quality or production. | Better ice quality and consistency. |
Ultimately, this analysis shows that while minor repairs are often worth it, major system failures on older machines almost always point toward replacement as the smarter long-term financial move.
The Value of Modern Efficiency
Investing in a new machine is about more than just dodging the next repair bill; it's an upgrade to your whole operation. Modern commercial ice machines, like those from trusted brands such as Atosa, are built for dependability and a lower total cost of ownership.
They are engineered to be more energy-efficient, conserve water, and use more durable components that can handle the grind of a commercial kitchen. When you choose a modern unit from a reputable supplier like The Restaurant Warehouse, you're not just buying equipment. You're investing in a more predictable bottom line and, honestly, a lot less stress.
Diagnosing Common Ice Machine Failures
When your ice machine starts acting up, it’s not random—it's sending out signals. Learning to read these clues is the first step in any successful ice machine repair. Instead of just guessing, you can follow a logical path to figure out exactly what’s gone wrong.
This whole process is about paying attention. Is the machine completely dead, or is it just making slushy, weird-looking ice? Can you hear strange noises or see a puddle forming? Each symptom points you in a different direction, and we’ll break down the most common ones you’re likely to face in a busy kitchen.
The Problem of No Ice Production
This is probably the most stressful failure, but a lot of the time, the fix is surprisingly simple. Before you start thinking about a massive repair bill, check the fundamentals. It's so easy to overlook the basics when you're in a panic, but I've seen firsthand that over 60% of "no ice" issues come down to simple water or power problems, not a dead compressor.
Start by checking the obvious stuff first:
- Water Supply: Is the water valve leading to the machine wide open? It's worth tracing the line back just to make sure nothing got accidentally shut off.
- Power Connection: Make sure the machine is plugged in tight and check if the circuit breaker has tripped. A quick flip of the breaker can sometimes be all it takes.
- Water Filter: A seriously clogged filter will slow water flow to a trickle, which means the machine won't even try to make ice. If it's been over six months, that filter is probably due for a change.
If you’ve gone through that list and still have no ice, the problem is likely inside the machine. The next parts to look at are the water inlet valve, which is the electronic gatekeeper for the water, and the float switch or water level sensor. A stuck float can trick the machine into thinking it's already full of water, so it never calls for more.
For a more detailed look at these specific components, our guide on troubleshooting tips for a commercial ice machine not making ice offers clear, step-by-step instructions.
Dealing with Leaks and Puddles
Water on the floor is more than just a mess; it's a slip hazard and a clear sign of trouble. Finding where a leak is coming from requires a bit of detective work. Always start with the easiest spots to check.
Look for drips around the water supply line connection at the back of the unit. A loose fitting is a common culprit and an easy fix. Next, take a look at the drain lines coming from the ice machine head and the storage bin. If a drain line is clogged or doesn't have the right downward slope, water will back up and spill over.
If the external lines look dry and secure, the leak is probably internal. You’ll want to inspect the drain pan for any cracks or blockages and make sure the bin drain isn't clogged with ice chips or other gunk.
When Ice Quality Suffers
Sometimes the machine is making ice, but it's not the ice you need. Small, cloudy, or hollow cubes are a dead giveaway that something is messing with the freezing process. This issue almost always points back to one of two things: a water flow problem or a dirty evaporator plate.
A dirty or scaled-up evaporator plate is the number one reason for bad ice. Mineral deposits from your water supply build up and act like an insulator, preventing the water from freezing into solid, clear cubes. This is what gives you that thin, hollow, or misshapen ice that melts way too fast in a drink.
The other likely suspect is a clogged water distribution tube. This part is supposed to cascade water evenly over the evaporator. If its little holes are blocked with scale, the water flow becomes uneven, creating dry spots and incomplete ice cubes. The only fix here is a thorough cleaning and descaling cycle.
This flowchart can help you visualize the key decision points when you're facing a potentially big repair.
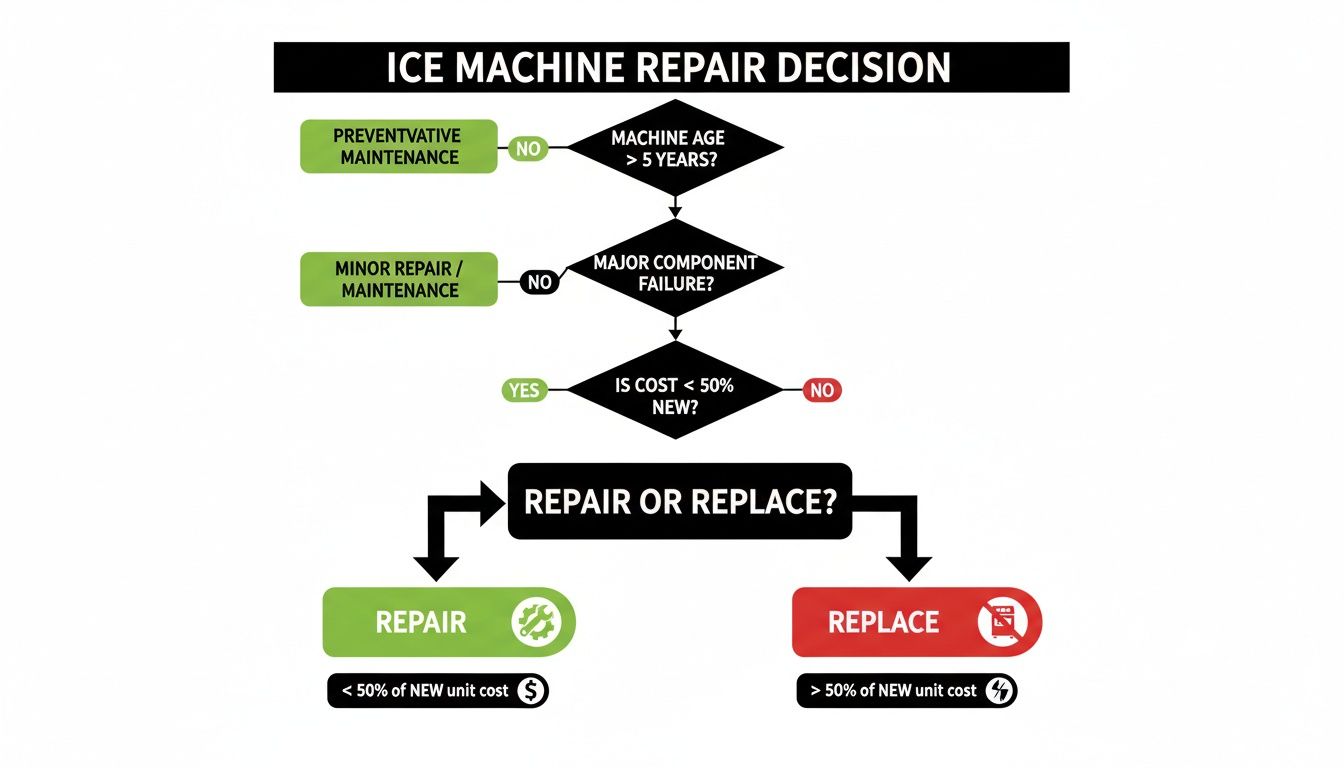
The flowchart reinforces a good rule of thumb—the 50% rule. It guides you toward repairing the machine when the costs are reasonable but pushes you toward replacement when the repair bill starts getting too close to the cost of a new unit.
Decoding Strange Noises
Commercial ice machines are naturally noisy. You’ll hear water filling, the compressor humming, and the familiar crash of ice dropping into the bin. The trick is to learn what’s normal for your specific machine and to immediately investigate any new or weird sounds.
Pro Tip: Never ignore a new noise. Grinding, squealing, or loud clanking sounds are mechanical cries for help. They often show up right before a major component fails, and catching them early can be the difference between a minor repair and a full-blown replacement.
Here’s a quick guide to what you might be hearing:
- Loud Grinding or Squealing: This usually points to a failing motor, either the condenser fan motor or the water pump motor. The bearings wear out over time and start making noise long before they completely seize up.
- Rattling or Vibrating: A loud rattle could be something as simple as a loose panel. However, it can also be a sign that the fan blades are hitting the housing or that the compressor mounts have worked themselves loose.
- Loud Buzzing or Humming: While the compressor always has a low hum, an unusually loud or struggling buzz could mean the compressor relay is failing or the compressor itself is having a hard time starting. This needs immediate attention to avoid burning out the component.
Your Essential Toolkit for Safe DIY Repairs
Before you even think about touching that ice machine, let's talk about getting prepared. Jumping into a repair without the right gear and safety mindset is like a chef trying to prep for dinner service without washing their hands—it's just asking for trouble. This isn't just about fixing the machine; it's about doing it safely and keeping things sanitary.

First, we’ll cover the safety steps that need to become second nature. After that, we’ll put together the go-to toolkit you'll need for most common fixes. The goal is to make sure every single cube that comes out of that machine is clean, safe, and perfect for your customers.
Safety and Sanitation First
I can't stress this enough: ignoring safety is the fastest way to turn a quick fix into a serious accident. Commercial ice machines are a potent mix of high-voltage electricity, water, and moving metal parts. Always, always start with a safety check.
The absolute first thing you do is disconnect the machine from its power source. Don't just flip a switch; unplug it from the wall. If it’s hardwired, that means heading to your breaker panel and switching off the correct circuit. This one move prevents the risk of electric shock, which is no joke in a wet environment.
Next, you need to use a lockout/tagout procedure. This is a non-negotiable safety practice in any commercial setting. Once the breaker is off, put a physical lock on it so nobody can flip it back on while you’re working. Add a tag that clearly says "Do Not Operate - Maintenance in Progress" for an extra layer of protection.
Remember, the health department considers ice a food product. If you skip cleaning steps during a repair, you could introduce nasty bacteria like Listeria or E. coli into the system. That's a huge risk for your customers. Sanitation isn't optional—it's a requirement.
Finally, gear up with the right Personal Protective Equipment (PPE). These simple items make a world of difference.
- Safety Glasses: Protects your eyes from chemical splashes or flying debris. You never know when something might pop loose.
- Waterproof Gloves: Keeps your hands safe from sharp metal edges and cleaning chemicals. It also stops you from transferring oils from your skin onto clean parts.
- Non-Slip Footwear: The floor around an ice machine is almost always damp. Good, grippy shoes are essential to prevent a nasty fall.
Building Your Repair Toolkit
Having the right tools ready to go makes any job smoother and faster. You don't need a massive mechanic's chest, but a few key items will let you handle the vast majority of common issues. Think of this as your ice machine first-aid kit.
Here’s what I recommend keeping in a dedicated toolkit:
| Tool | Primary Use | Why It's Essential |
|---|---|---|
| Multimeter | Testing electrical components | This is your set of eyes for electricity. It safely checks for voltage, tests continuity in switches, and helps diagnose bad motors or control boards. |
| Nut Driver Set | Removing panels and components | Ice machines are full of hex-head screws. A set of nut drivers (especially 1/4" and 5/16") is way more effective than an adjustable wrench in tight spaces. |
| Tubing Cutter | Replacing water lines | Using a knife can leave burrs that cause leaks. A proper tubing cutter gives you a clean, square cut on plastic or copper lines, ensuring a perfect seal. |
| Refrigeration Gauges | Advanced diagnostics (Pro Use) | For certified techs only. Gauges are needed to check refrigerant pressures, which points to problems like leaks or a failing compressor. Note: You must have an EPA license to handle refrigerant. |
On top of these tools, you’ll need the right cleaning supplies. Always use a nickel-safe ice machine cleaner for descaling the evaporator plate and other metal parts. Using the wrong chemical can strip the nickel plating, leading to corrosion and a very expensive repair bill. For sanitizing, an EPA-approved, food-grade sanitizer is the only way to go. Keep both on hand so you're always ready for a proper clean-down after you finish a repair.
Sourcing Parts and Knowing When to Call a Pro
Alright, you've done the detective work and have a pretty good idea of what's ailing your ice machine. Now comes the next fork in the road: finding the right parts or realizing it’s time to call in a professional. This is where a lot of well-intentioned DIY repairs can go sideways. Ordering the wrong component is an easy way to waste time and money, and diving into a complex fix without the right know-how can turn a small headache into a full-blown catastrophe.
The absolute key to getting the right part is finding your machine's data plate. It’s a small metal plate or sticker, usually hiding out on the back or side of the unit, and it holds the two most important pieces of information: the model number and the serial number. Think of these as your machine's unique fingerprint. Without them, ordering a part that fits and works correctly is just a guessing game.
Finding the Right Replacement Parts
With your model and serial numbers in hand, you can start the hunt. You’re going to run into two main options: Original Equipment Manufacturer (OEM) parts and aftermarket alternatives.
OEM parts come directly from the company that built your machine. This means they are a guaranteed perfect match for fit and performance. Aftermarket parts are made by other companies and are usually cheaper, but the quality can be a real roll of the dice.
When it comes to the guts of your machine—things like water pumps, control boards, or critical inlet valves—sticking with OEM is almost always the smarter move. It's not worth the risk. This is especially true if you're running newer, more complex machines from brands like Atosa. Working with a dedicated supplier like The Restaurant Warehouse makes this much easier, as they stock the specific OEM parts for the brands they sell, getting you a reliable component without the runaround.
When to Put Down the Tools
Look, knowing your own limits is probably the most valuable skill in any kind of repair. Fixing a clogged drain line yourself is a fantastic win and saves you a service call. But some jobs are strictly for the pros. Trying to tackle certain repairs without the right certifications isn't just dangerous—it can be illegal.
You need to pick up the phone and call a certified technician for issues involving:
- Refrigerant Leaks: Handling refrigerant requires an EPA 608 certification, period. A leak means the sealed system is compromised, which is a complex problem requiring specialized gear like recovery machines and vacuum pumps to fix properly.
- Compressor or Condenser Replacement: These are the heart and lungs of your ice machine's cooling system. Swapping one out is a major, labor-intensive job that demands expert knowledge of brazing, pressure testing, and charging the system with refrigerant.
- Complex Electrical Faults: If you've broken out the multimeter and are still stumped, or if you suspect the main control board is fried, it's time to step away. Bad wiring isn't just a machine problem; it's a serious fire hazard.
Calling a professional isn't giving up; it's making a smart business decision. A botched DIY repair can easily lead to more expensive damage, longer downtime, and safety risks that make the cost of a service call look like a bargain.
The world of ice machines is also getting more complicated. The automatic ice maker market is projected to jump from $3.8 billion in 2025 to a whopping $7.7 billion by 2035, largely driven by smart, IoT-connected units. These high-tech machines can often tell you what's wrong, but fixing a busted sensor can still run you $400-$1,200. The repair requires a certified tech who likely charges $100-$200 per hour. You can learn more about this growing market to get ahead of future repair trends.
Vetting a Repair Technician
Hiring the right technician is just as crucial as buying the right part. Don't just Google "ice machine repair" and call the first number you see. A few smart questions upfront can save you a world of hurt.
Before you book a service call, ask them:
- Experience with Your Brand: "Have you worked on Atosa (or Hoshizaki, or Manitowoc) machines before?" Experience with your specific make and model is a huge advantage.
- Licensing and Insurance: "Are you licensed and fully insured?" This is non-negotiable. It protects your business from any liability if an accident happens during the repair.
- Parts and Labor Warranty: "Do you offer a warranty on your work?" A good company will stand behind both the parts they install and their labor for at least 30 to 90 days.
- Trip Charges and Hourly Rates: Get the fee structure clear from the start. "What's your trip charge? Do you have a separate diagnostic fee? What's your hourly rate?"
Taking a few minutes to do this ensures your machine gets fixed correctly and safely, minimizing your downtime and protecting your investment. For a wider look at managing equipment problems, check out our guide on handling general restaurant equipment repair.
Proactive Maintenance to Prevent Future Breakdowns
The cheapest ice machine repair is the one you never have to make. It’s one thing to know how to fix your machine when it’s down, but a smart, proactive maintenance plan is what really protects your bottom line.
Think of it less as a chore and more as a profit-saving strategy. A simple, consistent schedule can dramatically cut down on those frantic emergency calls, improve the quality of your ice, and seriously extend the life of your investment.
This isn't just about dodging breakdowns, either. It's about operational excellence. Regular upkeep ensures your machine runs at peak efficiency, which means it uses less energy and water—saving you money on utility bills month after month.
Your Daily Maintenance Routine
The most effective habits are the small ones you do every day. These tasks take just a few minutes but are your first line of defense against the most common ice machine headaches. It’s like wiping down your kitchen counters at the end of a shift; it prevents bigger messes down the road.
- Exterior Wipe-Down: Grab a food-safe cleaner and wipe down all the exterior surfaces. This simple step prevents the buildup of kitchen grease and dust that can work its way into components and cause clogs.
- Bin Check: Take a quick look inside the ice bin. Make sure the ice is flowing freely and that the scoop is stored properly outside the bin—never buried in the ice—to prevent contamination.
- Observe and Listen: Pay attention to the machine's normal sounds and cycles. If you suddenly notice a new noise or a harvest cycle that seems to be dragging on longer than usual, that could be the earliest warning sign of trouble.
Weekly and Monthly Checks
Stepping up your routine on a weekly and monthly basis helps you tackle the issues that build up over time. These tasks focus on the air and water systems, which are the heart and lungs of your ice production. Neglecting these areas is a fast track to poor performance.
The most important weekly task? Cleaning the air filter on your air-cooled unit. A clogged filter is like trying to breathe with a bag over your head; it suffocates the machine, forcing the compressor to work harder and leading to overheating and eventual failure. Just pop it out, wash it with warm soapy water, let it dry completely, and put it back in.
Once a month, give your water filter a quick inspection. Most filters are good for about six months, but if you're in an area with hard water, you might need to swap it out more often. A failing filter directly impacts ice quality and is a major cause of scale buildup.
Neglecting regular maintenance is like skipping oil changes in your car—the machine might run for a while, but a major, expensive breakdown is inevitable. Consistent cleaning is the single most effective way to prevent about 70% of common ice machine failures.
The Crucial Semi-Annual Deep Clean
Twice a year, your ice machine needs a full-on deep cleaning and sanitization cycle. This is non-negotiable. It's the only way to remove the mineral scale that chokes internal components and eliminate the slime and mold that love to grow in that damp, dark environment.
To truly get your machine back to factory-fresh condition, you need a maintenance schedule that covers all the bases. This isn't just about wiping things down; it's a structured plan to keep every part of your machine in top working order, from the daily visual checks to the critical semi-annual deep clean.
Essential Ice Machine Maintenance Schedule
| Frequency | Task | Why It Matters |
|---|---|---|
| Daily | Wipe down exterior surfaces and check the ice bin. | Prevents grease buildup and ensures proper ice flow and sanitation. |
| Weekly | Clean the air filter on air-cooled units. | Ensures proper airflow, preventing the compressor from overheating. |
| Monthly | Inspect the water filter. | Maintains ice quality and prevents scale buildup from hard water. |
| Semi-Annually | Perform a full descaling and sanitizing cycle. | Removes mineral deposits and kills bacteria, slime, and mold. |
| Semi-Annually | Check and clean all water lines and sensors. | Ensures the machine cycles correctly and avoids false readings. |
This deep clean involves two distinct steps:
- Descaling: This process uses a nickel-safe descaling solution to dissolve mineral buildup (limescale) from the evaporator plate and other parts of the water system. This is what keeps your ice cubes solid, clear, and perfectly formed.
- Sanitizing: After the scale is gone, you run a cycle with an EPA-approved, food-grade sanitizer. This kills any bacteria, mold, and algae, ensuring the ice you serve is safe and clean.
You can learn more about the best practices with our comprehensive guide on proper ice machine cleaning procedures.
For a broader look at how this kind of proactive care can boost efficiency and prevent costly downtime across all your equipment, you might want to explore these effective preventive maintenance strategies for MEP systems. Implementing a structured plan is a proven way to protect your assets and keep your business running smoothly.
Your Top Ice Machine Repair Questions, Answered
Even when you know the basics of troubleshooting, specific questions always pop up. Getting clear, straightforward answers is the key to making smart, cost-effective decisions for your business. We've gathered some of the most common questions we hear from restaurant owners just like you.
How Often Should I Have My Commercial Ice Machine Professionally Serviced?
Even if you’re on top of your in-house cleaning, you should absolutely schedule a professional service check at least twice a year. A certified technician can go way beyond a simple cleaning.
They’ll dive deep into diagnostics, checking refrigerant levels, professionally cleaning hard-to-reach parts like the condenser coils, and testing every electrical connection. Think of this proactive check-up as an insurance policy against a catastrophic failure during your busiest dinner rush. For high-volume kitchens or restaurants in areas with particularly hard water, bumping that up to a quarterly service is an even better investment in reliability.
A professional service call isn't just about fixing what's broken; it's a preventive strategy. It’s how you spot potential disasters before they happen and cost you a fortune in downtime.
What’s the Most Common Reason an Ice Machine Stops Making Ice?
You might be surprised, but the single most frequent culprit for a machine that stops making ice is a lack of water. It sounds almost too simple, but it’s true. Before you panic, always check the basics first.
- Clogged Water Filter: A filter that’s past its prime can slow water flow to a trickle. This is a very common oversight.
- Closed Supply Valve: It happens. Someone might have accidentally bumped or closed the water line leading to the machine. Make sure it's fully open.
- Faulty Inlet Valve: This little part is the gatekeeper for water entering your machine. Over time, it can fail and get stuck closed.
Another huge reason is a dirty or heavily scaled-up evaporator plate. When mineral deposits from hard water build up, they act like an insulator, preventing the water from freezing properly. A consistent cleaning schedule is your best defense against this incredibly common problem.
Can I Use Just Any Cleaner on My Ice Machine?
Absolutely not. This is a critical point that can save you from a very expensive, irreversible mistake. You must always use a nickel-safe ice machine descaler specifically formulated for commercial units.
Using harsh chemicals like bleach or any old general-purpose cleaner will permanently damage the sensitive nickel plating on the evaporator and other key components. This damage leads to corrosion, terrible ice production, and can even leach harmful substances into your ice. Always, always stick to the manufacturer’s recommended cleaning and sanitizing solutions. It’s the only way to protect your equipment, your warranty, and your customers.
At The Restaurant Warehouse, we provide the durable, efficient equipment you need to keep your kitchen running smoothly, backed by financing options that make sense for your budget. Equip your business for success today by visiting us at https://therestaurantwarehouse.com.
About The Author

Sean Kearney
Sean Kearney is the Founder of The Restaurant Warehouse, with 15 years of experience in the restaurant equipment industry and more than 30 years in ecommerce, beginning with Amazon.com. As an equipment distributor and supplier, Sean helps restaurant owners make confident purchasing decisions through clear pricing, practical guidance, and a more transparent online buying experience.
Connect with Sean on LinkedIn, Instagram, YouTube, or Facebook.