

Atosa Refrigerator and Freezer Operating Instructions

Key Takeaways
- Set Temperature in Four Steps: Press and hold the SET button for about 1 second until the display flashes, use the UP and DOWN arrow buttons to select the desired temperature, then press SET again to confirm.
- Recommended Atosa Settings: Atosa refrigerator temperature control is dialed in best between 33–38°F, while atosa freezer set temperature should be 0°F or below for safe food storage.
- Dixell Controller Inside: Atosa units use a Dixell-style microcomputer controller. The compressor starts when the temperature hits the set point plus the differential (OT) and shuts off once the unit returns to the set point.
- Manual Defrost on Demand: Hold the snowflake button for more than 2 seconds to start a manual defrost cycle.
- Verify with a Separate Thermometer: Always confirm internal temperature with a separate thermometer — display readings can drift, especially after frequent door openings or in hot kitchens.
Quick-Start: How to Set Temperature on Your Atosa Refrigerator or Freezer
This is the fastest way to set or change the temperature on most Atosa refrigerators and Atosa freezers using the Dixell-style digital controller. The same four-step procedure works for the Atosa 2 door refrigerator, single-door reach-in, undercounter, sandwich prep table, pizza prep table, and chef base lineups.
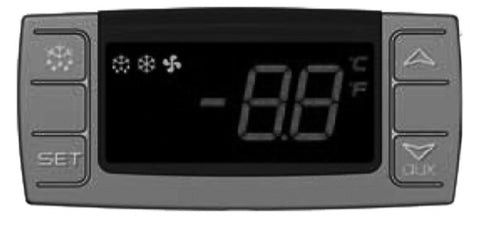
- Access the Control Panel: Locate the digital controller on the front of your Atosa refrigerator or Atosa freezer. The keyboard has a SET button, a snowflake button, and UP/DOWN arrow buttons.
- Enter Adjustment Mode: Press and hold the SET button for about 1 second (more than 2 seconds on some models) until the temperature display flashes. The celsius or fahrenheit LED will start blinking, confirming you are in adjustment mode.
- Adjust the Temperature: Use the UP and DOWN arrow buttons to select the desired temperature. The Atosa refrigerator temperature control range is typically 33–38°F. Atosa freezer settings should be 0°F or below.
- Confirm the New Setpoint: Press the SET button again to memorize the new set point value, or wait about 10 seconds and the controller will store the value automatically. The display will stop blinking, indicating the new temperature is set.
Recommended Atosa Temperature Settings
The right Atosa refrigerator temperature control point depends on what you store, but most operators land in the 33–38°F window — cold enough to slow bacterial growth, warm enough to avoid freezing produce. Atosa freezer set temperature is typically 0°F or below, with -8°F to 1°F as the operating sweet spot for safe long-term food storage. For the full step-by-step procedure with model-specific notes and reset guidance, see our Atosa Refrigerator and Freezer Set Temperature guide.
Initial Setup: Unboxing and First Power-On
New upright air-cooling Atosa refrigerator and Atosa freezers should be opened and ventilated before using in your restaurant's kitchen. After that, use warm water to clean the inside of the unit. Once the cabinet is dry, plug the unit into a standard 115V outlet and press the POWER switch on the controller keyboard. The green indicator light will turn on and the Atosa unit will start working. The microcomputer controller, installed in the controller keyboard, automatically adjusts the temperature ranges using the factory-set parameters.
Let the unit run for at least 4 hours before loading any product. This gives the cabinet time to reach the proper holding temperature so food does not enter a warm box.
Understanding the Dixell Controller on Atosa Units
Atosa refrigerators and freezers use a Dixell-style digital controller — the same controller family used across most commercial refrigeration in the value tier. The smart digital controller works like this: if the temperature goes up and hits the set point plus the differential, the compressor starts. It then turns off when the temperature goes back to the set point. That differential — visible on the controller as the OT parameter — is what keeps the compressor from short-cycling.
For deep parameter configuration (PB1, PB2, hysteresis, defrost interval, fan delay), see our Atosa Dixell controller configuration guide. That guide is the companion to the atosa dixell controller manual reference and walks through every parameter code an operator typically needs to touch.
Microcomputer Controller Button Reference
Every button on the Atosa microcomputer controller has a single-press function and, in most cases, a combo function for programming mode. Here is the full reference.

- SET button: Displays the target set point. In programming mode, it selects a parameter or confirms an operation.
- Snowflake button (upper left): Starts a manual defrost when held for more than 2 seconds.
- UP arrow button (upper right): In programming mode, browses parameter codes or increases the displayed value.
- DOWN arrow button (lower right): In programming mode, browses parameter codes or decreases the displayed value.
- UP + DOWN arrows together: Locks or unlocks the keyboard when held for more than 3 seconds.
- SET + DOWN arrow together: Enters programming mode when held for 3 seconds.
- SET + UP arrow together: Returns the display to the room temperature reading.
How to View the Set Point
Push and immediately release the SET button. The set point will be displayed. Push and immediately release the SET button again, or wait about 5 seconds, to return to the normal cabinet temperature visualization.
How to Change the Setpoint
- Enter Setpoint Mode: Push the SET key for more than 2 seconds to change the set point value. The value of the set point will be displayed and the celsius or fahrenheit LED will start blinking.
- Adjust the Value: Push the UP or DOWN arrow buttons to change the set value to the new desired temperature.
- Memorize the New Setpoint: To memorize the new set point value, push the SET button again or wait about 10 seconds without pressing a key.
How to Manual Defrost an Atosa Freezer
Push the snowflake button for more than 2 seconds and a manual defrost cycle will start. Manual defrost is most useful on freezer models that show heavy ice buildup on the evaporator coil between automatic defrost cycles, or when you want to clear frost before doing a deep clean.
How to Change a Parameter Value
- Enter Programming Mode: Press the SET and DOWN arrow buttons together for 3 seconds. The celsius or fahrenheit LED lights will start blinking, confirming programming mode is active.
- Select the Parameter: Press the SET key to display the parameter's current value. Use the UP and DOWN arrow buttons to change the value.
- Store and Move On: Press SET to store the new value and move to the next parameter.
- Exit Programming Mode: Press SET with the UP arrow button, or wait 15 seconds without pressing a key. The set value is stored when the procedure is exited by waiting for the time-out to expire.
How to Lock and Unlock the Keyboard
To lock the keyboard and prevent accidental setting changes, keep the UP and DOWN arrow buttons pressed for more than 3 seconds. The OF (which means OFF) message will be displayed and the keyboard will be locked. If a key is pressed while locked, the OF message will be displayed again as a reminder. To unlock the keyboard, keep the UP and DOWN arrow buttons pressed together for more than 3 seconds until the ON message is displayed.
Understanding "OT" and the Temperature Differential
The OT setting on your Dixell controller — the controller used in Atosa units — controls the temperature differential. Adjusting OT determines the variance between the set point and the actual temperature inside the cabinet before the compressor cycles on. A wider differential reduces compressor wear but allows more temperature swing; a tighter differential holds temperature more precisely but cycles the compressor more often.
If your display shows OT instead of a temperature reading, the controller is referencing the differential parameter rather than reporting an error. Confirm the door gasket is sealing tightly and that condenser coils are clean — these are the two most common causes of the cabinet drifting outside the differential window.
How to Factory Reset an Atosa Refrigerator or Freezer
An Atosa refrigerator reset is most often needed after a power surge, a controller lockup, or when a unit was previously configured for an unusual application. The full atosa refrigerator reset procedure walks through unplugging the unit, restoring factory defaults through the parameter menu, and reconfirming the holding setpoint. Because the parameter codes vary slightly by model year, see our Atosa Set Temperature and Reset guide for the model-specific reset procedure.
Alarm Signals and What They Mean

The Atosa microcomputer controller will display an alarm code on the screen when it detects a fault. The most common Atosa alarm signals you will see in a busy kitchen include:
- HA (high temperature alarm): Cabinet temperature has risen above the high-alarm threshold. Check the door gasket, condenser coils, and condenser fan.
- LA (low temperature alarm): Cabinet temperature has dropped below the low-alarm threshold. Check the thermostat sensor and verify the setpoint.
- P1 (probe 1 fault): Cabinet probe is disconnected or short-circuited. Inspect the wire harness and probe connection.
- P2 (probe 2 fault): Evaporator probe is disconnected or short-circuited.
- EE (memory error): Internal memory issue. Power-cycle the unit; if the alarm persists, the controller may need replacement.
- OF: Not an alarm — the keyboard is locked. Hold UP and DOWN together for 3 seconds to unlock.
Practical Tips: Verifying Temperature and Ongoing Monitoring
Use a separate thermometer inside the unit to verify the actual internal temperature. Display readings can occasionally drift from the cabinet's true holding temperature, particularly after frequent door openings during service or when ambient kitchen temperature spikes during a dinner rush. Keep a daily temperature log — most health departments require it, and it is the fastest way to catch a slow component failure before product is lost.
Always refer to the user manual specific to your Atosa model for detailed instructions, as default parameters and alarm thresholds vary slightly between product lines. Regularly monitor and adjust the temperature as needed when the external environment shifts seasonally, when the unit is loaded with warm product, or when service patterns change.
Atosa Manuals by Product Type
Operators frequently search for the specific Atosa manual that matches their unit. The most-requested manual references and their typical use cases:
- Atosa refrigerator manual: Default reference for any Atosa reach-in refrigerator (1-, 2-, or 3-door).
- Atosa freezer manual: Reach-in freezer reference covering operating, defrost, and alarm procedures.
- Atosa 2 door refrigerator manual: Specific to the popular MBF8503GR-class 2-door reach-in.
- Atosa sandwich prep table manual: Covers sandwich prep table setup, pan layout, and rail temperature settings.
- Atosa pizza prep table manual: Covers pizza prep table setup with deeper pan rails.
- Atosa MCF8701 manual: See the dedicated Atosa MCF8701 manual page.
- Atosa Dixell controller manual: Parameter-level reference — see our Atosa Dixell controller guide.
Atosa parts are widely available through authorized Atosa parts suppliers, and Atosa USA backs every commercial-grade unit with a 2-year parts and labor warranty plus a 5-year compressor warranty.
Is Atosa a Good Brand?
Is Atosa a good brand? Yes — Atosa refrigeration has earned a strong reputation as the leading value-tier brand in commercial refrigeration. Atosa refrigerator reviews, atosa fridge reviews, and atosa freezer reviews — sometimes searched as atosa refrigeration reviews or just atosa reviews — consistently praise the brand for delivering the look and feel of a premium refrigerator at a more accessible price. Common Atosa models include the atosa commercial refrigerator and atosa commercial freezer reach-in lines, the atosa chef base, the atosa 2 door refrigerator, atosa pizza prep table, and atosa sandwich prep table. For head-to-head comparisons see Atosa vs True, Atosa vs Turbo Air, and Atosa vs Beverage-Air. Operators weighing atosa vs avantco generally choose Atosa for the longer compressor warranty and broader authorized service network.
Shop Atosa Refrigeration
Browse the full Atosa refrigerator collection for current models, or jump straight to a popular workhorse like the Atosa MBF8503GR 2-Door Reach-In Refrigerator.
Related Guides
- Atosa Refrigerator and Freezer Set Temperature
- Atosa Dixell Controller Configuration Guide
- Atosa Commercial Refrigerator Temperature: Step-by-Step
- Best Commercial Refrigerator Brands
- Commercial Refrigerators Buyer's Guide
Frequently Asked Questions
What temperature should an Atosa refrigerator be set to? The recommended atosa refrigerator temperature control range is 33–38°F. This window is cold enough to slow bacterial growth without freezing fresh produce or beverages.
What temperature should an Atosa freezer be set to? The atosa freezer set temperature should be 0°F or below for safe long-term storage. Most operators run their Atosa freezers between -8°F and 1°F.
How do you set the temperature on an Atosa refrigerator? Press and hold the SET button for about 1 second until the display flashes. Use the UP and DOWN arrow buttons to select the desired temperature, then press SET again to confirm. The display will stop blinking once the new setpoint is stored.
How do I manually defrost my Atosa freezer? Push the snowflake button on the controller for more than 2 seconds. A manual defrost cycle will start automatically and the controller will return to normal operation when the cycle completes.
What does "OF" mean on an Atosa controller? OF means OFF — the keyboard is locked. To unlock, press the UP and DOWN arrow buttons together for more than 3 seconds until the ON message appears.
What does "OT" mean on an Atosa controller? OT refers to the temperature differential parameter on the Dixell controller used in Atosa units. It controls the variance between the set point and the actual cabinet temperature before the compressor cycles on.
How do I factory reset an Atosa refrigerator or freezer? The Atosa refrigerator reset procedure varies slightly by model year. The general approach is to unplug the unit, enter programming mode, restore factory defaults through the parameter menu, then reconfirm the holding setpoint. See our Atosa Set Temperature guide for model-specific reset steps.
Is Atosa a good brand? Yes — Atosa is widely considered the strongest value-tier brand in commercial refrigeration. Atosa reviews consistently praise the stainless steel construction, Dixell controller, and 2-year parts and labor warranty plus 5-year compressor warranty.
Where can I find the Atosa refrigerator manual or Atosa freezer manual? Most current Atosa refrigerator manual and Atosa freezer manual PDFs are published on the Atosa USA support site. For the popular MCF8701 model, see our dedicated Atosa MCF8701 manual page.
What controller does Atosa use? Atosa uses a Dixell-style microcomputer controller across most of its commercial refrigeration line. For parameter-level configuration, the atosa dixell controller manual reference is published in our Atosa Dixell controller configuration guide.
How long do I need to let a new Atosa unit run before loading it? Let the unit run empty for at least 4 hours so the cabinet reaches the proper holding temperature before any food is added. Loading warm product into a cabinet that has not yet reached temperature is one of the most common reasons new operators see HA (high temperature) alarms in the first week.
Why is my Atosa unit not holding temperature? The four most common causes are a damaged door gasket, a dirty condenser coil, a failing condenser fan, or an improperly configured OT differential. Verify the gasket seals tightly, clean the condenser coil with a soft brush, confirm the fan spins freely, and review the OT setting in programming mode.
About The Author

Sean Kearney
Sean Kearney is the Founder of The Restaurant Warehouse, with 15 years of experience in the restaurant equipment industry and more than 30 years in ecommerce, beginning with Amazon.com. As an equipment distributor and supplier, Sean helps restaurant owners make confident purchasing decisions through clear pricing, practical guidance, and a more transparent online buying experience.
Connect with Sean on LinkedIn, Instagram, YouTube, or Facebook.