


How to Keep Food Warm Catering a Professional Guide
Keeping food hot for a catering job is about more than just taste; it’s about safety, quality, and your reputation. The whole game boils down to one critical rule: keep your hot food safely above 140°F (60°C) from the moment it leaves your kitchen until it hits the guest's plate. Get this right, and you're a hero. Get it wrong, and you've got a problem. Mastering this involves understanding how different foods behave and having the right gear and a solid plan.
The Science of Keeping Catered Food Hot and Safe
Serving food that's gone lukewarm isn't just disappointing for guests—it's a massive failure that can wreck your reputation and, worse, create a serious health hazard. Knowing how to keep food warm for catering isn't some secret art; it's about mastering the science of heat retention and food safety. Every single successful caterer I know has this down cold. It's the bedrock of a memorable event.
At the heart of it all is a concept called the "temperature danger zone." This is the temperature range where nasty bacteria like Salmonella and E. coli throw a party, multiplying like crazy and turning good food bad.
Food safety experts define the temperature danger zone as the range between 40°F (4°C) and 140°F (60°C). Your number one job as a caterer is making sure your hot food never dips into this zone for any significant length of time.
Holding food at or above 140°F essentially puts bacterial growth on pause, keeping the meal safe to eat throughout a long event. This isn't just a friendly suggestion; it's a hard-and-fast rule in professional catering. For a much deeper dive into these principles, it’s worth getting familiar with the Hazard Analysis Critical Control Point system. You can learn more about how a HACCP plan ensures food safety in our detailed guide.
Understanding How Different Foods Hold Heat
Not all food is created equal when it comes to staying hot. The speed at which an item cools off depends on its density, moisture, and overall composition—something we call its thermal mass.
Dense, wet foods like a big beef roast or a deep pan of lasagna have a high thermal mass. They cling to heat for a lot longer than lighter, drier items like dinner rolls or a tray of roasted vegetables. Knowing this helps you plan your cooking, packing, and serving timeline much more effectively.
- High Thermal Mass Foods: Think braised meats, thick stews, hearty soups, casseroles, and rich sauces. These are your best friends for heat retention.
- Low Thermal Mass Foods: Things like bread, pastries, steamed veggies, and delicate fish. These guys will get cold fast and need more active heating solutions on-site.
For example, a tray of roasted asparagus will lose its heat almost instantly if you just set it on a buffet line, while a big pot of chili will stay piping hot for a good while under the same conditions. This is exactly why you'll see caterers keeping bread in a warming drawer but might just leave a roast under a simple heat lamp.
The Role of Humidity in Food Quality
But temperature is only half the battle. The other crucial element? Humidity.
Dry heat will absolutely murder certain dishes, turning something that was supposed to be succulent into something leathery and sad. This is especially true for items like grilled chicken breast, carved turkey, and even pasta.
Without enough moisture in the holding environment, the food's own water content starts to evaporate, leaving it dry and unappetizing. This is precisely why professional holding cabinets have humidity controls and why chafing dishes rely on a water pan. The steam from that water pan creates a moist atmosphere that helps preserve the food’s texture and flavor.
Think of it this way: a dry sauna and a steam room can be the exact same temperature, but the experience is worlds apart. The same logic applies to your food. For crispy things like fried chicken or french fries, you want low humidity. For a prime rib, you need high humidity to keep it perfect. Mastering these subtle but critical details is what separates a good caterer from a truly great one.
Choosing the Right Warming Equipment for Your Menu
Your warming equipment is the absolute backbone of your catering operation. Getting this right isn't just about buying the shiniest new gear; it's a strategic decision that directly affects your food quality, safety, and frankly, your sanity on event day. The right tools—from transport to the service line—are what guarantee every dish you perfected in the kitchen arrives tasting exactly as you intended.
The number of options out there can feel overwhelming, but the key is to think about your menu first. Are you serving delicate sauces that need gentle, consistent heat, or are you holding pans of hearty lasagna that can handle something more robust? Answering that question is your first step. And you're not alone in needing this gear; the global market for catering food warmers was recently valued at around USD 557.9 million. Experts even see it growing at nearly 6.3% annually over the next decade, a trend you can read more about in the full market analysis on Future Market Insights.
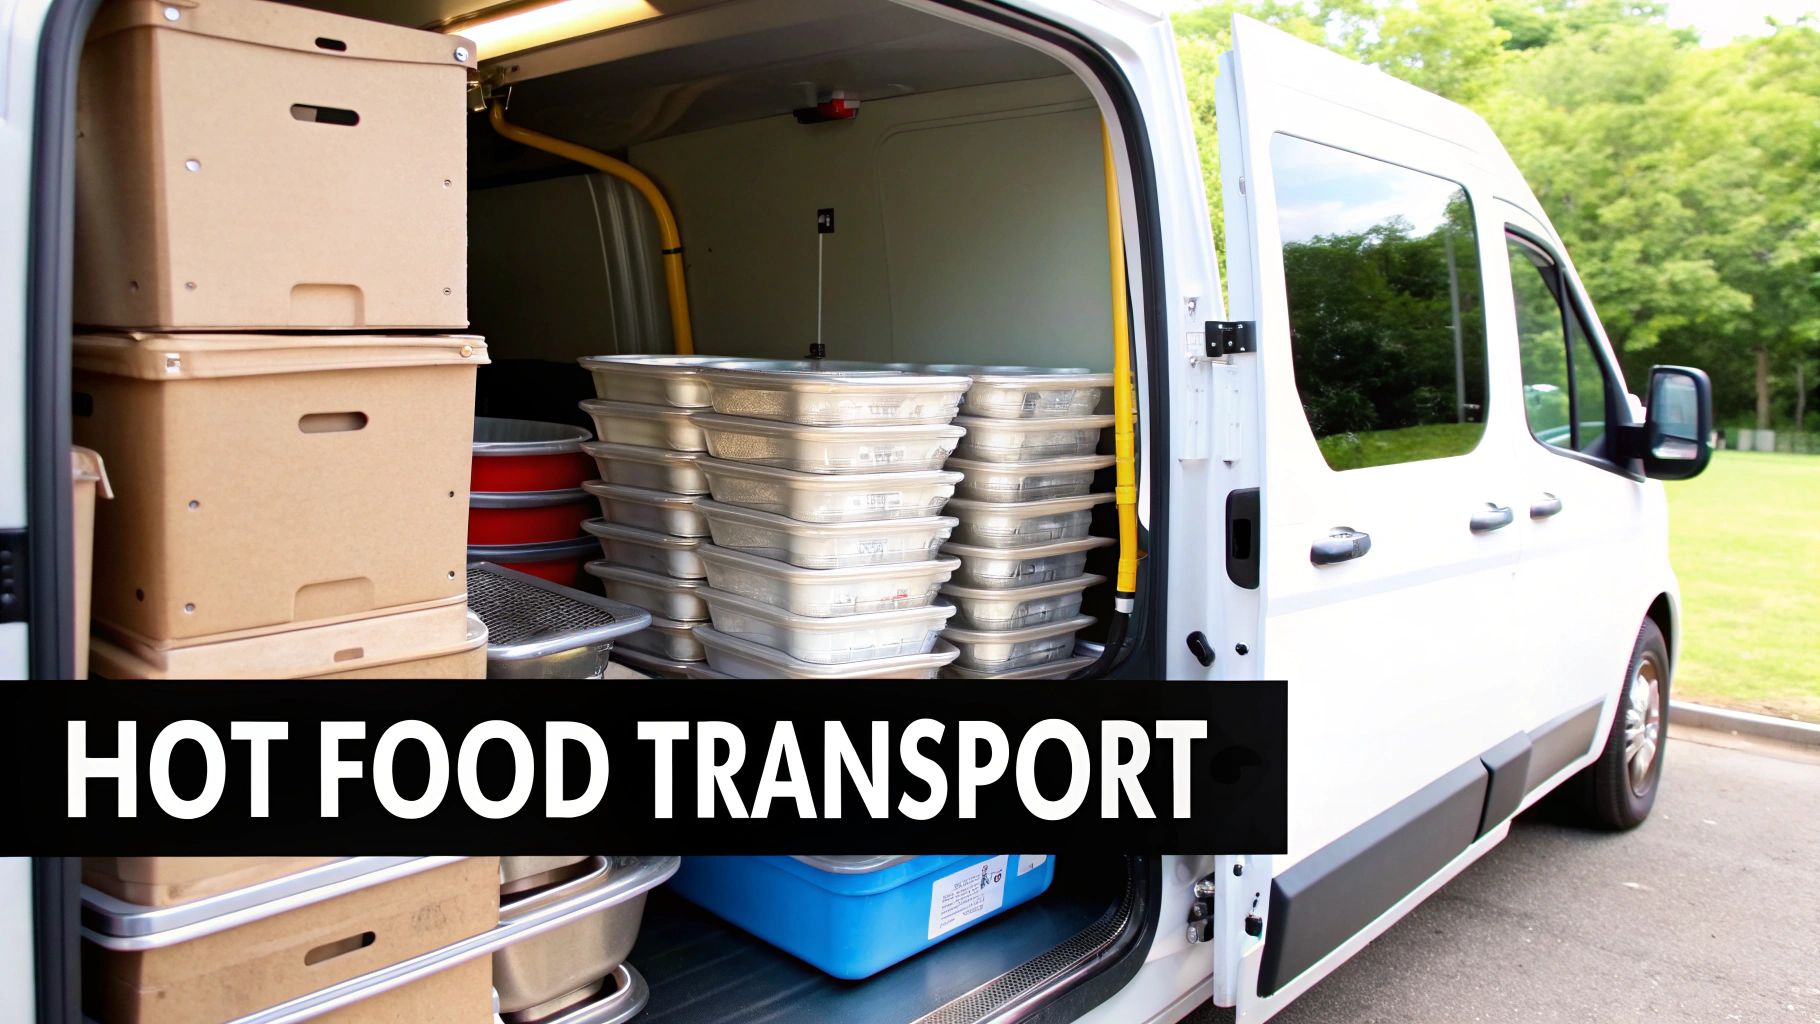
The Workhorses of Transport: Insulated Food Carriers
Before your food ever sees a buffet line, it has to survive the journey from your kitchen to the venue. This is where insulated food carriers, which we all just call "hot boxes," are completely non-negotiable. These are passive warming solutions—they don't generate their own heat, but they are exceptionally good at holding onto it.
Think of them as high-tech coolers designed to keep things hot. They're perfect for moving full-size hotel pans over long distances, protecting them from temperature swings and the inevitable bumps in the road.
Picture this: you've got a wedding reception an hour's drive from your kitchen. You can cook your main courses, pan them up, and load them into pre-heated carriers. That food will stay well above the crucial 140°F safety threshold for hours, arriving at the venue hot, safe, and ready for staging.
Pro Tip: Always preheat your insulated carriers before loading them. Just place a pan of hot water inside for 20-30 minutes, then pull it out right before you load the food. This simple step makes a massive difference in heat retention.
On-Site Heating Solutions: Chafing Dishes and Fuel Sources
Once you're at the venue, the game changes to active heating for service. Chafing dishes are the classic, go-to solution for any buffet-style event. They use a water pan to create gentle steam heat, which keeps food from scorching or drying out.
But not all chafing dish fuels are created equal. The choice you make has a real impact on performance and whether it's even suitable for the venue.
- Gel Fuel: This is the traditional choice, usually ethanol or methanol-based. It burns with a hot, visible flame but can sometimes have an odor and doesn't last as long.
- Wick Fuel: A cleaner-burning option that uses a wick to draw up liquid fuel. It gives you a more consistent, controlled flame, burns longer than gel, and is generally safer for indoor use.
- Induction Burners: This is the high-tech, flame-free option. Induction chafers use magnetic fields to heat the pan directly, offering incredible temperature control and zero fire risk. They are a must-have for venues with strict fire codes or for high-end events where safety and aesthetics are top priorities.
For an outdoor barbecue, traditional wick chafers are perfect. But for a corporate luncheon in a historic building with a strict "no open flame" policy, an induction setup is your only choice. Knowing the difference is crucial. For a deeper look at your options, check out our comprehensive commercial food warmer guide.
This infographic gives you a quick visual for making food safety decisions on the fly.
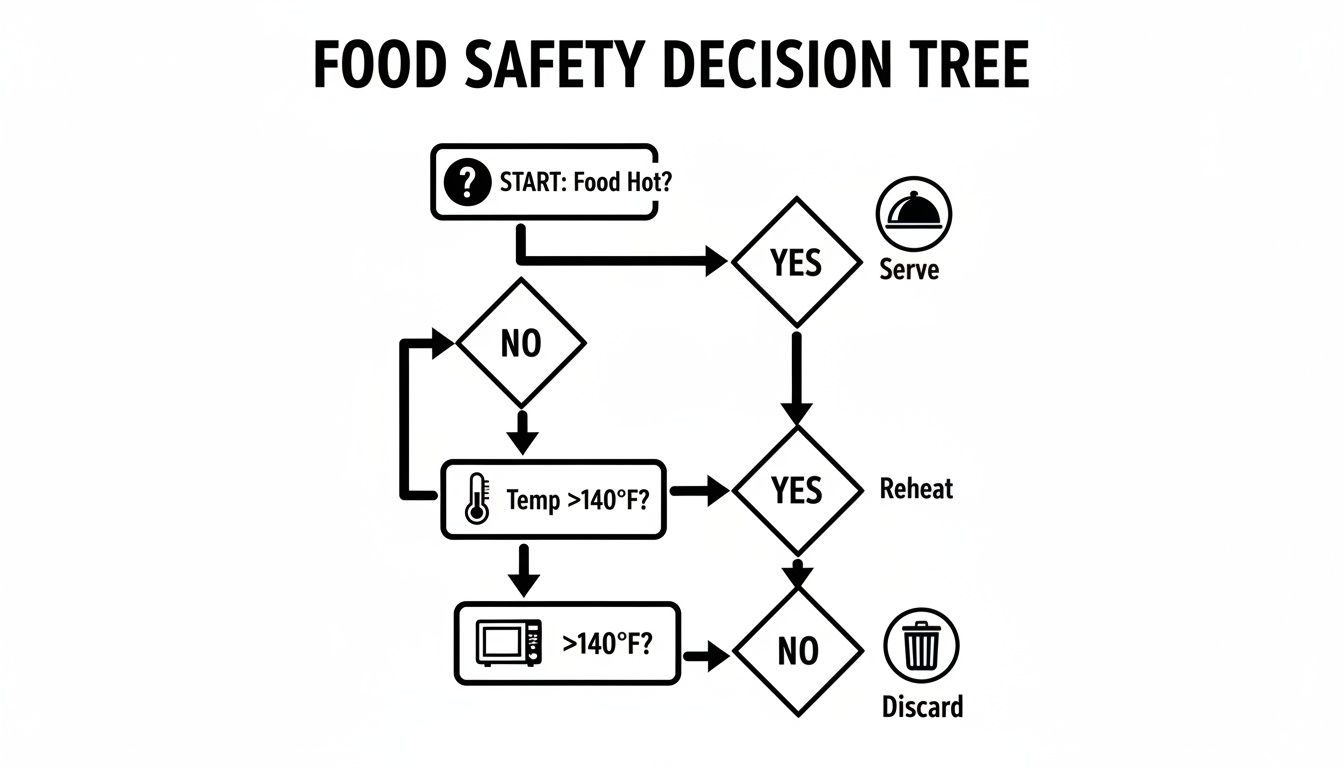
As you can see, the first step is always checking the temperature. If food has dropped below 140°F, you have a critical decision to make about reheating or discarding it to keep everyone safe.
Advanced Control: Portable Holding Cabinets
For large-scale events or menus that demand precise conditions, you need to bring in the heavy hitters: portable holding cabinets. These are essentially mobile ovens that give you control over both temperature and humidity.
Imagine you're catering a gala for 300 guests, and dinner service gets delayed by an hour for speeches. Without a holding cabinet, your food quality would nosedive. With one, you can hold pans of prime rib at a perfect 150°F with 75% humidity, ensuring it stays juicy and tender until the moment it's served. These units are indispensable for maintaining the integrity of delicate proteins, breads, and anything else that's prone to drying out. They give you the control to adapt to an event's unpredictable timeline without ever compromising on quality.
Mastering Hot Food Transport and Logistics
The trip from your kitchen to the event venue is often the most treacherous part of any catering job. This is where all your careful planning hits the road, and even a tiny oversight can seriously compromise the quality of your food. Mastering transport isn't just about moving boxes; it's a calculated process to make sure every dish arrives hot, safe, and looking fantastic.
Successfully moving catered food means you have to think like a logistics pro. Every single step, from the way you pack the van to how you label each container, adds up to a smooth, professional setup on-site. The whole point is to make the arrival and unloading process as quick and stress-free as possible.
The Art of Strategic Packing
Tossing food pans into an insulated carrier and calling it a day just won't cut it. To truly understand how to keep food warm for catering during transport, you have to be strategic about packing each hot box and loading your vehicle. The two guiding principles? Maximize thermal density and minimize movement.
A simple trick that makes a huge difference is to preheat your insulated food carriers. Just place a deep hotel pan filled with hot water inside each carrier for about 20-30 minutes before you load the food. This primes the interior, cutting down on that initial heat loss when your hot food goes in.
Once they're preheated, it's time to load. Think of it like a game of Tetris where your goal is to eliminate every bit of empty space.
- Pack Full Carriers: An insulated carrier packed to capacity will hold its temperature way more effectively than one that's half-empty. The combined thermal mass of all that food helps everything stay hot.
- Use Food-Safe Fillers: If you can't quite fill a carrier, use food-safe space fillers to close the gaps. Tightly rolled-up towels or even empty, sealed food pans work great to prevent air from circulating, which is a major cause of heat loss.
- Stack Strategically: Put the heaviest and sturdiest items on the bottom—think pans of braised short ribs or dense casseroles. Lighter, more delicate things like trays of roasted vegetables or dinner rolls should always go on top so they don't get crushed.
Securing Your Cargo for the Road
Your vehicle is the last piece of the transport puzzle. Even the best-packed carriers are useless if they're sliding around, tipping over, or getting banged up during the drive. Properly securing your cargo is a non-negotiable step for both safety and quality control.
Use ratchet straps or bungee cords to secure stacks of carriers to the van walls or even to each other. The goal is zero movement. A sudden stop or a sharp turn shouldn't cause a catastrophic shift in your cargo.
For caterers taking on long-distance jobs, investing in a power inverter can be a game-changer. It lets you run active warming equipment, like a portable holding cabinet, right from your vehicle's battery. This provides continuous heat on those journeys that last several hours.
The trip to the venue is an extension of your kitchen's holding line. Treat your vehicle with the same level of care and organization, ensuring every item is stable, secure, and maintaining temperature from the moment you leave until you arrive.
Beyond specialized gear, it's helpful to know the basics. You can find some valuable practical tips and essential gear for keeping food warm while traveling that are highly applicable to catering logistics.
Logistics That Save Time and Sanity
Your work at the venue begins the second you park. A well-thought-out plan for loading and unloading can save you critical minutes and prevent total chaos during setup. This is where labeling becomes your absolute best friend.
Every single carrier and container should be clearly labeled with its contents and where it's going at the venue (e.g., "BUFFET - Main," "KITCHEN PREP," "BAR"). This simple step empowers your team to move items to their correct spots immediately upon arrival, instead of opening every box to see what's inside.
Finally, plan your load-in order in reverse. The items you'll need first at the venue—like tables, linens, and chafing dish stands—should be the last things you put in the vehicle. This way, they're the first things you can grab, letting you start setting up the event infrastructure while other team members unload the food. Having a complete inventory is also vital; our comprehensive catering supplies checklist is an excellent resource to make sure nothing gets left behind.
Executing a Flawless On-Site Setup and Service
Getting the food from your kitchen to the venue is only half the battle. Seriously. The moment you arrive, the clock starts ticking, and how efficiently you handle the on-site setup will make or break the entire event. This is where all your planning and attention to detail really pay off, turning what could be a chaotic load-in into a smooth, professional service that leaves clients and their guests impressed.

Executing a flawless setup is all about creating a repeatable process. You need to know exactly what to do from the second you park the van to the moment the first guest picks up a plate. Mastering this routine is absolutely fundamental to understanding how to keep food warm for catering under the pressure of a live event.
Strategic Buffet and Station Placement
Your first decision on-site is a big one: where to set up your service stations. This choice affects everything—food temperature, guest flow, and even the event's overall vibe. Don't just grab the first empty space you see; scout the location with a caterer's eye.
One of the biggest mistakes I see new caterers make is setting up directly under an A/C vent or by a drafty doorway. That’s a recipe for disaster. A constant flow of cool air will suck the heat right out of your chafing dishes, forcing your fuel to work overtime and potentially dropping your food into the temperature danger zone.
Pro Tip: Before you unload a single piece of equipment, do a quick walkthrough of the service area. Feel for air currents from vents, windows, and doors. Pick a spot that’s sheltered from direct drafts to give your warming gear the best chance of success.
This one small step can save you a massive headache later. It’s also smart to consider how close you are to the kitchen or your prep area. Minimizing the distance your team has to lug hot, heavy pans of food is always a good idea.
The Art of Firing Up Your Equipment
There’s a right way and a wrong way to get your buffet line hot. Firing up everything at once means food sits out for too long, but waiting until the last minute will cause delays and cold entrees. The key is a staggered, methodical approach.
Start by getting your chafing dish frames and water pans in place. Always fill the water pans with hot water from the get-go—using cold water just forces your fuel to waste precious energy heating the water instead of the food. Once the hot water is in, you can light your fuel canisters.
Here’s a simple sequence that works every time:
- Set the Stage: Arrange all your chafing dish frames on the buffet line according to your layout.
- Add Hot Water: Fill the water pans with pre-heated water to about one-inch deep.
- Light the Fuel: Safely light your chafer fuel and place it securely under the pans. This gives the water time to get nice and steamy.
- Bring in the Food: Only place your hot food pans on the line about 15-20 minutes before service is scheduled to start. This keeps everything at peak quality without overcooking.
This methodical process ensures your entire buffet line is hot and ready precisely when you need it, not an hour too early.
Maintaining Temperature and Quality During Service
Your job isn't done once the food is out. Throughout the event, you need to actively monitor temperatures to keep everything safe and delicious. This is where a reliable digital probe thermometer becomes your best friend.
Discreetly spot-check the temperature of each dish every 30-45 minutes. You want to make sure nothing ever dips below that critical 140°F mark. If an item is losing heat, you can pop in a fresh fuel canister or adjust its position on the line.
Humidity is just as important as heat. That steam from the water pans is what keeps food from drying out. Check the water levels periodically and be ready to top them off with more hot water to prevent pans from going dry, which can scorch your food and ruin its texture.
Food warming trays and buffet servers are mainstays for a reason. In fact, the global market for these trays was recently valued at around USD 554.8 million and is projected to grow to over USD 939.3 million in the next decade, driven by the rise in events that need these exact solutions. Of course, flawless service also means partnering with quality providers; learning from the best Indian catering services in Melbourne can offer great insights into what sets a top-tier caterer apart.
Troubleshooting Common On-Site Heating Issues
No matter how perfectly you plan, every seasoned caterer knows that things can go sideways at an event. It’s almost a rite of passage. A sudden gust of wind snuffs out your chafing dish flames, a venue’s power outlet is dead on arrival, or a dish just isn’t holding temperature. Knowing how to handle these on-site heating hiccups with confidence is what separates the pros from the amateurs.
This isn’t about panic; it’s about having a game plan. Your ability to troubleshoot on the fly is a critical skill, especially when you’re under the pressure of a live event. The key is to stay calm, figure out the problem quickly, and implement a solution that keeps the food safe and the service flowing.
Dealing with Chafing Dish Failures
Chafing dishes are the workhorses of any buffet line, but they aren’t foolproof. The most common headache you'll run into is a flame going out, especially if you’re working an outdoor event.
When you notice a chafer has gone cold, don't just relight it and walk away. First, check the basics: Is there enough fuel left in the can? Is the wick properly exposed? Sometimes a cheap fuel canister will just burn out way faster than you expected.
- Windy Conditions: If wind is the culprit, you need to create a barrier. Often, you can just reposition the buffet line against a wall or use some decorative elements to shield the flames. If you do a lot of outdoor gigs, investing in proper wind guards for your chafers is a no-brainer.
- Insufficient Water: Take a look at the water pan. If it runs dry, the food pan will get way too hot, potentially scorching the food, and the lack of steam means no heat is being transferred. I always keep a pitcher of hot water nearby for quick, easy refills.
- Dead Fuel: If a canister is empty, swap it out immediately. This is exactly why your emergency kit is non-negotiable; having extra fuel and lighters on hand can save the entire service.
Always, always, always carry a 'catering emergency kit' to every single event. Mine includes extra chafer fuel, a couple of long-reach lighters, a reliable digital thermometer, duct tape, and extra extension cords. Being prepared for the most common failures turns a potential crisis into a minor speed bump.
Responding to Power and Equipment Malfunctions
When you're relying on electric warmers, holding cabinets, or induction burners, power issues can bring your operation to a screeching halt. The very first thing I do when I arrive at any venue is locate and test the power outlets I plan to use. Don't just look at them—plug something in.
If an outlet is dead or a circuit breaker keeps tripping, you have to adapt fast. See if there's another accessible circuit you can use. If not, it's time for plan B. This might mean consolidating dishes into your working electric warmers or leaning more heavily on your chafing dishes.
The whole food service industry depends on this kind of hot-holding technology. One market analysis valued the global food warmer machines market at about USD 2.5 billion in a recent year, with projections to reach roughly USD 4.1 billion over the next decade. You can discover more insights about the food warmer market on Dataintelo.com.
Even with the best gear, problems pop up. Here’s a quick-hitter guide for tackling the most common heat-related issues you'll face on-site.
| Quick Fixes for Common Heat-Related Issues |
| :--- | :--- | :--- |
| Problem | Likely Cause | Immediate Solution |
| Food in chafer is lukewarm, not hot. | Water pan is dry or fuel flame is too low/out. | Immediately refill the water pan with hot water. Check and relight/replace the fuel canister. |
| Electric warmer won't turn on. | Faulty outlet, tripped circuit breaker, or bad cord. | Test the outlet with another device. Check the venue's breaker box. If possible, swap to a different outlet or use a backup extension cord. |
| Food is scorching on the bottom. | Lack of water in the steam pan or heat is set too high. | Add hot water to the pan immediately to create a buffer. If electric, turn down the temperature setting. |
| Buffet line is losing heat (outdoor event). | Wind is extinguishing flames or cooling food surfaces. | Create a physical barrier using tables, walls, or decorative panels. Use wind guards if you have them. |
| Food temperature dropped below 140°F. | Holding equipment failure or prolonged exposure. | Do not just "warm it up." Remove the item and rapidly reheat it to 165°F using an oven or microwave before returning it to service. |
Think of this table as your on-the-fly cheat sheet. Diagnosing the issue is half the battle; having a ready-made solution lets you act decisively and keep the event running smoothly.
Safely Reheating Food That Has Cooled
So what happens if, despite your best efforts, a food item’s temperature drops below the non-negotiable 140°F threshold? Your first and only priority is food safety. You can't just nudge the temperature back up. The food absolutely must be rapidly reheated to 165°F for at least 15 seconds to kill any potential bacteria before it can be put back on the hot-holding line.
This is only possible if you have access to a real heat source at the venue, like an oven or a powerful microwave. Trying to reheat a whole pan of food with a chafing dish is dangerously slow and will keep the food in the temperature danger zone for far too long.
If you don't have a way to properly reheat the item, the safest—and only—professional choice is to discard it. It’s a tough call to make, but your clients’ health and your hard-earned reputation are worth infinitely more than one pan of food.
Common Questions About Catering Food Temperatures
Even after years in the catering game, you still run into tricky situations with food temps. We get questions all the time from seasoned pros trying to dial in their process, because getting this right is what separates a good event from a great one.
Let's break down some of the most common questions we hear, pulling from real-world experience and the food safety rules we all live by.
How Long Can Food Realistically Be Held Hot?
This is the million-dollar question, isn't it? In a standard chafing dish, you can safely hold most foods above 140°F for about two hours before the quality—the texture, the moisture, the flavor—really starts to take a nosedive.
Sure, it might remain food-safe for up to four hours, but your guests will notice the difference. For any event with a longer service time, you absolutely need to step up your game with equipment that has better humidity and temperature control, like a proper electric holding cabinet. This is the core of learning how to keep food warm for catering without your beautiful food turning into a sad, dry memory.
Which Foods Hold Heat Best and Which Are a Nightmare?
Some menu items are just built for catering, while others will give you a serious headache. Knowing the difference ahead of time can save you a world of trouble.
- Best Performers: Braised meats, thick stews, chilis, lasagna, and dense casseroles are your champions. Their high moisture content and thermal mass help them hold on to heat beautifully.
- Problem Children: Delicate items are a caterer's nightmare. Think steamed fish, anything fried, and pastas with light sauces. They lose their texture and heat so fast, turning soggy or dry in a standard chafer. These dishes demand perfect timing and are best served immediately.
The single biggest mistake I see caterers make is not matching the menu to the logistics of the event. A gorgeous, delicate dish that can't be held properly is a recipe for a disappointed client. Always, always plan your menu with holding time as a key ingredient.
Can I Use Slow Cookers for a Small Gig?
Look, I get the temptation. But using non-commercial gear like a slow cooker or Crock-Pot for a professional catering job is just asking for trouble. While they can keep food warm, that’s not what they’re designed for—their main job is slow cooking.
Most consumer-grade slow cookers don't have the precise thermostats needed to guarantee your food stays safely above that critical 140°F mark. They often heat unevenly, creating hot and cold spots that are a food safety risk. For your professional liability and the well-being of your guests, always stick to commercial-grade warming equipment. It's just not worth the risk.
For all your professional warming solutions, from chafing dishes to insulated carriers, The Restaurant Warehouse provides the reliable, commercial-grade equipment you need to execute every event flawlessly. Find the right gear to protect your food quality and your reputation at https://therestaurantwarehouse.com.
About The Author

Sean Kearney
Sean Kearney is the Founder of The Restaurant Warehouse, with 15 years of experience in the restaurant equipment industry and more than 30 years in ecommerce, beginning with Amazon.com. As an equipment distributor and supplier, Sean helps restaurant owners make confident purchasing decisions through clear pricing, practical guidance, and a more transparent online buying experience.
Connect with Sean on LinkedIn, Instagram, YouTube, or Facebook.
Leave a comment