

How to Clean Your Ice Maker: how to clean your ice maker in 5 steps
Let's be honest, the process is pretty straightforward: you turn the machine off, get all the ice out, hit it with a cleaning or descaling solution, and then follow up with a sanitizing solution. It’s absolutely critical to clean first to get rid of the gunk, and then sanitize to kill off any lingering bacteria and mold. This two-step dance is what ensures your ice is safe, clear, and tastes like, well, nothing.
Why a Clean Ice Maker Is a Critical Kitchen Asset

It’s easy to tune out the ice maker, that reliable workhorse humming away in the corner. But this machine is far more than just another piece of kitchen equipment, and ignoring its maintenance can snowball into some serious operational headaches. Learning how to clean your ice maker properly isn't just about good housekeeping—it’s a core business practice that directly impacts your bottom line, customer safety, and brand reputation.
The financial hit from neglect can be steep. In the fast-paced world of restaurants and bars, a broken commercial ice maker turns a simple oversight into a costly nightmare. Back in 2021, average repair bills were already hitting $708.44, with some fixes skyrocketing to $2,000 or more. Over the lifespan of a commercial unit, repairs and upkeep can eat up a staggering 80% of the total ownership costs.
The Hidden Risks of an Unclean Machine
Beyond the immediate repair bills, a dirty ice maker poses serious health and safety threats. The FDA actually classifies ice as a food product, holding it to the same strict hygiene standards as anything else on your menu. This isn't just some technicality; it has real-world consequences.
A neglected ice machine is the perfect breeding ground for mold, slime, and harmful bacteria. The cool, dark, and moist interior creates an ideal environment for contaminants to flourish, turning a vital kitchen asset into a potential liability.
These contaminants can lead to some pretty severe outcomes for any foodservice business:
- Health Code Violations: A grimy ice machine is one of the first things a health inspector will spot. Violations can lead to poor scores, mandatory closures, and a black eye on your reputation.
- Customer Illness: Serving contaminated ice can cause foodborne illness outbreaks, which can be absolutely devastating for any establishment.
- Substantial Fines: The FDA has the authority to levy fines up to $500,000 for serious food safety violations.
Shifting from Chore to Strategy
When you understand the potential health impacts—it's worth exploring the truth about mold contamination and health risks—cleaning stops feeling like a tedious chore and becomes a strategic, profit-protecting activity.
Regular cleaning prevents the buildup of limescale and slime, which forces the machine to work harder, suck up more energy, and ultimately fail sooner. A clean machine runs more efficiently, produces clearer and better-tasting ice, and keeps you compliant with health regulations. If you're looking for a deeper dive into different models, you might find our guide on choosing a https://therestaurantwarehouse.com/blogs/restaurant-equipment/commercial-ice-machine helpful. This guide will walk you through everything you need to know.
Assembling Your Essential Cleaning Toolkit
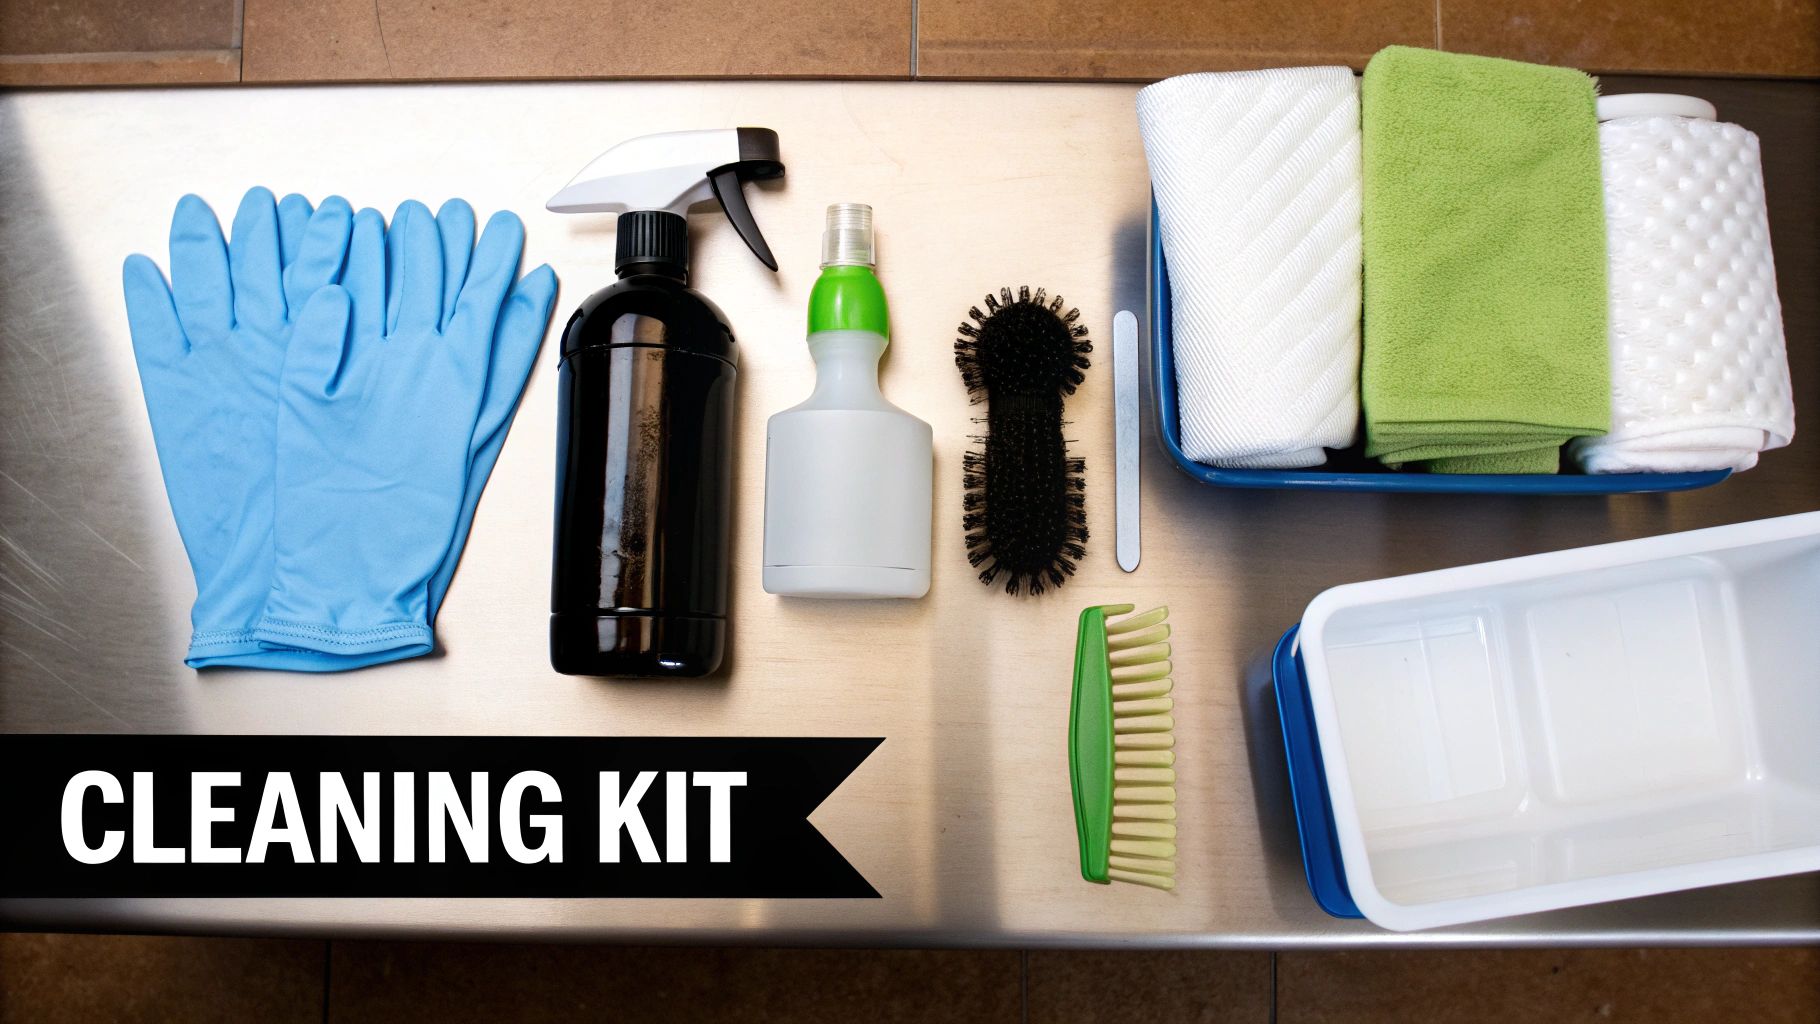
Before you even think about powering down your ice machine, the single most important step is getting your gear in order. Trust me on this one. Having everything you need laid out and ready to go turns a frustrating scramble into a smooth, professional job.
This is all about efficiency and safety. Once that machine is off, the clock is ticking. You want to move seamlessly from one step to the next without having to stop and hunt for a brush or the right cleaning solution. Think of it like a chef’s mise en place—everything in its place before the cooking starts.
Essential Gear for the Job
Your basic toolkit is pretty straightforward, and you probably have most of these items on hand already. These are the workhorses that will do the heavy lifting.
- Personal Protective Equipment (PPE): This is non-negotiable. At the very least, you need a pair of chemical-resistant gloves and proper safety glasses. The solutions you'll be using can irritate your skin and cause serious eye damage if they splash.
- Brushes and Cloths: Get a small set of soft-bristle nylon brushes in a few different sizes. They’re perfect for getting into all the nooks and crannies without scratching any surfaces. You’ll also need a handful of clean, lint-free microfiber cloths for wiping and drying.
- Buckets and Spray Bottles: It’s a good practice to have two dedicated buckets—one for your cleaning solution and another for clean rinse water. A clearly labeled spray bottle is also a must-have for applying sanitizer evenly across all the machine's components.
Understanding Your Cleaning Agents
Now we get to the real science of cleaning an ice maker. You absolutely need two different types of solutions for this job, and they are not interchangeable. Using the wrong product can damage your machine or, even worse, fail to kill off the harmful pathogens you're trying to eliminate.
A proper cleaning requires a one-two punch: first you descale to remove the mineral buildup, then you sanitize to kill the germs.
| Essential Cleaning Agents: Descaler vs. Sanitizer |
| :--- | :--- | :--- |
| Characteristic | Ice Machine Descaler (Cleaner) | Food-Grade Sanitizer |
| Primary Purpose | To break down and remove mineral buildup. | To kill bacteria, mold, slime, and other microorganisms. |
| What It Fights | Limescale, calcium, and other mineral deposits from the water supply. | Pathogens that can cause illness and violate health codes. |
| When to Use It | The very first step, after emptying the machine of ice and water. | The final step, after the descaler has been completely rinsed away. |
| Key Ingredient Type | Typically an acidic solution (like phosphoric or citric acid). | Usually a quaternary ammonium compound or similar EPA-approved agent. |
| Is it a Sanitizer? | No. It cleans physical grime but does not disinfect. | Yes. Its sole purpose is to eliminate microbial threats. |
It's critical to understand that these two products do completely different jobs. A descaler clears the way, and the sanitizer finishes the fight, ensuring the ice you serve is both clean and safe.
The Complete Deep Cleaning Process
Alright, let's get to the heart of it—the full deep clean that’s going to get your ice maker back to its absolute best. This is more than just a quick wipe-down. It’s a methodical process that tackles both the mineral scale you can see and the microbial gunk you can't.
To do this right, we need to think of it as two separate, but equally critical, phases: descaling first, then sanitizing.
I always tell people it’s like prepping a wall before you paint. You wouldn't just slap a new coat over dirt and scuffs; you have to clean and prime the surface first. It's the same idea here. Sanitizer can't do its job if germs are hiding under a layer of mineral scale. Descaling clears the gunk away, and sanitizing deals the final blow to any bacteria or mold left behind.
Phase One: Descaling and Mineral Removal
The first part of the job is all about breaking down the limescale and calcium deposits that build up over time from your water supply. This isn't just about looks; that scale produces cloudy, poor-quality ice and actually insulates important parts of the machine, making it work harder and use more energy.
Before you touch anything, make the machine safe to work on. Power down the unit entirely and unplug it from the wall. Go ahead and shut off the main water supply line, too. The last thing you want is the machine kicking on or water flowing while you've got your hands in there.
Next, you've got to empty it out completely. Scoop all the ice out of the storage bin and toss it. Even if it looks okay, you can't be sure it isn't contaminated. Once the bin is empty, get rid of any water left in the sump or reservoir.
Now for the descaling solution. Follow the instructions on your nickel-safe cleaner to get the right water-to-cleaner ratio. Pour the mix directly into the water trough or reservoir. Power the machine back on and start a "clean" or "wash" cycle. This will send the acidic solution through the entire water system, dissolving all those mineral deposits on the evaporator plate, water lines, and distribution tubes. This cycle usually takes somewhere between 20 to 45 minutes.
While that's running, you can work on the removable parts.
- Water Curtain: This plastic shield is a magnet for scale buildup.
- Distribution Tube: The little holes on this part get clogged easily, messing up your ice formation.
- Probes and Sensors: Water level and ice thickness sensors need to be clean to work correctly.
Gently remove these components and let them soak in a separate bucket with the same descaling solution. A soft-bristle brush is your best friend here for scrubbing away stubborn scale. Whatever you do, don't use a wire brush or scouring pad—you’ll scratch and permanently damage the surfaces.
Once the cleaning cycle is done, power the machine down again and drain all the descaling solution. This next part is probably the most important step of this phase: rinsing. You have to get every trace of that acidic descaler out of there. One quick rinse won't cut it. Run at least two full rinse cycles with fresh, clean water to completely flush the system. For a deeper dive into picking the right products, check out our review of the best ice machine cleaning solutions.
Phase Two: Sanitizing for Food Safety
With the scale gone, the machine is clean, but it's not food-safe yet. The second phase is all about sanitizing—killing off the invisible threats like bacteria, slime, and mold. This is the step that keeps you in line with health codes and ensures you're serving a safe product.
Critical Safety Note: Never, ever mix descaling solution with sanitizing solution. The reaction between the acid and the sanitizer (which is usually chlorine-based) can create toxic chlorine gas. It's incredibly dangerous. Always make sure the machine is completely rinsed of descaler before you even think about starting this phase.
Start by mixing your EPA-approved, food-grade sanitizer. Just like with the descaler, follow the label for the exact dilution. The wrong mix can either be totally ineffective or leave behind unsafe chemical residue.
Once your solution is ready, pour it into the water trough and kick off another "clean" or "wash" cycle. This sends the sanitizer through all the same water paths, hitting every food-contact surface.
While that cycle runs, take the removable parts you descaled and rinsed earlier and submerge them in a bucket of the sanitizing solution, making sure they're fully covered. A sanitizer's effectiveness all comes down to contact time, sometimes called dwell time. This is the minimum time the solution has to sit on a surface to kill everything. It's usually between 1 and 5 minutes, but always, always check the label for the exact time.
For the inside of the machine and the ice bin, a spray bottle is perfect. Fill a labeled spray bottle with your sanitizer and give every interior surface a good coating—the bin, the door, the gasket, and the ice scoop. Let the solution sit for its required contact time. Don't wipe it off.
After the machine's sanitizing cycle finishes and everything has met its contact time, you're on the home stretch. Most food-grade sanitizers are "no-rinse," which means you just let them air dry. Rinsing can actually re-introduce contaminants. Once all the surfaces and parts are dry, you can put the machine back together.
Finally, plug the ice maker in, turn the water back on, and switch it on to start making ice. As one last safety check, it's always best practice to throw out the very first batch of ice. This guarantees any last traces of cleaning solution are completely flushed out before you start serving.
Keeping Your Ice Maker Humming Between Deep Cleans
A full deep clean is like hitting the reset button on your ice maker. But the real secret to keeping that machine running smoothly for years? It's all about the small, consistent things you do in between.
It’s a common trap to think a deep clean every six months is enough. The truth is, peak performance comes from a steady rhythm of maintenance—simple daily, weekly, and monthly habits that stop major headaches before they even start.
This isn’t about adding another huge chore to your list. It’s about shifting from reactive, emergency cleanings to a proactive, manageable routine. This is what separates a machine that just gets by from one that truly performs, cranking out crystal-clear, high-quality ice day after day.
Your Daily and Weekly Maintenance Rhythm
Consistency is your best friend here. Working a few quick checks into your kitchen’s opening or closing procedures will make a world of difference. These aren’t big jobs. We’re talking about quick inspections that take minutes but can save you from a massive repair bill down the line.
Daily Habits (Takes less than 2 minutes):
- Wipe Down the Exterior: Grab a clean, damp cloth and give the machine's door, handle, and nearby surfaces a quick wipe. This simple step prevents sticky kitchen grease and dust from building up and eventually getting sucked into the unit.
- Inspect the Ice Bin: Take a quick look at the ice in the bin. You're watching for any cloudiness, weird colors, or funky smells. Make sure the ice scoop is clean and hanging in its proper holder—never leave it buried in the ice.
Weekly Tasks (Just 5-10 minutes):
- Check and Clean the Air Filter: Think of the air filter as your machine's lungs. When it gets clogged, it’s like trying to breathe through a straw. The condenser chokes, forcing the whole system to work way harder. Just slide the filter out, give it a good rinse with warm water, let it air dry completely, and pop it back in. This one task can dramatically boost your machine's efficiency.
Monthly Check-Ins for Long-Term Health
Once a month, you’ll want to set aside a little more time for a couple of crucial components. These tasks have a direct impact on both your ice quality and the mechanical health of the machine. Skip them, and you’re basically asking for lower ice production and unnecessary wear and tear.
When you do tackle a bigger cleaning, it helps to remember the fundamental workflow.
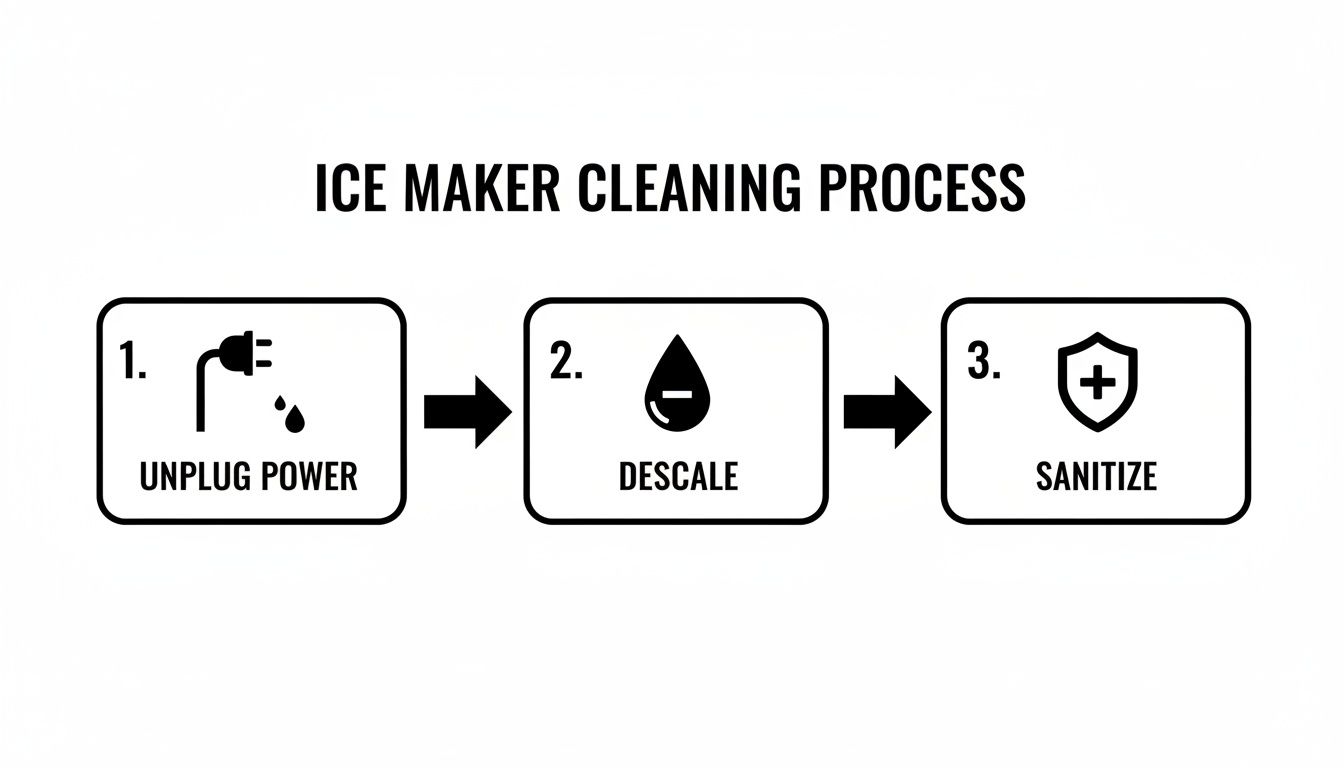
This visual is a great reminder of the essential order of operations: always start by safely unplugging the unit, then tackle the mineral scale before finishing with a food-safe sanitizer.
Your ice machine is an investment, not just another appliance. Consistent maintenance is the single best way to protect it, ensuring you get a safe, high-quality product while keeping your operational costs down.
One of your most important monthly tasks is to inspect the water filter. A clogged filter creates a double-whammy of problems. First, it kills your ice quality, leading to cloudy, off-tasting cubes because it can't remove impurities anymore. Second, it puts a ton of strain on the machine's guts. The water pump has to fight to pull water through the blockage, which leads to premature wear. Most modern systems have an indicator light, but nothing beats a quick manual check.
This commitment to regular upkeep really pays off. A 2023 analysis found that poorly maintained commercial ice machines are serious energy hogs, as scale and gunk force them to run overtime. After a proper cleaning, machines run cooler and quieter, leading to energy savings of 10-25%.
Even better, a consistent maintenance schedule can double or even triple an ice maker's lifespan. You can learn more about the financial impact of commercial ice machine maintenance on Wasserstrom.com. Sticking with it not only shaves money off your utility bills but turns a big purchase into a durable, decade-long asset.
Creating a Custom Cleaning Schedule for Your Kitchen
So, how often should you really be deep cleaning your ice maker? If you're looking for a single, one-size-fits-all answer, you won't find one. The truth is, the perfect cleaning frequency depends entirely on the unique conditions of your kitchen.
Thinking about how to clean your ice maker needs to be a proactive plan, not just a reaction when you spot slime. Things like your local water quality, what’s floating around in your kitchen air, and how hard the machine works every day play a massive role in how fast scale and biofilm build up.
Key Factors That Influence Cleaning Frequency
I've seen high-volume bars in cities with notoriously hard water that need a full descaling and sanitizing cycle every three months just to keep up. On the flip side, a small coffee shop with a top-notch water filtration system might only need that same deep clean every six to eight months.
To figure out your own custom schedule, you need to get honest about these three areas:
- Water Hardness: This is the big one. Hard water is packed with minerals like calcium and magnesium, which are the building blocks of limescale. The harder your water, the faster that chalky scale will form on the evaporator plate, leading to cloudy ice and putting a serious strain on your machine.
- Kitchen Air Quality: Is your ice maker sitting near a fryer, griddle, or oven? If so, it’s constantly sucking in airborne grease and flour dust. This stuff creates a sticky film inside the unit that traps contaminants and becomes a food source for mold and bacteria, putting slime growth into overdrive.
- Daily Ice Production: A machine that’s cranking out ice 24/7 is processing a huge amount of water and air. This constant use naturally leads to a quicker buildup of both mineral scale and airborne gunk compared to a machine that gets a break.
When you’re thinking about a comprehensive cleaning plan, remember it goes beyond just one appliance. A truly sanitary environment means looking at all food storage and prep areas. For example, tackling issues like preventing pantry pests is part of a bigger, smarter hygiene strategy.
Scenario-Based Cleaning Recommendations
So, how does this all translate into a real-world schedule? Official guidelines often say to clean at least twice a year, but for a busy commercial kitchen, that’s just a starting point. If you’re a restaurant in an area with hard water, you should probably bump that up to every three to four months. If your machine is near the cookline, you might even need to do a deep clean every single month.
Your cleaning schedule isn't set in stone. It's a living document that should adapt to your operational reality. If you notice cloudy ice or the slightest hint of slime, it's time to clean, regardless of what the calendar says.
Use this table as a starting point. Find the scenario that best matches your kitchen, and then adjust as you see how your machine performs over time.
Recommended Cleaning Frequency Based on Environment
| Operational Environment | Recommended Deep Cleaning Frequency | Key Factors |
|---|---|---|
| Low Volume & Filtered Water (e.g., small office, cafe with soft water) | Every 6-9 Months | Low mineral load; minimal airborne contaminants. |
| High Volume & Moderate Water (e.g., typical restaurant or bar) | Every 3-4 Months | Consistent daily use; standard water hardness. |
| High Volume & Hard Water (e.g., busy bar in a hard-water region) | Every 2-3 Months | High mineral content leads to rapid scale buildup. |
| Kitchen with Fryers/Ovens (any kitchen with airborne grease/yeast) | Every 1-2 Months | Airborne particles accelerate slime and mold growth. |
This table provides a solid baseline, but always let the machine tell you what it needs. A quick inspection once a week can help you spot trouble early and adjust your schedule before it becomes a bigger problem.
Troubleshooting Common Ice Maker Problems
Even with a perfectly consistent cleaning schedule, your ice machine can still throw you a curveball. Commercial kitchens are tough environments, and sometimes issues pop up that require a bit of detective work. Before you pick up the phone to call a technician, it’s worth running through a few common problems to see if there's a simple fix.
Think of this as your first line of defense. It's a quick guide to help you diagnose the most frequent issues operators face, helping you figure out what you can handle in-house versus when it's really time to call in a professional.
Why Is My Ice Cloudy or Soft?
There's nothing more disappointing than scooping a glass full of cloudy, soft, or "wet" ice. This is almost always a sign of a problem with water flow or temperature, and it’s a clear signal that something in the system isn't working quite right.
The most common culprit here is a dirty or clogged water filter. When that filter is packed with sediment, it restricts the amount of water getting to the evaporator plate. Without enough water, the machine can't form solid, complete cubes, and you end up with slushy, poor-quality ice.
Another major cause is scale buildup directly on the evaporator plate itself. These mineral deposits create an insulating layer that completely disrupts the freezing process, preventing the water from freezing into those clear, hard cubes you need.
- Your first move: Start by checking and replacing your water filter. This is often the quickest fix.
- Your next step: If a new filter doesn't solve the problem, a full descaling cycle is necessary to strip that mineral buildup from the evaporator.
If you’ve done both and the ice quality is still poor, the problem might be more serious, possibly related to the machine's refrigeration system. In that case, it’s best to call a qualified technician.
What Causes Pink or Brown Slime in My Ice Machine?
Discovering a pink or brown biofilm inside your ice machine is alarming, and for good reason. That slime is a living colony of airborne bacteria and mold that absolutely thrives in the cool, damp environment of an ice maker. It’s a serious health hazard and an undeniable sign that the machine is overdue for a deep clean.
These microorganisms are often introduced right from the air. Yeast from nearby bread-making, dust from vents, or airborne grease from the cookline can all settle inside the machine and start to multiply. Because ice bins rarely have a chance to fully empty and dry out, this slime can quickly contaminate every new batch of ice.
The only effective way to eliminate this biofilm is with a complete cleaning and sanitizing cycle. You must use an EPA-approved, food-grade sanitizer to ensure all microorganisms are killed. Simply wiping it down is not enough.
To keep the slime from coming back, you’ll need to increase the frequency of your cleaning schedule. It's also a good idea to take a look at the machine's placement—making sure it has good air circulation around it can help reduce the buildup of airborne contaminants.
Why Is My Ice Machine Making Less Ice Than Usual?
A sudden drop in ice production is a classic symptom of a maintenance issue. When your machine can't keep up with demand, it’s a sure sign that one of its core systems is struggling. Fortunately, the causes are often straightforward and can be resolved with a thorough cleaning.
There are a few key areas to investigate right away:
- Clogged Airflow: Check the air filter and the condenser coils. If they are caked with dust, grease, or flour, the machine can't dissipate heat properly. This slows down the entire refrigeration cycle, which in turn drastically reduces ice production. A good vacuuming of the condenser fins and washing the filter often solves this.
- Restricted Water Supply: A clogged water filter is a common cause, but scale can also build up in the water inlet valve, choking off the flow of water to the machine.
- Heavy Scale on the Evaporator: Just like it causes cloudy ice, scale also insulates the evaporator plate. This makes it much harder for ice to form and release properly during the harvest cycle, slowing down the whole process.
If your production is down, following the complete deep cleaning process is your best course of action. Pay special attention to clearing the air filters and condenser, and perform a full descaling cycle. To learn more about diagnosing other issues, our guide to common ice machine troubleshooting can provide additional insights. Restoring proper airflow and water flow will almost always bring your production capacity back to where it should be.
At The Restaurant Warehouse, we provide the high-quality, reliable equipment you need to keep your kitchen running smoothly. From top-tier ice machines to essential cooking and refrigeration units, we have everything you need to succeed. Explore our extensive catalog and find the perfect equipment for your business today at https://therestaurantwarehouse.com.
About The Author

Sean Kearney
Sean Kearney is the Founder of The Restaurant Warehouse, with 15 years of experience in the restaurant equipment industry and more than 30 years in ecommerce, beginning with Amazon.com. As an equipment distributor and supplier, Sean helps restaurant owners make confident purchasing decisions through clear pricing, practical guidance, and a more transparent online buying experience.
Connect with Sean on LinkedIn, Instagram, YouTube, or Facebook.
Leave a comment