

A Practical Guide to Commercial Kitchen Design Layout
A great commercial kitchen design layout is the absolute heart of any food business. It’s not just a floor plan; it’s the strategic core that directly impacts everything from how fast a plate gets to a customer to how happy your staff is at the end of a long shift.
Why Smart Kitchen Design Is Your Biggest Business Advantage
Let's be real—your kitchen layout is the engine driving your entire operation. A clunky, poorly designed space is a recipe for disaster. It creates bottlenecks, jacks up ticket times, compromises safety, and is a fast track to staff burnout.
On the flip side, a thoughtfully optimized layout is one of your most valuable assets, setting the pace for your restaurant, food truck, or catering business. This isn't just about where you stick the fryer. It’s about creating a seamless flow where raw ingredients move logically from the delivery door to storage, prep, the cooking line, and finally to the customer, all without wasted steps or risking cross-contamination.
This deliberate approach is a massive productivity booster, and it hits your bottom line in all the right ways.
The Financial Impact of an Optimized Layout
Investing in professional design isn't a splurge—it's a critical business decision with a clear payback. And the industry knows it. The global market for professional kitchen design services was valued at a hefty $20.5 billion in 2023 and is expected to climb to nearly $33 billion by 2032. That tells you just how seriously smart operators are taking layout optimization. You can discover more insights about the growing commercial kitchen design market if you're curious.
A well-designed kitchen cuts down on unnecessary labor costs simply by minimizing how much your staff has to move around. When your team isn't wasting energy navigating a chaotic space, they can focus on what they do best: making incredible food, fast.
Thinking about your kitchen as a strategic investment starts with grasping its foundational elements. We've put together a quick table to break down the core pillars of an effective design and how they directly impact your business.
Core Elements of an Efficient Kitchen Layout
| Design Element | Primary Goal | Impact on Business |
|---|---|---|
| Workflow Efficiency | Create a logical, one-way path for food from receiving to service. | Reduces ticket times, minimizes staff collisions, and boosts overall productivity. |
| Strategic Zoning | Dedicate specific areas to distinct tasks (prep, cooking, cleaning). | Prevents cross-contamination, improves organization, and increases food safety. |
| Safety and Compliance | Adhere to all health, fire, and accessibility (ADA) codes. | Protects staff and customers, avoids costly fines, and ensures legal operation. |
Understanding these pillars is the first step toward creating a kitchen that not only functions but excels. Let's dig a little deeper into what each one means for your daily operations.
The Three Pillars of Effective Design
Every great commercial kitchen layout is built on three fundamental concepts. Getting these right is non-negotiable.
-
Workflow Efficiency: This is all about the logical journey food takes through your kitchen. It starts when a delivery arrives and ends when a finished dish goes out to a customer. Each station should be placed to smoothly hand off to the next. A solid workflow prevents kitchen traffic jams and shaves precious seconds off every order.
-
Strategic Zoning: A properly zoned kitchen has clearly defined areas for specific tasks: receiving, storage, food prep, cooking, and warewashing. This separation is crucial. It's your number one defense against cross-contamination (think raw chicken near prepped salads—a huge no-go) and keeps the entire space organized and running efficiently.
-
Safety and Compliance: Your layout has to meet all local health codes, fire safety regulations, and accessibility standards like the ADA. Things like proper spacing between hot equipment, powerful ventilation, and easily accessible hand-washing stations aren't just good ideas—they're legal requirements that protect your team, your customers, and your business from serious trouble.
Mapping the Journey From Delivery to Dish
A great commercial kitchen layout isn’t about cramming equipment into a room; it’s about choreographing a dance. The real secret to a smooth, efficient workflow is to think about the journey an ingredient takes, from the moment it hits your back door to when it lands on a customer’s plate. When you map this path logically, you eliminate wasted steps, prevent dangerous cross-contamination, and shave precious minutes off every single order.
This flowchart breaks down the big picture, showing how you move from a high-level workflow concept to a compliant, fully-planned kitchen.
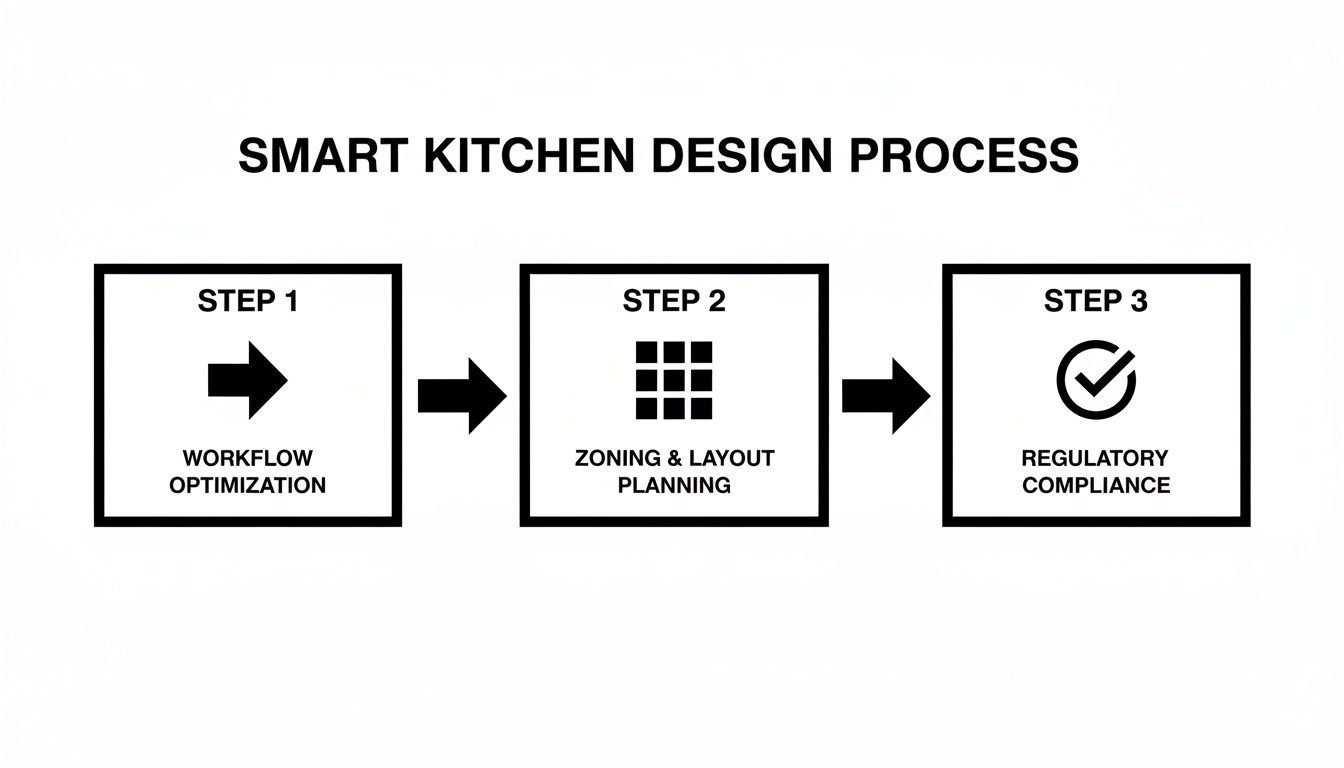
As you can see, workflow, zoning, and compliance aren’t separate tasks. They're all connected, with each step building on the last to create a kitchen that just works. Let's walk through each station in that journey.
Receiving and Storage: The First Touchpoint
Your receiving area is the front gate of your kitchen. It absolutely has to be right next to a back entrance to make life easier for delivery drivers and your team. This zone needs enough clear floor space to inspect incoming goods properly and a sturdy scale to verify weights.
From there, ingredients are immediately whisked away to the right storage spot:
- Dry Storage: Shelving for non-perishables like flour, sugar, and canned goods should be just a few steps away. I always recommend open wire shelving—it promotes air circulation and makes taking inventory a breeze.
- Cold Storage: Your walk-in cooler and reach-in fridges need to be easily accessible from both the receiving area and your main prep line.
- Frozen Storage: Freezers, whether they’re big walk-ins or smaller chest-style units, follow the same rule. Smart placement means temperature-sensitive items aren't left sitting out for a second longer than necessary.
A rookie mistake I see all the time is placing storage too far from the prep line. Every extra ten steps a cook takes to grab an onion adds up to wasted hours over a week. Your goal is to slash that travel time.
Getting this flow right is also a huge safety issue. The U.S. Bureau of Labor Statistics reported 93,800 nonfatal injuries in full-service kitchens back in 2019, many from slips, trips, and collisions. Clear, logical paths between zones are critical. In fact, a well-designed layout can boost productivity by up to 50%, completely changing your kitchen's performance while protecting your team.
Food Prep: The Transformation Zone
This is where the magic starts to happen, as raw ingredients get transformed. The food prep station needs to be the bridge between your storage areas and the cooking line. Think of it this way: your prep tables, cutting boards, and sinks should be positioned for easy access to both the refrigerators and the cooktops.
I also strongly suggest creating dedicated sub-zones within your prep area. For example, having a separate station for handling raw meat, far away from where you're chopping vegetables, is a food safety 101 move that dramatically cuts down the risk of cross-contamination.
The Cooking Line: Where the Action Happens
Welcome to the heart of your kitchen. Whether you’re running a rigid assembly line for a pizza shop or a more flexible zone-style setup for a fine-dining spot, the core principle is identical: organize your equipment based on your menu and how you cook.
A classic cooking line might flow like this:
- Fryers and Grills: Usually placed first for items that have longer cook times.
- Ranges and Ovens: These are the central workhorses for all your sautéing, searing, and baking.
- Warming and Holding: The final stop to keep finished components at the perfect temperature before they hit the plate.
This linear setup ensures a dish moves logically from raw to cooked, straight toward the service area.
Plating, Service, and Warewashing: Closing the Loop
The final steps are just as important as the first. The plating and service area should be directly next to the cooking line, allowing chefs to pass finished dishes to servers with minimal movement. This "pass" or "expo" window acts as the last quality control checkpoint before a dish makes its way to the dining room.
Finally, the warewashing station. This needs to be located where servers can drop off dirty dishes without ever having to walk through the main cooking and prep zones. This creates a clean circular flow—dirty dishes in one door, clean dishes out another—preventing contamination and keeping the kitchen clear of clutter.
For a deeper dive into arranging these zones, you might be interested in our guide on the essentials of a commercial kitchen floor plan.
Choosing the Right Layout for Your Operation
There’s no single magic formula for a perfect kitchen layout. Let's get that out of the way right now. The best design is always the one that’s built around your specific menu, your service style, and the four walls you have to work with. What works wonders for a high-volume pizza joint would be a chaotic nightmare for a fine-dining spot.
Think of the five most common layouts not as rigid blueprints, but as proven starting points. You can adapt them, borrow from them, and even combine them to create a system that fits your operation like a glove.
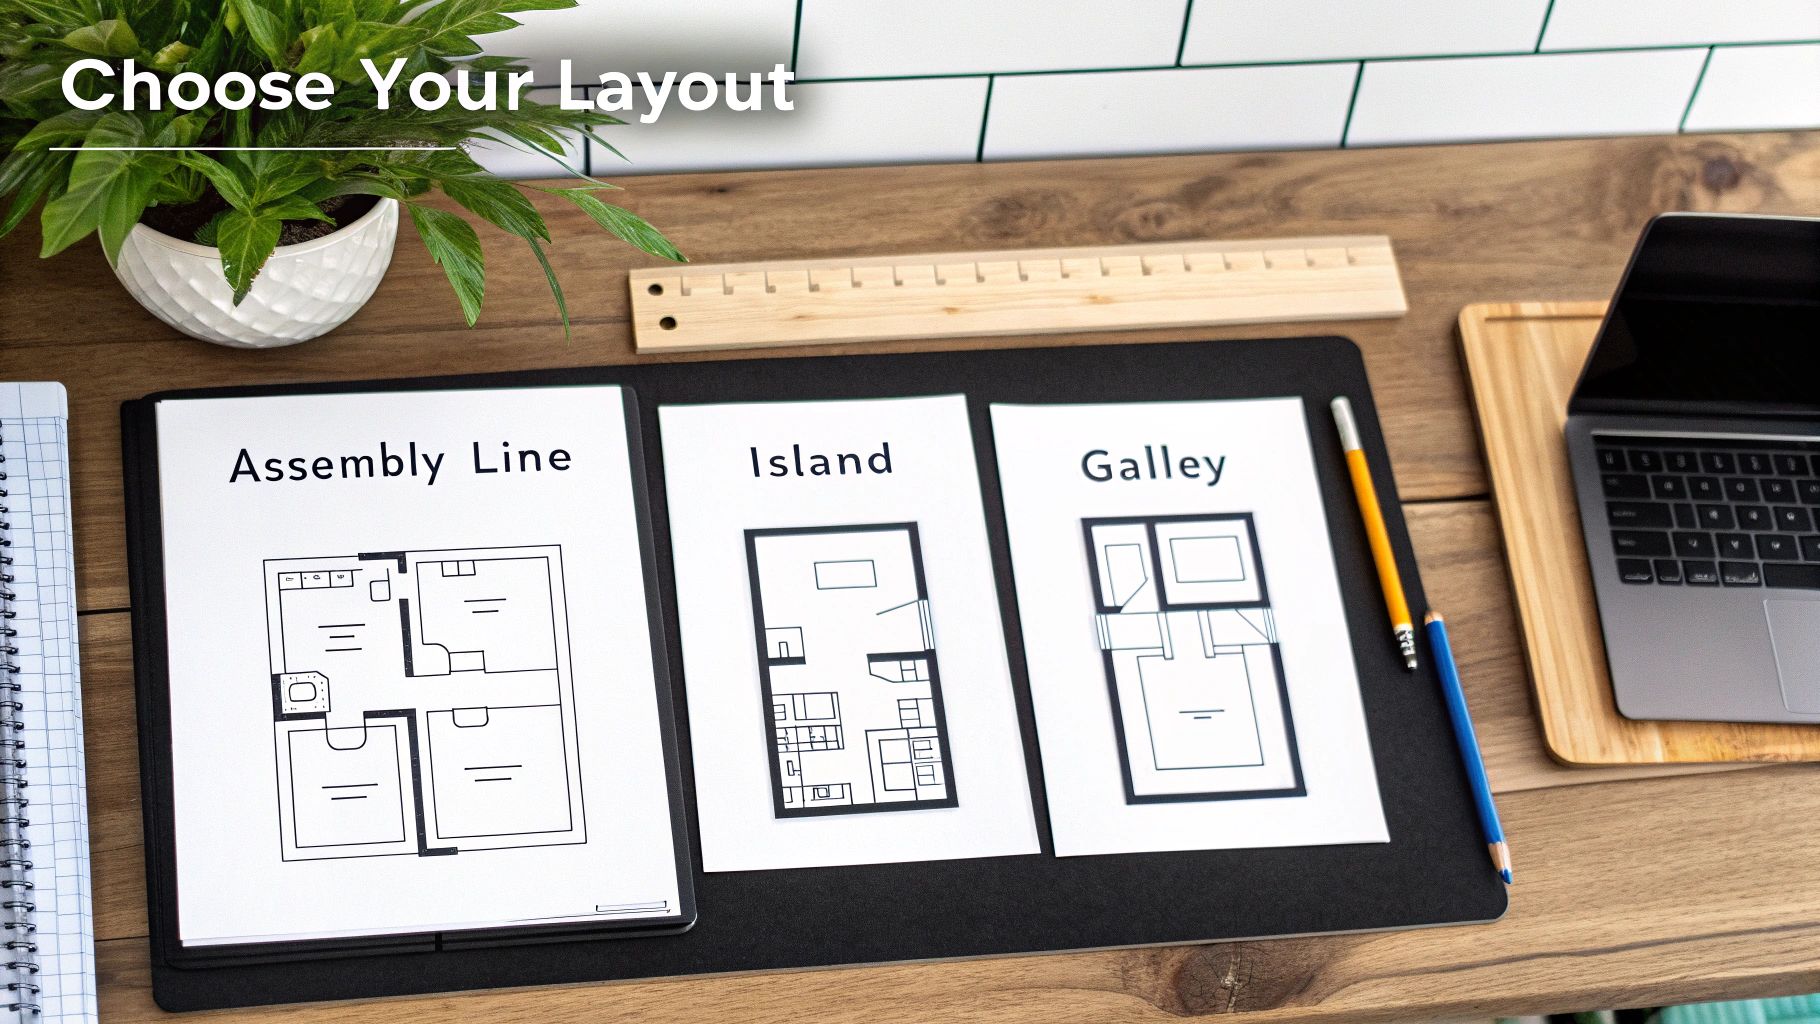
The Assembly Line Layout
When it comes to pure speed and consistency, the assembly line is king. Equipment is organized in a straight line that mirrors the exact sequence of how a dish is made. This setup is a no-brainer for businesses with a limited, repetitive menu where every order follows the same few steps.
Picture a fast-casual burrito spot. The line starts with tortillas, moves to proteins, then toppings, and ends at the register. Each station hands off to the next in a seamless flow. It’s all about maximizing throughput and cutting down on wasted movement.
- Best For: Fast food, high-volume cafeterias, pizza shops, and any concept built for speed.
- Key Advantage: Unbeatable efficiency for repetitive tasks. It keeps the kitchen incredibly organized and makes training new staff a breeze.
- Potential Drawback: This layout is highly specialized. If you ever decide to radically change your menu, the whole setup could become clunky and require a costly overhaul.
The Island Layout
With an island layout, your main cooking equipment—ranges, ovens, grills, fryers—is clustered together in a central "island." All the other zones, like prep, storage, and dishwashing, are arranged along the outer walls. This naturally creates a circular workflow around that central hub.
This setup is a long-time favorite in many fine-dining kitchens because it empowers the head chef. They can stand in one central spot and oversee every single station, ensuring quality and expediting orders. It’s fantastic for communication and teamwork.
The island layout transforms the head chef into a conductor, orchestrating the entire kitchen from a single vantage point. It’s built for supervision and collaboration, making it ideal for complex menus where timing is everything.
The Zone-Style Layout
A zone-style layout is exactly what it sounds like: the kitchen is organized into distinct blocks or stations based on the type of dish. You might have a dedicated salad station, a separate grill station, a fryer station, and a baking station, each with its own equipment and prep space.
This modular approach is incredibly versatile. It lets multiple cooks work on different menu items at the same time without tripping over each other. A busy casual dining restaurant serving everything from steaks to pastas would thrive with this design, as it keeps all the different workflows separate and organized.
The Galley Layout
When space is tight, the galley layout is often the only way to go. All your equipment and workstations are lined up along two parallel walls, creating a single aisle for staff to move through. You’ll see this everywhere in food trucks, ghost kitchens, and tiny urban eateries where every square inch is critical.
The biggest challenge here is pretty obvious: it's cramped. With just one narrow corridor for movement, it can get congested during a busy service, which can slow things down. This layout really works best for smaller teams and simpler menus.
The Open Kitchen Layout
The open kitchen concept, which has become incredibly popular, literally tears down the wall between the kitchen and the dining room. It turns the act of cooking into a form of entertainment, adding a theatrical flair to the dining experience. That kind of transparency can build a lot of trust with customers and keeps the kitchen team accountable.
But running an open kitchen demands a much higher level of discipline. Cleanliness, organization, and staff conduct are always on display. It can also introduce more noise and cooking smells into the dining area, which you'll need to manage with a powerful—and often expensive—ventilation system.
In the real world, many of the most successful kitchens actually use a hybrid model, borrowing the best elements from different styles to create a custom solution that perfectly matches their unique operation.
Fitting Your Equipment into the Grand Plan
This is where the blueprints and sketches start to feel real. You’ve zoned your workflow, and now it’s time to bring in the steel. Selecting and placing your equipment is like putting together a high-stakes puzzle where every piece—from your six-burner range to that walk-in cooler—has to fit perfectly within your footprint and your budget.
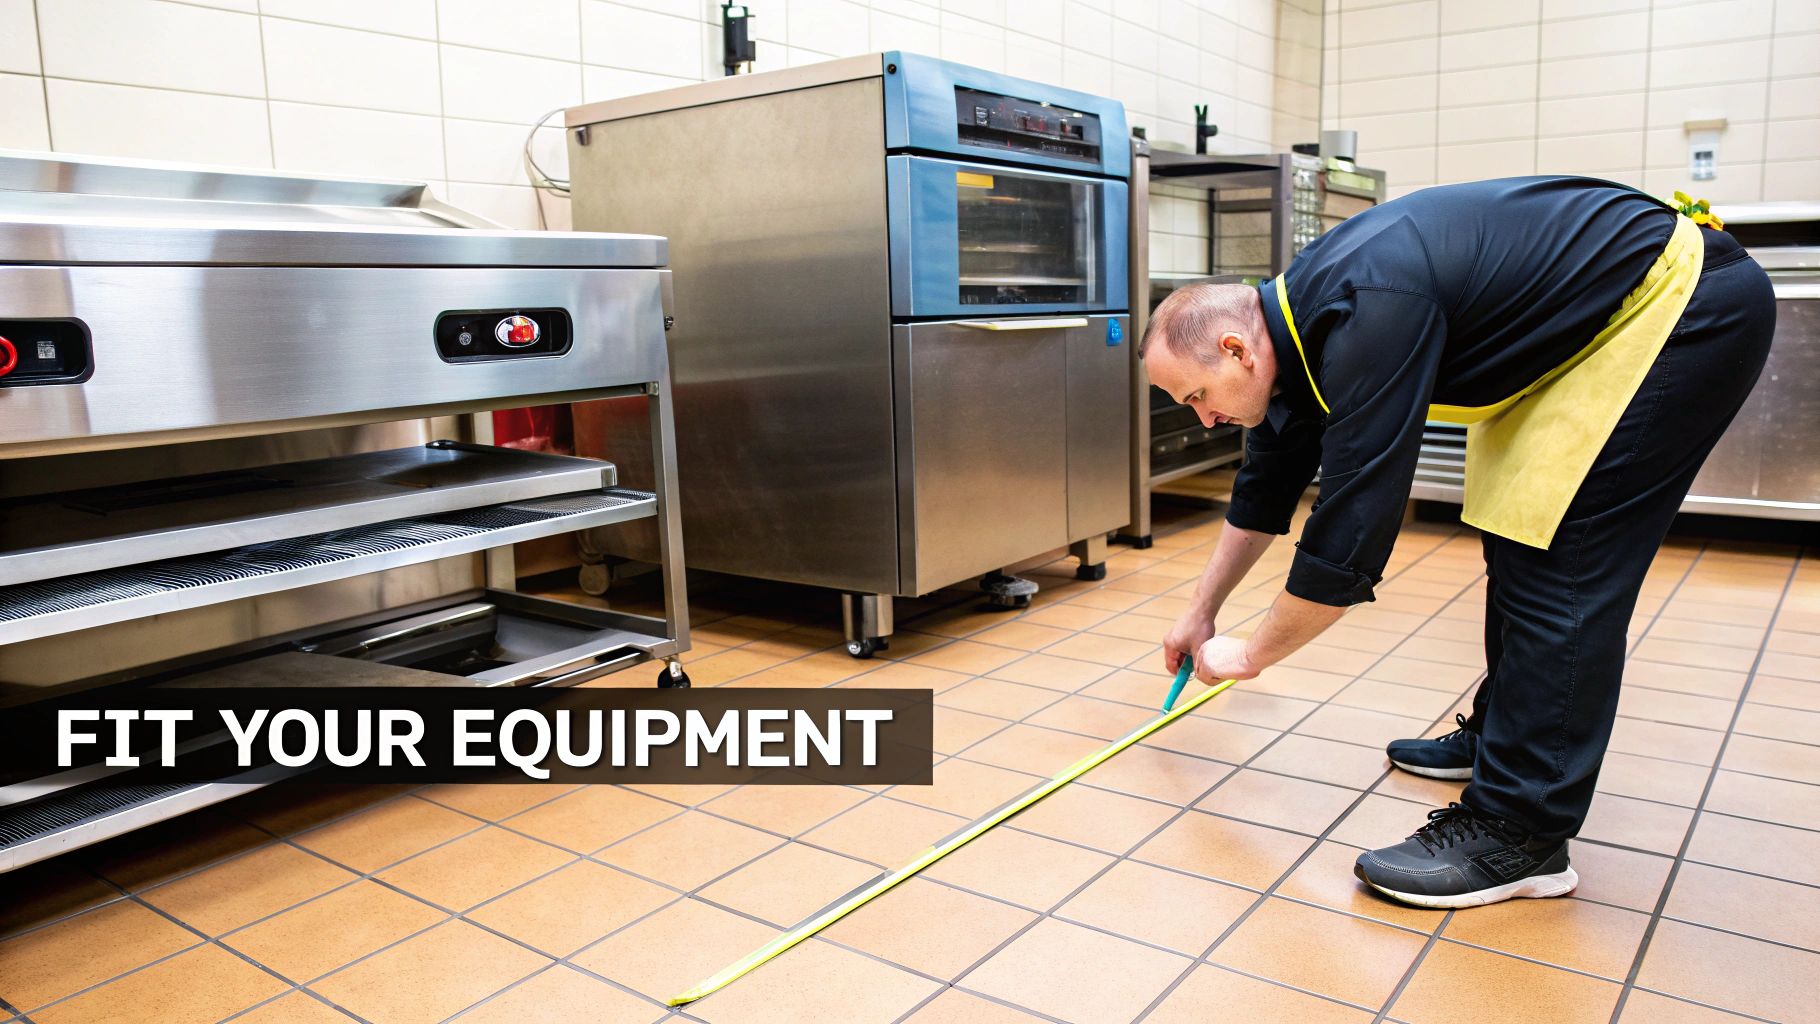
Before you do anything else, measure everything. Get the total dimensions of your space, then measure it again just to be sure. Accurate numbers are non-negotiable; a few inches off can be the difference between a smooth, functional workspace and a cramped, hazardous mess.
From Blueprint To Reality: Sizing And Placement
With your exact dimensions in hand, you can start placing equipment on your floor plan. This isn't just about making things fit—it's about making them work together. You have to account for more than just the equipment's footprint; you need to leave essential clearance space around it.
Your staff needs room to move safely and efficiently, especially when they're hustling with hot pans or heavy stock pots. A good rule of thumb is to allow at least 3 feet of clearance in main traffic aisles and 4 feet between workstations that face each other. This is key to preventing collisions and keeping the flow smooth during the busiest rushes.
As you plan, think about the "why" behind each piece. For a café going for that classic, authentic vibe, a specific piece of gear like a traditional espresso machine becomes a centerpiece. That single decision will dictate counter space, plumbing, and electrical hookups, creating a chain reaction that impacts the rest of the layout.
I’ve seen it happen time and again: someone buys the biggest and best of everything without thinking about the actual space. A massive walk-in cooler sounds great, but if it eats up your entire prep area, it’s a liability, not an asset.
Think critically about what your operation truly needs. A restaurant in the city with daily deliveries might get by with a smaller walk-in, freeing up precious space for another prep table. On the other hand, a more remote spot with weekly deliveries absolutely needs to prioritize a larger storage capacity.
The Rise Of Modular And Mobile Equipment
Modern commercial kitchens are moving away from the old-school, bolted-down setups. The industry is embracing flexibility because menus change and operational needs evolve. This is where modular and mobile equipment gives you a serious strategic advantage.
This shift toward more adaptive design is a game-changer. Modular kitchens, with things like mobile grill carts, rolling griddles, and flexible shelving, allow you to reconfigure your space on the fly with minimal downtime.
Consider adding these flexible options to your layout:
- Rolling Prep Tables: These can be moved to create extra workspace exactly where you need it, then tucked away when things slow down.
- Mobile Fryers: Perfect for catering gigs or if you want to adjust your cooking line for a special menu feature.
- Modular Shelving: Easily reconfigurable shelving lets you adapt your storage areas as your inventory changes over the seasons.
This approach doesn't just maximize the space you have now—it also future-proofs your kitchen for business growth and whatever new trends come your way.
Striking The Balance Between Ambition And Reality
Every chef dreams of a kitchen decked out with all the top-of-the-line toys. But at the end of the day, the realities of your budget and physical space have to guide your final calls. This is where making smart, strategic choices makes all the difference.
For instance, a combi oven can do the job of a convection oven, a steamer, and a proofer, all in one unit. The initial investment might be higher, but the space you save can be enormous—potentially enough to add an entire new station. In the same way, undercounter refrigerators can add valuable cold storage right on the prep line, cutting out all those constant trips to the walk-in.
The goal is to equip your kitchen for success without overspending or creating an inefficient, overcrowded workspace. For a comprehensive look at your options, check out our in-depth commercial kitchen equipment guide. It's a fantastic resource for comparing different types of equipment to find what best suits your needs and budget, ensuring your grand plan becomes a profitable reality.
Navigating Codes and Mechanical Systems Without Headaches
A brilliant kitchen layout on paper means nothing if it can’t pass inspection. This is where we get into the nitty-gritty of your project—the health codes, safety regulations, and the critical mechanical, electrical, and plumbing (MEP) systems that can absolutely make or break your timeline and budget.
Trust me, ignoring these details isn't an option; it’s a recipe for costly revisions and major headaches down the road. Think of your MEP systems as the central nervous system of your kitchen. They’re the arteries that provide the power, water, and air circulation needed to bring your operation to life. Getting these systems dialed in from the very start is essential, as they are often the most complex and expensive parts of any build-out.
Mechanical, Electrical, and Plumbing Essentials
Your MEP plan is the detailed roadmap your contractors will live by. It dictates everything from where you can place an outlet to how you’ll handle wastewater. A poorly planned MEP system can lead to failed inspections, damaged equipment, or even dangerous working conditions for your team.
Let's break down the core components you need to get right:
-
Mechanical (HVAC): This is all about proper ventilation. Commercial kitchens produce a staggering amount of heat, smoke, and grease-laden vapor. Your ventilation system, which is centered around a powerful Type 1 hood, is legally required to manage all of it. A properly sized hood isn’t just a nice-to-have; it's a non-negotiable safety feature that prevents fires and maintains breathable air for your staff. To dig into the specifics, check out our complete guide on commercial kitchen ventilation requirements.
-
Electrical: Your equipment list is what drives your electrical needs. Heavy-duty appliances like combi ovens, commercial ranges, and big floor mixers often require dedicated 220V circuits. You can't just plug these workhorses into a standard wall outlet. An electrician has to map out your total power load to make sure you have enough amperage to run everything at once without tripping breakers during a busy service.
-
Plumbing: Beyond the standard hot and cold water lines, your plumbing plan has to account for some very specific needs. This includes installing floor drains for easy cleaning, dedicated hand-washing sinks in all prep zones, and a three-compartment sink for warewashing.
One of the most critical plumbing components you'll deal with is the grease trap or interceptor. This device is required by pretty much every municipality to prevent fats, oils, and grease (FOG) from getting into the public sewer system, where it can cause destructive and costly blockages.
When you're planning for your mechanical systems and local codes, understanding the real cost of grease trap cleaning is crucial for both your initial design and your ongoing operational budget. Getting the placement and sizing right during the design phase will save you a ton of money on maintenance later on.
Health Codes and ADA Compliance
Every single design choice you make has to be filtered through the lens of local health and safety codes. These regulations vary by city and state, but they all share the same goal: protecting public health.
Here are a few universal code requirements you absolutely need to keep in mind:
- Surface Materials: Any surface that touches food, like countertops and prep tables, must be smooth, non-porous, and easy to sanitize. There's a reason stainless steel is the industry standard.
- Hand-Washing Stations: You must have dedicated hand sinks—totally separate from your prep or utility sinks—that are easily accessible to all staff in food prep areas.
- Food Safety Clearances: Codes often dictate minimum distances between raw food prep areas and ready-to-eat food stations to prevent any chance of cross-contamination.
Finally, your layout must be compliant with the Americans with Disabilities Act (ADA). This ensures your kitchen is accessible to employees with disabilities. Key considerations include making sure your aisles are wide enough for wheelchair access (typically at least 36 inches) and that some workspaces are at an accessible height.
Tackling these technical requirements early in the process is the smartest move you can make. It’s far cheaper to get the plan right on paper than it is to tear out a wall because an inspector flagged a violation. Always consult with licensed contractors and architects to ensure your commercial kitchen design layout is fully compliant from day one.
Your Essential Kitchen Design Checklist
Alright, let's pull all these ideas together into a practical checklist. Think of this less as a simple to-do list and more as your roadmap, turning that rough concept in your head into a fully functional, compliant kitchen reality.
This is your project management hub, plain and simple. It's what keeps the small—but absolutely critical—details from getting lost in the chaos of a build-out. Every point here is a tangible action item, designed to help you sidestep those costly mistakes that can derail a project.
Concept and Workflow
This first phase is all about the big picture. You're defining what your kitchen needs to do and, just as importantly, how it's going to get it done.
- Finalize Your Menu: Get granular here. Analyze every single dish to figure out the exact equipment and station flow you'll need to produce it efficiently.
- Map the Food Journey: Grab a notepad and literally sketch the path an ingredient takes. Follow it from the delivery door, through storage and prep, all the way to the final plate.
- Choose Your Layout Model: Settle on a primary layout—Assembly Line, Island, Zone-Style—that best supports your specific menu and desired service speed.
- Measure Everything Twice: Seriously. Get the exact dimensions of your space, making sure to note the locations of every door, window, and structural column.
Equipment and Mechanical Systems
With a solid workflow mapped out, you can now zero in on the hardware and the systems that bring your kitchen to life. This is where your vision meets the hard reality of engineering.
I’ve seen this mistake happen more times than I can count: someone orders a beautiful, powerful new oven before confirming their utility capacity. That shiny new piece of equipment is useless if your electrical panel can't support it, and fixing that after the fact means expensive and time-consuming rework.
- Select Core Equipment: Finalize your list of essential appliances based on your menu analysis and projected daily volume.
- Verify Equipment Specs: For every single piece of equipment, check the dimensions, power requirements (voltage, phase), and any plumbing needs. Don't skim this part.
- Consult MEP Professionals: Get licensed electricians, plumbers, and HVAC specialists on-site early. They need to assess your building’s capacity and map out all the necessary hookups.
- Confirm Clearances: Plan for enough workspace and clear traffic lanes around all equipment. You have to meet safety code minimums, but a little extra room can make a world of difference for your team's efficiency.
Answering Your Top Kitchen Design Questions
Even the most detailed blueprint can leave you with a few nagging questions. I get it. Designing a kitchen from scratch is a huge undertaking, and a few uncertainties are bound to pop up. Let's tackle some of the most common questions I hear from restaurant owners, clearing up the confusion so you can keep your project moving forward.
How Much Space Should I Leave Between Equipment?
This is a big one, and it's all about safety and flow. For your main traffic paths—where people are walking back and forth the most—you need at least 3 feet (36 inches) of clear space. This gives your staff room to move safely, even when they're hustling with a hot stockpot.
Now, for those areas where staff are working back-to-back, like a prep line facing the cook line, you’ll want to bump that up to 4 feet (48 inches). It feels like a lot, but that extra foot prevents people from constantly bumping into each other and ensures you can fully open an oven door without trapping someone. Always, always double-check your local fire codes, as they often have their own specific rules on this.
What's the Most Common Mistake You See in Kitchen Layouts?
Hands down, the biggest (and most expensive) mistake I see is treating storage as an afterthought. New owners get so focused on the shiny new cooking equipment and the main line that they forget about where everything is going to live.
The result? Dry goods, refrigerated items, and cleaning supplies end up shoved into a corner far from where they're actually used. This forces your team into a marathon of time-wasting trips across the kitchen just to grab a bag of flour or a new pan. You have to weave your storage—dry, cold, and frozen—right into your initial workflow plan, making sure it’s a short, easy trip from the receiving door and close to the prep stations.
A poorly planned kitchen forces your team to fight against the layout every single shift. The goal is to create a space that feels intuitive and supports their movements, rather than hindering them with unnecessary obstacles and long travel paths.
How Can I Plan for Future Menu Changes?
Your menu is going to evolve, and your kitchen should be able to keep up without a complete, budget-busting remodel. The key here is to think in terms of flexibility and modular design. Instead of bolting everything to the floor, build in some adaptability from day one.
Here are a few practical ideas I always recommend:
- Mobile Prep Tables: Get a few stainless steel tables on good, locking casters. They can be rolled into place to create an extra workstation or moved out of the way entirely.
- Modular Equipment: Whenever possible, put your equipment on casters. Mobile fryers, griddles, or low-boy refrigerators can be swapped out or rearranged as your needs change.
- Multi-Use Appliances: Investing in a versatile piece of equipment like a combi oven is a game-changer. It can steam, bake, roast, and more, all in one footprint, giving you a ton of culinary options without taking up more space.
This kind of adaptable thinking ensures your commercial kitchen design layout can grow with your business, not hold it back.
At The Restaurant Warehouse, we provide the high-quality, durable equipment you need to build a kitchen that works as hard as you do. From flexible financing options to expert advice, we're here to help you bring your vision to life. Equip your dream kitchen by exploring our extensive catalog at https://therestaurantwarehouse.com.
About The Author

Sean Kearney
Sean Kearney is the Founder of The Restaurant Warehouse, with 15 years of experience in the restaurant equipment industry and more than 30 years in ecommerce, beginning with Amazon.com. As an equipment distributor and supplier, Sean helps restaurant owners make confident purchasing decisions through clear pricing, practical guidance, and a more transparent online buying experience.
Connect with Sean on LinkedIn, Instagram, YouTube, or Facebook.