

How to Replace a W0404520 Gasket Door
Is your Atosa refrigerator running constantly? Noticing higher energy bills or condensation around the door? Before you call for an expensive repair, check the seal. The problem is often that simple black rubber strip: the W0404520 gasket door. This small part is your main defense against warm air, spoiled food, and wasted money. A tiny tear or a weak seal forces your equipment to work overtime. We'll show you how to quickly check if your gasket is the culprit and what to do next.
Is Your Refrigerator Door Leaking? Check This Gasket First

It’s easy for kitchen managers to underestimate the impact of a failing door gasket. It seems like such a minor part, but its failure kicks off a whole chain of problems that hit both your daily operations and your bottom line.
A compromised seal lets warm, moist air creep into the refrigerated cabinet. This forces the compressor to work overtime just to hold the set temperature. This constant strain doesn't just inflate your energy costs; it also wears down the entire refrigeration system, setting you up for more frequent and expensive repairs down the road.
What Happens When Your Gasket Fails?
The fallout from a faulty Atosa USA W0404520 gasket, door seal goes way beyond a little inefficiency. Just think about the real-world impact on a busy kitchen:
- Food Safety Risks: When internal temperatures are all over the place, you're creating a breeding ground for bacteria. A healthy gasket is crucial for maintaining the right humidity and temperature, which is just as important as preventing mold in commercial kitchen equipment for overall food safety.
- Failed Health Inspections: Health inspectors are trained to spot equipment problems from a mile away. A torn, loose, or moldy gasket is an immediate red flag that can lead to a bad score or even a temporary shutdown.
- Financial Drain: From wasted energy and spoiled food to emergency repair calls, the costs of a bad gasket add up fast. A single incident of food spoilage can easily cost more than replacing every single gasket in your kitchen.
Understanding the W0404520 Gasket Specifications
When it’s time to replace a worn-out gasket, getting the right part is half the battle. Ordering the wrong size means you’re back to square one, wasting time while your refrigerator struggles. To make sure you get it right the first time, let’s go over the specific details of the Atosa W0404520 gasket. Knowing these specifications will help you confidently source the correct replacement and get your equipment back to peak performance. This isn't just about finding a part that fits; it's about restoring the airtight seal that protects your inventory and your energy budget.
Product Details and Dimensions
The Atosa W0404520 door gasket is precision-engineered for specific Atosa commercial freezer and refrigerator models. It measures exactly 22 inches by 26 inches with a thickness of 3/16 inches. These dimensions are critical because they guarantee the snug, perfect fit needed to create an effective seal. Even a fraction of an inch off can create gaps that let cold air escape, defeating the purpose of the replacement. Before you order, it's always a smart move to double-check the model number on your Atosa refrigerator to confirm compatibility and ensure you’re getting the exact part designed for your unit.
Material and Origin
In a busy commercial kitchen, equipment parts need to be tough. This gasket is made from durable, BPA-free materials designed to handle the daily demands of a professional foodservice environment. This means it can stand up to frequent opening, temperature changes, and routine cleaning without cracking or becoming brittle. The BPA-free construction also ensures it's safe for a food storage environment. Plus, the W0404520 gasket is made in the U.S.A., which speaks to its high-quality manufacturing standards. You can trust that you're installing a reliable component built for longevity and performance.
Alternative Part Numbers to Know
Searching for replacement parts can be tricky, especially when different suppliers use different part numbers. To make your search easier, it helps to know the alternative numbers for the W0404520 gasket. Jot these down in your maintenance log: the OEM Part No. is W0404520, the Breakaway Part No. is 950-1001, and the Breakaway Profile No. is 709B. Having these cross-reference numbers on hand streamlines the process of ordering new restaurant equipment parts, allowing you to quickly find what you need from any supplier without confusion.
Is Your W0404520 Gasket Failing? Here's How to Check
Before you rush to order a new part, it’s worth taking a few minutes to confirm that your current Atosa USA W0404520 gasket, door seal is actually the problem. Getting the diagnosis right from the start saves you time, money, and the headache of replacing a perfectly good part.
The best place to start is with a quick visual and physical check. Get up close and look for the obvious stuff—cracks, splits, or any sections that have gone brittle and hard. A healthy gasket should feel soft and flexible, not stiff. Also, keep an eye out for any mold or mildew, which is a dead giveaway that moisture is getting trapped because the seal isn't doing its job.
Easy Ways to Test for an Airtight Seal
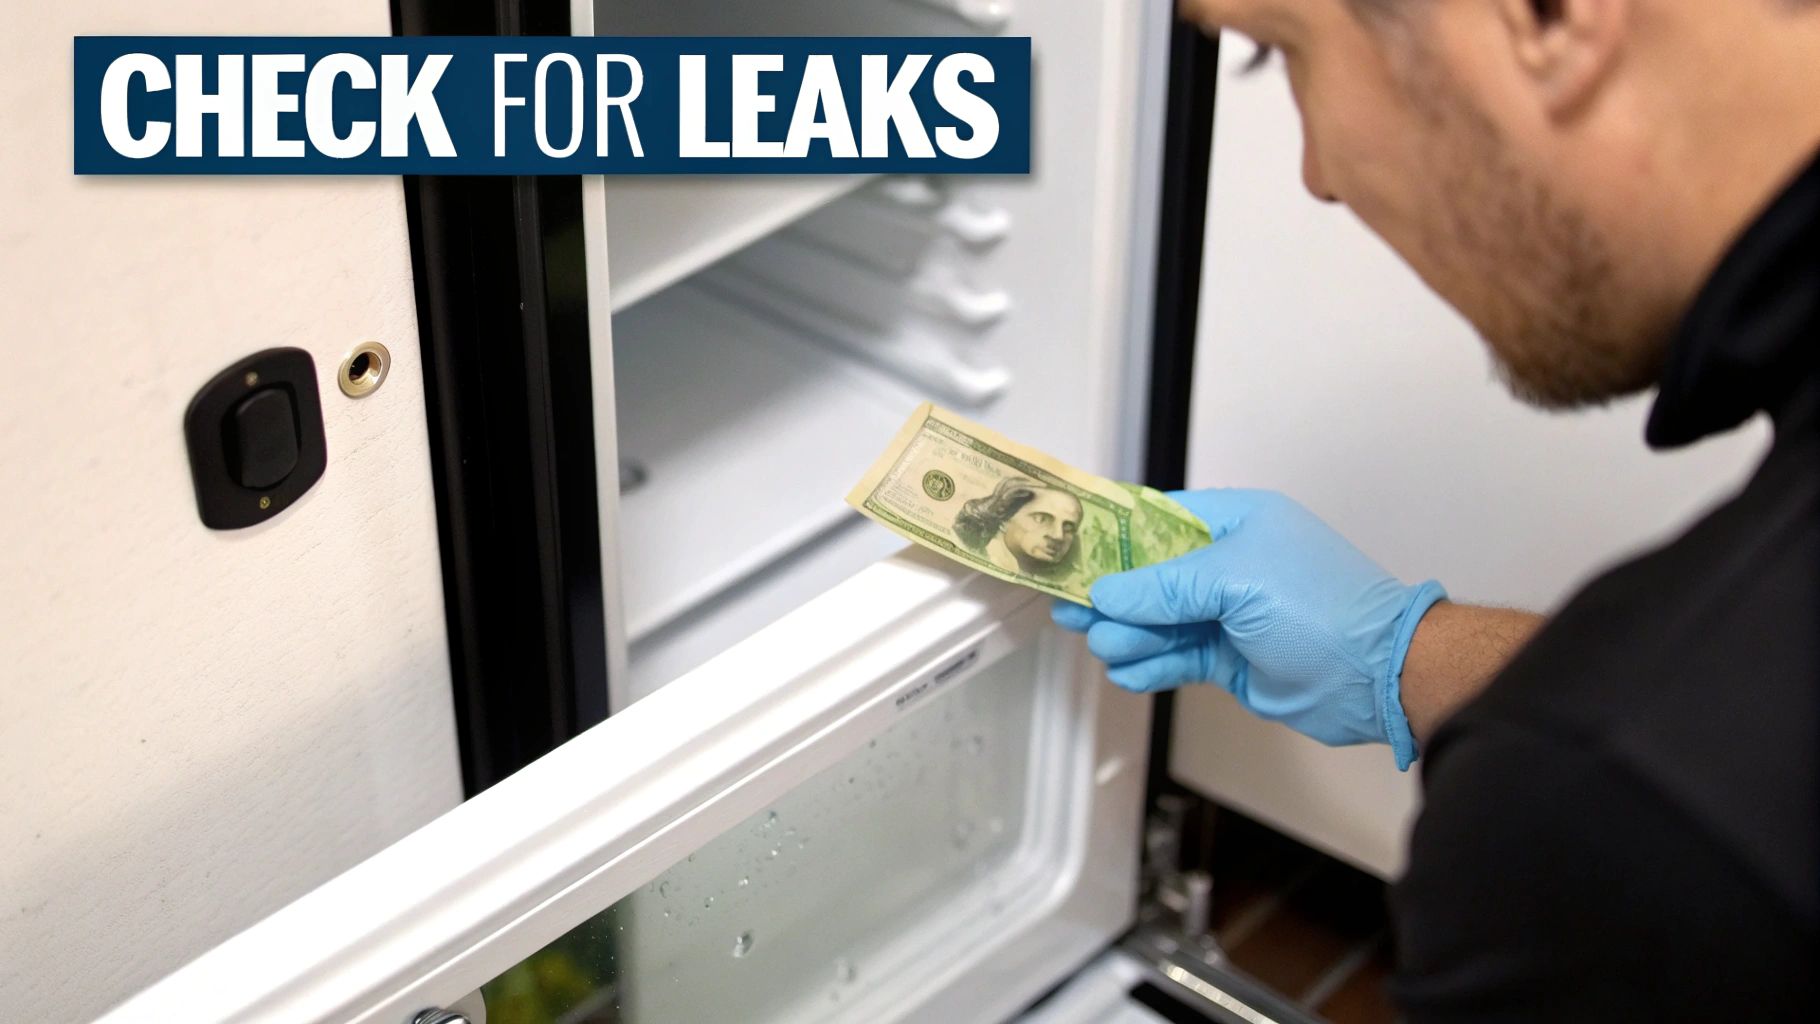
Sometimes a gasket looks fine but is still failing. Tiny, invisible gaps can let warm air seep in, forcing your cooler to work overtime. This is where a couple of old-school physical tests are your best friend.
The "dollar bill test" is a classic for a reason—it just works. Close the refrigerator door on a dollar bill. Now, try to pull it out. If it slides out with almost no resistance, you’ve found a weak spot in the seal. You should feel a solid drag. Make sure to test this all the way around the door—top, bottom, and both sides—to catch any hidden leaks.
A worn gasket can lead to a 20-30% increase in a refrigeration unit's energy consumption. This inefficiency directly hits your utility bills, making a seemingly small part a significant operational expense over time.
A Quick Checklist for a Failing Gasket
Sometimes the signs are subtle. Use this table to quickly diagnose common issues with your Atosa door gasket and understand their impact.
| Symptom | What to Look For | Potential Impact |
|---|---|---|
| Condensation | Moisture or "sweating" on the door edges or nearby floors. | Indicates cold air is escaping and meeting warm kitchen air. |
| Constant Cycling | The compressor seems to be running almost nonstop. | The unit is working overtime to compensate for cold air loss. |
| Ice Buildup | Frost or ice forming inside the unit, especially near the door. | Warm, moist air is getting in and freezing. |
| Visible Damage | Cracks, tears, or brittle, hardened sections on the gasket. | A compromised physical barrier, guaranteeing a poor seal. |
Paying attention to these secondary symptoms can often point you directly back to a compromised seal. The global refrigerator door gasket market is projected to hit $840 million by 2033, reflecting a huge industry-wide push for better energy efficiency. You can dig deeper into what’s driving this in recent market analysis reports.
Removing the Old Gasket (Without Wrecking Your Door)
Alright, time to get your hands dirty. Pulling out that old, failing gasket is your first real step, and honestly, a little patience here will save you a lot of headaches later. The name of the game is to remove the entire Atosa USA W0404520 gasket, door seal cleanly without scratching up your door or leaving stubborn bits behind in the channel.
A clean removal is the foundation for a perfect, airtight seal with the new part. If you rush this part, you could easily gouge the door frame or leave behind debris that stops the new gasket from sitting flush. That would defeat the whole purpose of replacing it in the first place.
I always recommend starting at one of the top corners. It just gives you the best leverage to get things going. Get a firm grip on the old gasket and start pulling it away from the door frame with gentle, steady pressure. You're essentially pulling a flexible "dart" out of a groove, so a consistent pull works best.
What to Do When the Gasket is Old and Brittle
It happens all the time, especially in busy kitchens where gaskets have seen years of action. You start pulling, and the old rubber is so brittle it just breaks off in chunks. Don't panic, and whatever you do, don't grab a screwdriver or a metal scraper. That's a surefire way to damage the door's channel.
Instead, reach for a plastic putty knife or even an old credit card to gently pry out the leftover pieces. Just work your way along the channel, carefully lifting out those broken sections.
Pro Tip: A little bit of warmth can make a stubborn old gasket surprisingly cooperative. Try hitting a tough section with a hairdryer on a low setting for a few moments. It often softens the rubber just enough to make it easier to pull out in one piece.
Once you’ve wrestled the whole gasket out, you’ve got one last crucial task. Take a close look at the now-empty channel, inspecting it all the way around the door. You need to make sure it's completely clean and free of any old gasket material, grease, or grime. A pristine channel isn't just a suggestion—it's non-negotiable if you want the new Atosa USA W0404520 gasket, door seal to install correctly and create that perfect seal.
How to Install Your New Gasket for a Perfect Seal
Now for the satisfying part: getting that new Atosa USA W0404520 gasket, door seal in place. You've done the prep work, the channel is spotless, and you're ready to get that perfect, energy-saving seal from day one. I've seen plenty of people try to rush this part, and it almost always ends in a poor fit and a lot of frustration.
Before you even get near the door, take a look at your new gasket. It’s probably been coiled up in a box for a while during shipping, and it might be a bit stiff or misshapen. Trying to install a cold, rigid gasket is a recipe for disaster—it just won't seat properly in the channel.
The Warm-Up Trick for a Flawless Fit
Making the material pliable and easy to work with is the secret to a great installation. This simple step makes a world of difference in how well the gasket seals.
- Hot Water Soak: This is my go-to method. Just let the gasket sit in a sink of hot (but not boiling) water for about 10-15 minutes. It works like a charm.
- Hairdryer Method: If a sink isn't practical, a hairdryer on a low heat setting will also do the trick. Just move it evenly along the gasket to gently warm up the material.
Once the gasket is warm and flexible, you're ready to press it into the channel. Remember, this is about finesse, not brute force.
My Two Cents: Whatever you do, don't stretch the gasket to make it fit. It’s a common mistake that creates thin, weak spots in the seal, which will absolutely lead to gaps and air leaks down the road.
The infographic below gives a great visual of the removal process, which is the crucial first half of the job. A clean slate is everything.
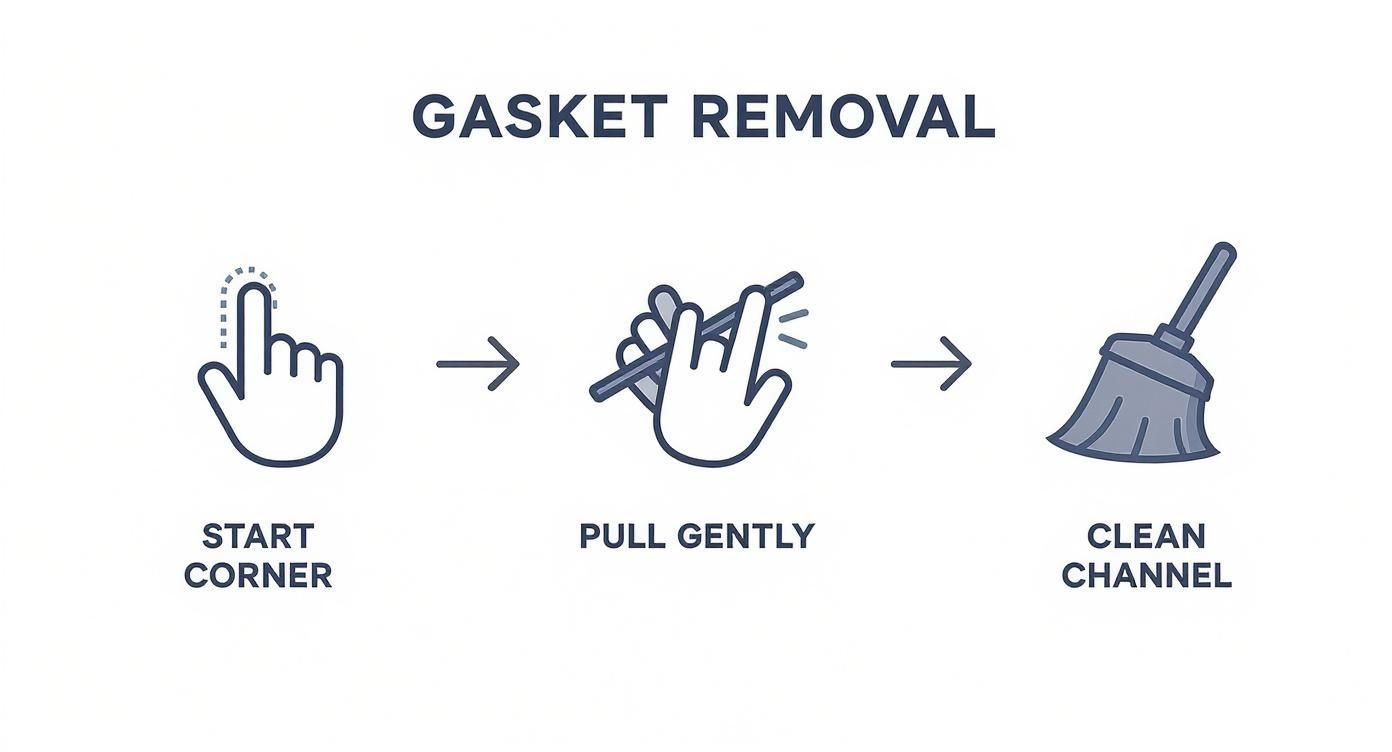
This visual really drives home the methodical approach needed to prep the door channel correctly before your new gasket goes in.
Pressing Your New Gasket into the Door Channel
I always start with the corners. Press them firmly into the door's channel first. Getting the corners locked in ensures the whole gasket stays perfectly aligned and doesn’t get skewed as you work your way around.
With the corners secure, use your thumbs to gently press the dart-style back of the gasket into the channel. Work in small sections, moving from the corners along the top, bottom, and sides until the entire thing is fully seated. You should feel a satisfying little pop or click as the dart locks into place.
Once it’s all in, do a final check. Run your fingers along the entire perimeter to feel for any loose spots or areas that didn't quite seat right. For some extra tips and visuals, you can also check out our detailed guide on how to install a door gasket on commercial refrigerators and freezers.
It's no surprise that the demand for quality seals like this is growing. The global door gasket market recently hit USD 3.75 billion, all driven by the need for better, more efficient sealing solutions in kitchens everywhere.
New Gasket Care: Make It Last
Alright, you've got your new Atosa USA W0404520 gasket, door seal installed, and it's fitting like a glove. The next goal is simple: make that perfect seal last as long as possible. A few consistent, simple habits can easily double the life of your gasket, protecting it from the daily abuse of a busy kitchen.
The absolute number one enemy of a healthy gasket is grease buildup. A weekly wipe-down using a soft cloth and a mild, food-safe detergent is a must-do, not a nice-to-do. This quick task prevents grease from eating away at the flexible material and keeps the magnetic strip from losing its grip.
Gasket Cleaning: The Dos and Don'ts
What you clean with is just as important as how often you clean. Harsh chemicals like ammonia or anything abrasive will dry out the rubber, causing it to crack and turn brittle in no time. Stick to the gentle stuff.
- Do Use: A simple mix of warm water with a few drops of regular dish soap.
- Don't Use: Bleach, heavy-duty degreasers, or any chlorine-based cleaners directly on the gasket.
Pro Tip: Don't forget to wipe down the surface of the unit where the gasket actually makes contact. A clean frame is just as crucial as a clean gasket for getting that airtight seal.
These small routines are the foundation of good equipment health. For a bigger picture on overall upkeep, our guide on Atosa refrigerator and freezer maintenance instructions lays out more detailed schedules. It's also smart to check out some comprehensive preventive maintenance checklists for your other kitchen systems to build a proactive mindset and keep everything running efficiently.
Common Questions About the Atosa W0404520 Gasket
Even with a replacement that seems straightforward, it’s completely normal to have a few questions pop up. In my experience, getting a quick, clear answer can be the difference between a minor hiccup and a really frustrating afternoon. Let’s walk through some of the most common issues and questions we hear about the Atosa USA W0404520 gasket, door seal.
One of the most frequent calls we get is about a new gasket that just doesn’t seem to be sealing right after it's been installed. More often than not, the issue isn't a faulty part, but simply a stiff one.
Gaskets can get cool and rigid during shipping and storage. If your new seal is leaving gaps, a little warmth is almost always the solution.
Pro Tip: Grab a hairdryer and use it on a low setting to gently warm up the gasket material. This makes it much more pliable and cooperative. Once it's warm, close the door and let the gasket conform to the frame for a few hours. This little trick helps it create a perfect, custom seal.
Making Sure You Have the Right W0404520 Gasket
Another common concern is making sure you’ve ordered the right part for your specific unit before you even click "buy." How can you be absolutely certain the W0404520 is the correct gasket for your Atosa model?
The most reliable way to know for sure is to check the serial number plate on your Atosa unit. This little metal plate lists the exact model number. You can then cross-reference this with the manufacturer’s part list or the supplier’s website to confirm you've got a match. While the Atosa USA W0404520 gasket, door is a very common part, taking a moment to verify saves a ton of hassle later.
- Locate the Data Plate: You'll usually find it inside the unit, mounted on one of the side walls.
- Identify the Model Number: Jot it down or just snap a quick picture with your phone.
- Cross-Reference: Match that number with the part description online before you purchase.
For a bit more guidance on matching parts to your equipment, check out our guide on how to seal the deal finding the right Atosa door gasket.
Compatible Atosa Refrigerator Models
This particular gasket is a real workhorse, designed to fit a wide range of popular Atosa refrigerators and freezers. It’s one of the most common replacement parts for a reason. The W0404520 is the correct fit for several key models, including the MGF8402, MGF8406, and MSF8304 series units. While this covers many of the coolers you'll find in commercial kitchens, Atosa has a broad product line. I always tell people the best way to guarantee you're getting the right part is to confirm your specific model number before placing an order. This simple check saves you from the headache of returns and gets your equipment back to peak performance faster.
What to Do If You're Unsure
If you're looking at your refrigerator and have no idea which model it is, don't worry—it happens to the best of us. There's a foolproof way to find out. Look for the metal data plate on your unit, which is usually located on an interior wall. This plate has all the critical information, including the exact model and serial number. My go-to tip is to snap a quick photo of it with your phone to keep that information handy. If the plate is worn or hard to read, you can also carefully measure your old gasket's outside dimensions. Comparing those measurements to the W0404520's specs (22-3/8" x 26-9/16") is a solid backup plan to ensure a perfect fit for your restaurant equipment.
OEM vs. Generic Gaskets: What's the Difference?
Finally, a lot of people ask if they can just use a generic gasket instead of the OEM part. I get it, sometimes they look similar and cost a bit less.
While some non-branded options might appear to fit, I highly recommend sticking with the genuine Atosa part. The W0404520 is specifically designed with the correct magnetic strength and material composition for an optimal, energy-efficient seal on your unit. Going with a generic can often lead to a weak seal, energy loss, and more headaches down the road.
At The Restaurant Warehouse, we provide genuine OEM parts to ensure your equipment runs efficiently and reliably. Find the exact Atosa gasket you need today at https://therestaurantwarehouse.com.
Protecting Your Refrigerator's Warranty
Beyond simple performance, there's another critical reason to stick with an OEM part: protecting your equipment's warranty. Using a genuine "Original Equipment Manufacturer" gasket is often a requirement to keep your warranty valid. Manufacturers specify these parts because they are tested and proven to work with their systems. If a generic part fails and causes a bigger issue, like forcing the compressor to burn out, your claim could be denied. Sticking with the authentic Atosa W0404520 gasket ensures you stay compliant and your investment remains protected.
Purchasing Your Replacement Gasket
You’ve done the diagnostic work and confirmed it’s time for a new gasket. The next step is getting the right replacement part into your hands. This isn’t just a minor repair; it’s a direct investment in your kitchen’s efficiency and safety. A fresh, perfectly sealed gasket is your key to maintaining consistent temperatures, which keeps food fresh and safe for longer. It also prevents your refrigeration unit from working overtime, saving you a noticeable amount on your monthly energy bills. The good news is that sourcing a genuine Atosa W0404520 is a straightforward process with a reliable supplier.
When you shop for restaurant equipment parts, you want to be sure you're getting a genuine OEM component that guarantees a perfect fit and optimal performance. Using the correct part eliminates the guesswork and the risk of a poor seal that could come with a generic alternative. At The Restaurant Warehouse, we make it easy to find the exact parts you need for your Atosa units, ensuring you can get your equipment back to peak condition quickly and without any hassle. This simple purchase is one of the smartest, most cost-effective maintenance tasks you can perform.
Expected Cost and Bulk Orders
For a single Atosa W0404520 gasket, you can generally expect the cost to be manageable and a worthwhile investment considering the energy savings and spoilage prevention it provides. However, if you're managing a larger operation with multiple locations or are outfitting a new kitchen, buying gaskets one by one isn't the most efficient approach. Many suppliers recognize this and offer special pricing for bulk orders. If you need to purchase a significant number of gaskets, it's always a good idea to reach out directly to the sales department to inquire about volume discounts, which can lead to substantial savings.
Customization for Non-Standard Sizes
What happens if you have an older, custom, or off-brand unit where a standard W0404520 gasket just won't fit? Don't worry, you still have options. While most modern commercial refrigerators use standard-sized parts, the world of kitchen equipment is vast. If you find yourself with a non-standard door size, there are specialized companies that can create a custom gasket for you. You'll typically need to provide precise measurements of your door's channel, but this service ensures you can get a perfect, airtight seal even on the most unique pieces of equipment, keeping your older but still reliable units running efficiently.
Understanding Warranties and Returns
Once you've found the right part, it's smart to take a moment to understand the policies that come with it. Knowing the details about the product's warranty and the supplier's return policy isn't about expecting problems; it's about being a prepared and savvy business owner. A clear warranty provides peace of mind that you're receiving a quality component, while a fair return policy gives you a safety net in case of a simple mistake. This is especially important when dealing with essential equipment, as these policies can protect you from unexpected costs and downtime, which is a core part of smart restaurant equipment financing and management.
Product Warranty Information
A genuine OEM part like the Atosa W0404520 gasket should come with a manufacturer's warranty, which is a strong indicator of its quality and durability. For instance, it's common to find these specific gaskets sold with a two-year warranty against defects. This coverage protects you in the rare event that the part fails prematurely due to a manufacturing issue. Before you complete your purchase, always check the product description or contact the supplier to confirm the length and terms of the warranty. This small step ensures you know exactly what level of protection you're getting with your new part.
Typical Return Policies
Even with careful planning, mistakes can happen. You might accidentally order the wrong part number or realize you need a different size. That's where a clear return policy is essential. Most suppliers will allow you to return a product like a gasket within a 30-day window, but there's a key condition: the item must be new, unused, and in its original unopened packaging. This is why it's so important to double-check the part number on the box against your old gasket or equipment model *before* you open it. Once the seal is broken, the part is typically no longer returnable.
Key Takeaways
- A Failing Gasket is a Financial Drain: A worn-out door seal forces your refrigerator to work harder, driving up energy costs. It also risks expensive food spoilage and can be an immediate red flag during a health inspection, hitting your bottom line from multiple angles.
- Diagnose the Problem in Minutes: Before buying a replacement, perform a quick check. Visually inspect the gasket for cracks or brittleness, then use the dollar bill test—if the bill slides out easily from the closed door, you've found a leak.
- Warm the Gasket for a Perfect Fit: For a flawless, gap-free installation, soak your new gasket in hot water for about 10 minutes. This simple step makes the material flexible, allowing it to seat properly in the door channel and create an airtight seal from the start.
Related Articles
About The Author

Sean Kearney
Sean Kearney used to work at Amazon.com and started The Restaurant Warehouse. He has more than 10 years of experience in restaurant equipment and supplies. He graduated from the University of Washington in 1993. He earned a BA in business and marketing. He also played linebacker for the Huskies football team. He helps restaurants find equipment at a fair price and offers financing options. You can connect with Sean on LinkedIn or Facebook.
Leave a comment