

Your Guide to Choosing a Walk In Cooler
A walk in cooler is so much more than just a big refrigerator; for businesses that depend on fresh inventory, it’s the operational heart of the entire kitchen. Think about it—for restaurants, grocery stores, and even florists, these controlled spaces are absolutely essential for keeping products top-notch, ensuring safety, and preventing a ton of costly spoilage. Understanding its role is the first step toward making a smart investment.
What a Walk In Cooler Really Does for Your Business

At its core, a walk in cooler is an engineered space built for one main purpose: bulk cold storage. Unlike a standard reach-in that you might see on the line, a walk-in has the muscle to store entire pallets of produce, stacks of beer kegs, or buckets of fresh flowers in a stable, perfectly chilled environment. That capability alone elevates it from a simple appliance to a cornerstone of your daily efficiency.
Picture a busy restaurant kitchen during the dinner rush. The ability for a chef to quickly grab large quantities of prepped ingredients without someone having to constantly restock a small fridge is priceless. That kind of smooth workflow is a direct result of having a well-organized walk in cooler.
Beyond Simple Cooling
The real magic of a walk in cooler is its ability to do more than just keep things cold—it creates a specific, stable environment that protects your investment. This is achieved through a powerful combination of a robust refrigeration system and high-quality insulation, both working together to lock in a consistent temperature, even when the door is swinging open every few minutes.
Here's what it really accomplishes:
- Preserving Product Quality: For delicate items like leafy greens, fresh fish, or flowers, that precise temperature control is everything. It prevents wilting, spoilage, and loss of freshness, ensuring your customers get the best product possible.
- Ensuring Food Safety: By holding perishable goods well outside the temperature "danger zone" (40°F to 140°F), a walk in cooler is your number one tool for staying on the right side of health codes and preventing foodborne illnesses.
- Maximizing Storage Capacity: It allows you to buy ingredients and supplies in bulk—often at a much better price—without ever having to worry about where you’re going to put it all.
This laser focus on reliable cold storage is why the market is growing so fast. The global demand for walk-in coolers and freezers is projected to jump from USD 11.2 billion in 2025 all the way to USD 19.6 billion by 2035.
A Strategic Business Investment
When you start to see a walk in cooler as a strategic investment instead of just another expense, the whole perspective changes. The initial cost can feel substantial, which is why many businesses explore options like equipment financing for small businesses to make it more manageable. This kind of financial tool helps you hold onto your capital while still getting the essential gear you need to grow.
A properly sized and maintained walk in cooler pays for itself by cutting down on food waste, unlocking savings from bulk purchasing, and smoothing out your entire operational workflow. It's an investment in consistency, safety, and profitability.
Ultimately, this piece of equipment is fundamental to the entire ecosystem of https://therestaurantwarehouse.com/blogs/restaurant-equipment/commercial-refrigeration-for-your-restaurant. By safeguarding your most valuable assets—your inventory—it directly supports your business’s bottom line, its reputation, and its long-term success.
Decoding the Different Types of Walk In Coolers
Navigating the world of walk-in coolers can feel like learning a new language, but it really boils down to two key decisions. The first choice is about the refrigeration system, and the second is about the structure of the box itself. Getting these right is crucial for ensuring your unit fits your space, budget, and daily operations perfectly.
Think of these choices as the foundational DNA of your cold storage. They determine everything from installation complexity and initial cost to where noise and heat are managed within your business. Let's break down these options into simple, practical terms.
Self-Contained vs. Remote Refrigeration
The biggest distinction you’ll run into is how the refrigeration system is set up. This one choice impacts your kitchen environment, installation costs, and long-term maintenance, so it's a big deal. Each approach has clear advantages depending on what your specific operation needs.
A self-contained unit is the essence of "plug-and-play." Imagine a window air conditioner; all the essential components—the compressor, condenser, and evaporator—are built into a single, compact package. This entire assembly typically mounts directly onto the wall or ceiling of the walk-in cooler.
This all-in-one design makes installation incredibly straightforward and often less expensive upfront. There's no need for complex refrigerant lines running through your building, which simplifies the entire process. This convenience is a major reason why they’re so popular.
In fact, self-contained walk-in coolers have become a dominant force in the market. By 2023, they captured a massive 64% market share, valued at approximately USD 6.6 billion. The biggest drivers are the simplified installation and the lack of intricate refrigeration piping, which leads to significant cost savings. You can explore more data on walk-in cooler market trends to see the full picture.
A remote refrigeration system, on the other hand, operates more like the central HVAC system for your home. The noisy, heat-producing components (the condenser and compressor) are installed "remotely"—often on the roof or in a separate mechanical room away from the main kitchen area. Refrigerant lines are then run from this remote location to the evaporator coil inside the walk-in cooler.
While this setup requires a more involved and costly installation, it offers some powerful benefits. It removes all that excess heat and operational noise from your kitchen, creating a much more comfortable and productive environment for your staff. This is particularly valuable for larger operations or kitchens where space and ambient temperature are critical concerns.
When you're weighing the pros and cons, it really helps to see a direct comparison of how these two systems stack up.
Self-Contained vs Remote Refrigeration Systems
| Feature | Self-Contained System | Remote System |
|---|---|---|
| Installation | Simple, "plug-and-play" design. No complex refrigerant lines needed. | Requires professional installation with refrigerant lines run from the remote unit to the cooler. |
| Initial Cost | Lower upfront cost due to simpler installation and fewer components. | Higher initial cost due to more complex installation and additional piping. |
| Kitchen Environment | Vents heat and noise directly into the surrounding area (your kitchen). | Moves heat and noise outside or to a separate mechanical room, creating a cooler, quieter kitchen. |
| Best For | Smaller kitchens, businesses on a tighter budget, or locations where running refrigerant lines is difficult. | Larger restaurants, high-volume kitchens, or any space where reducing kitchen heat and noise is a top priority. |
| Maintenance | All components are in one place, making service access relatively easy. | Components are split, which can sometimes make servicing more complex depending on the remote unit's location. |
Ultimately, your choice depends on balancing your upfront budget against the kind of work environment you want to create for your team.
This infographic compares the installation complexity, cost, and noise levels of self-contained versus remote refrigeration systems.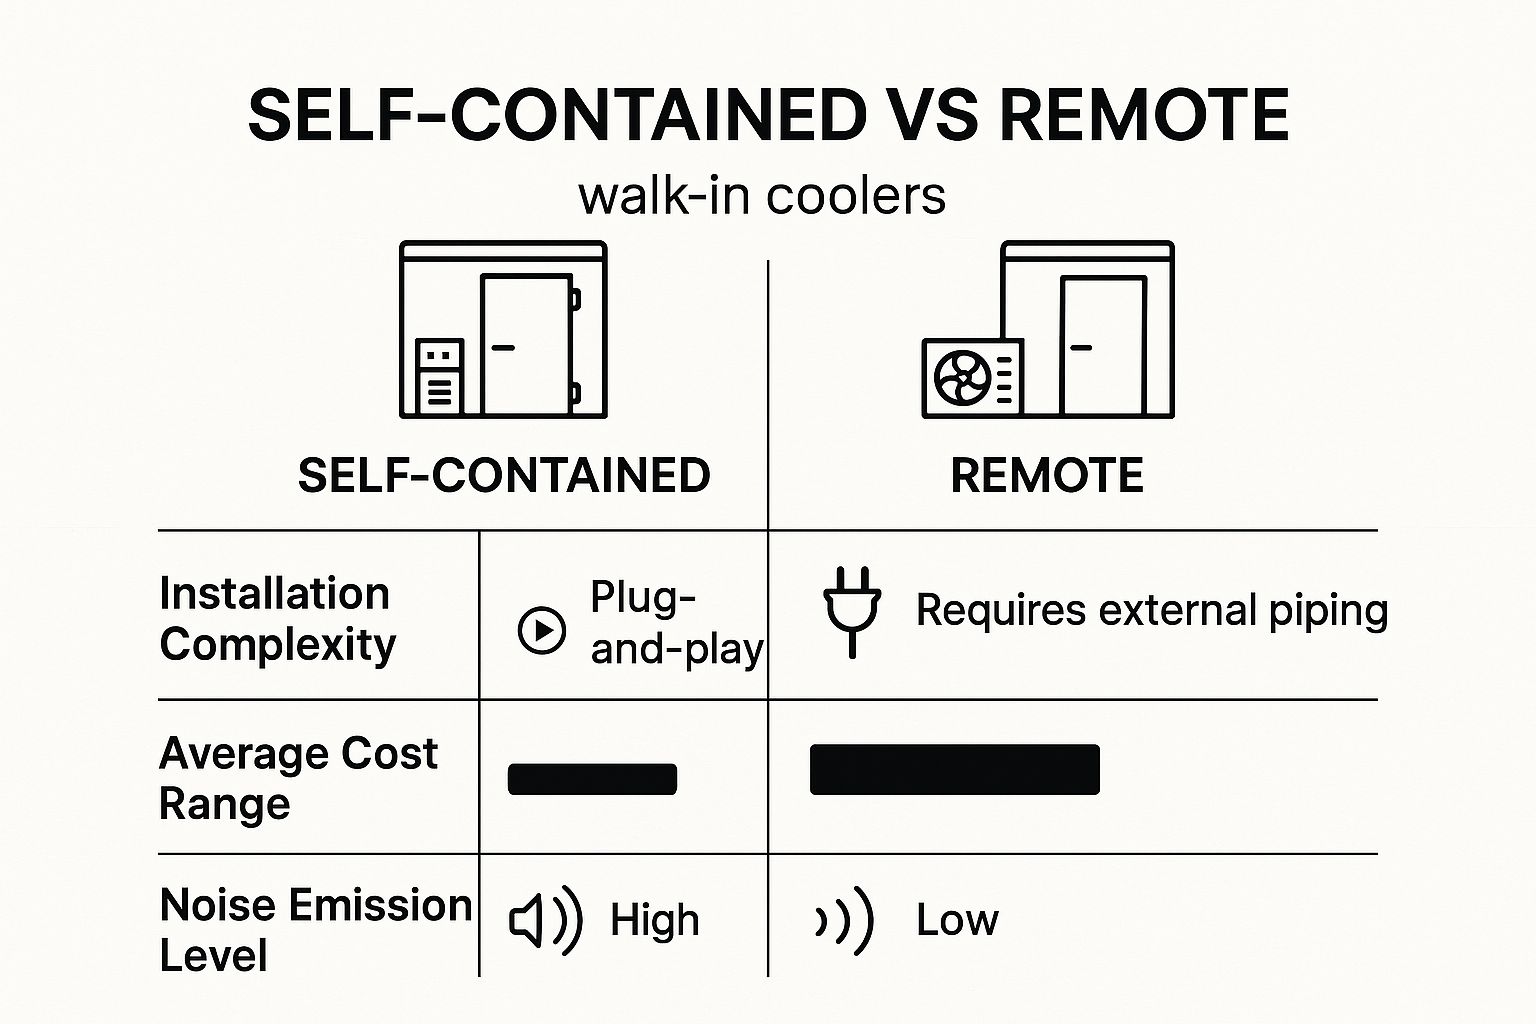
The visualization clearly shows the trade-offs: self-contained units offer lower initial costs and simpler setups, while remote systems provide a quieter and cooler work environment at a higher price point.
Prefabricated vs. Custom-Built Units
Once you've decided on the refrigeration type, the next step is choosing the structure of the walk-in box itself. This decision really hinges on your available space, your specific storage needs, and your long-term goals for the business.
Prefabricated walk-in coolers are like buying furniture from a catalog. They are manufactured in standard, modular sizes and shipped to your location ready for assembly. These units are built with interlocking panels that are designed for a quick and easy setup.
Key Takeaway: Prefabricated models are an excellent choice for businesses with standard spatial layouts, offering a cost-effective and efficient path to reliable cold storage. They are the go-to for many restaurants, cafes, and bars.
Conversely, custom-built walk-in coolers are the tailored suits of the refrigeration world. They are designed and constructed to fit your exact specifications, making them the perfect solution for tricky, unconventional spaces where a standard box just won't do.
- Odd-Shaped Rooms: They're perfect for fitting into L-shaped corners, under staircases, or in rooms with low ceilings.
- Specific Internal Layouts: You can get custom shelving configurations, multiple temperature zones, or unique door placements to match your workflow.
- Future Expansion: A custom build can be designed with future growth in mind, making it easier to expand down the line.
Of course, this level of personalization comes at a higher cost and involves a longer design and construction process. However, for businesses where space is at a premium or unique operational needs must be met, a custom-built walk-in cooler is an invaluable investment that maximizes every last square inch of your available real estate.
Understanding the Core Components and Features
To really get a feel for how a walk-in cooler protects your valuable inventory, it helps to look under the hood. It’s way more than just a big, cold box; it's a carefully engineered environment where several key components work together in perfect harmony.
Once you understand these parts, you'll be able to spot a quality unit and see exactly how specific features impact its performance and, just as importantly, your long-term operating costs.
Think of it like building a high-performance house. The structure needs strong walls (the panels), a solid foundation (the flooring), a secure entrance (the door), and a powerful climate control system (the refrigeration unit). Every single element is critical for creating a stable, efficient, and reliable space.
The Foundation: Insulated Panels and R-Value
The walls and ceiling of a walk-in cooler are its first line of defense against the outside world. They’re built from insulated panels, which are essentially sandwiches made of a rigid foam core pressed between two sheets of metal—usually galvanized steel or aluminum. This construction provides both structural strength and, more importantly, thermal resistance.
The effectiveness of this insulation is measured by its R-value. A higher R-value means the panel is better at stopping heat from getting in, which is the constant battle your cooler is fighting. Think of the R-value as the thickness of a winter coat; a thicker coat gives you much better protection from the cold.
For a walk-in cooler, an R-value of at least R-25 is a common baseline, while freezers need R-32 or higher. Better insulation means the refrigeration system doesn't have to work as hard, which translates directly to lower energy bills month after month.
This insulation is what keeps the cold air in and the warm, ambient air of your kitchen out. Panels with a high R-value are one of the most important features for long-term energy efficiency and cost savings.
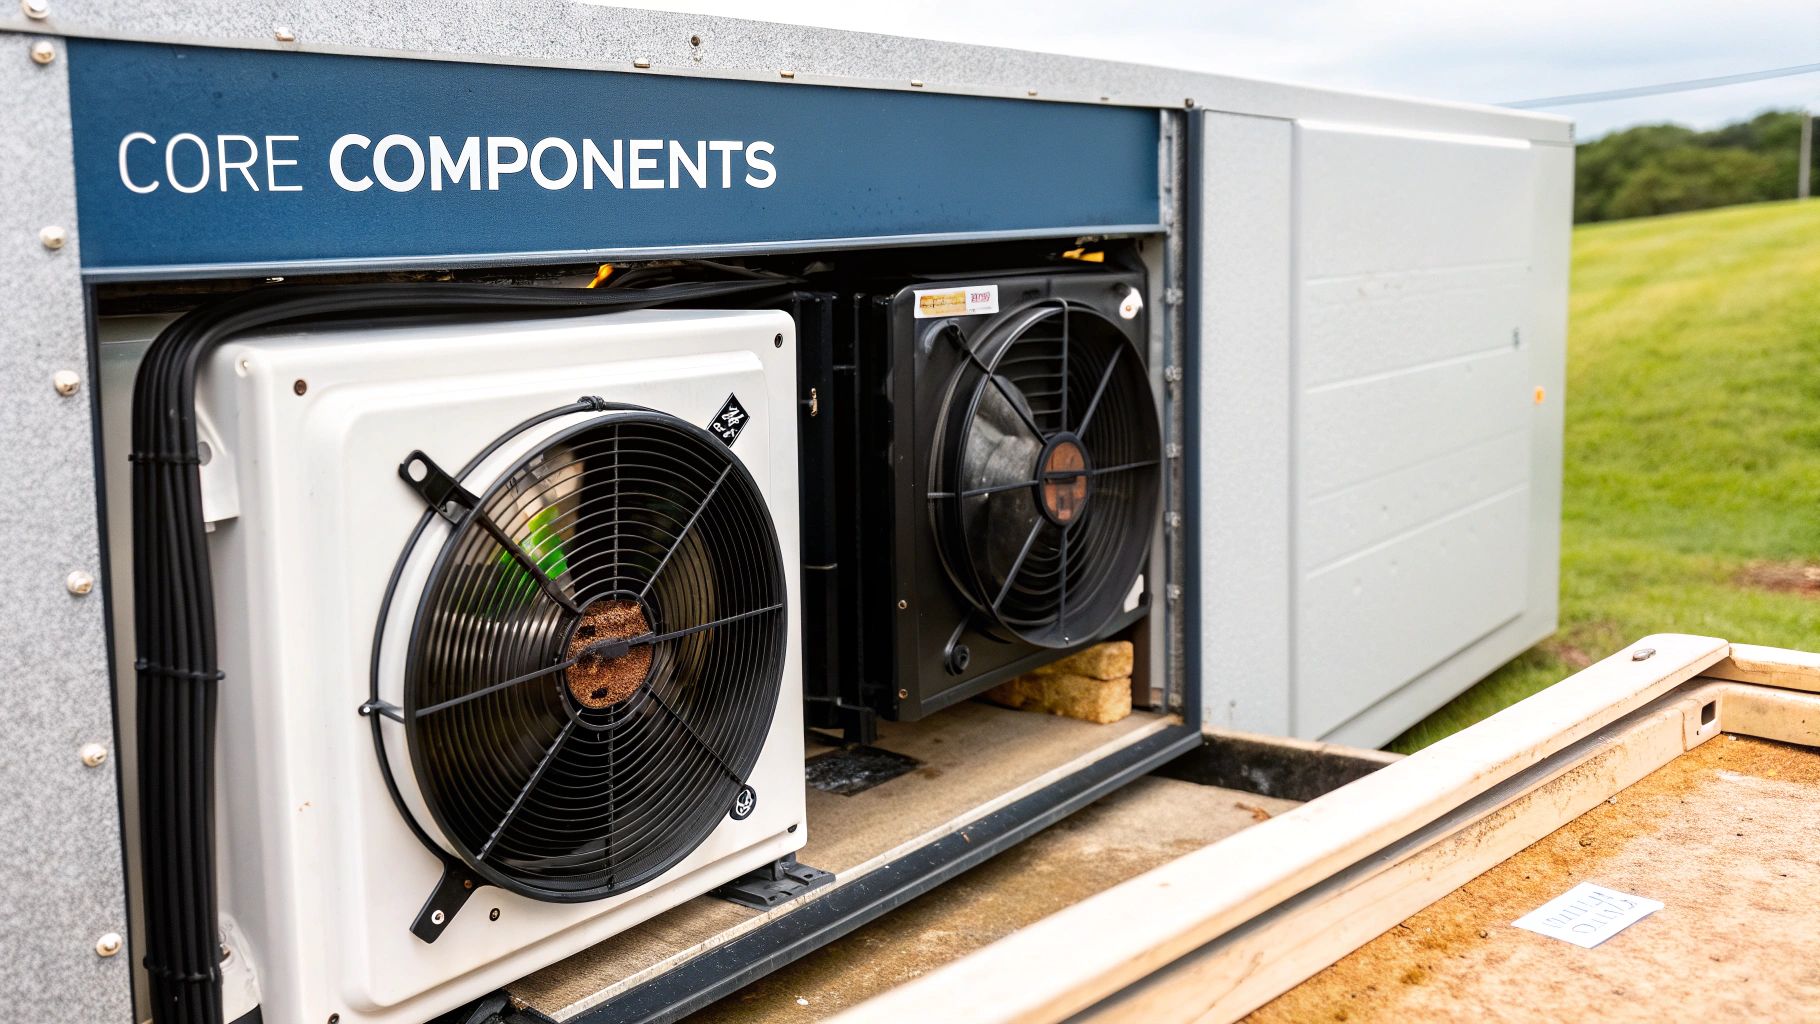
The Refrigeration System: The Heart of the Cooler
If the panels are the cooler's bones, the refrigeration system is its beating heart. This system is responsible for actively pulling heat out of the box and keeping everything at your desired temperature. It’s a closed-loop cycle starring three main components.
- The Compressor: This is the engine of the system. It pressurizes refrigerant gas, cranking up its temperature and pressure before sending it on to the next stage.
- The Condenser: Located outside the cold space (either on top of the cooler or somewhere remotely), the condenser releases the heat from that hot, high-pressure refrigerant, turning it back into a cool liquid.
- The Evaporator: Inside the cooler, the liquid refrigerant flows through the evaporator coils. As it absorbs heat from the air inside the box, it evaporates back into a gas, creating the cold air that chills your products.
This continuous cycle of compressing, condensing, and evaporating is what keeps your walk-in cooler at a stable, food-safe temperature. A well-maintained system ensures this process runs like clockwork, preventing temperature swings that could put your inventory at risk.
The Gateway: Doors and Access Features
A walk-in cooler door gets a ton of use and abuse, making it one of the most critical—and vulnerable—components. A poorly sealed or damaged door is like leaving a window wide open in an air-conditioned house; it forces the system to work overtime, wasting energy and money.
Modern walk-in cooler doors are designed for durability and efficiency with several key features:
- Self-Closing Hinges: These ensure the door closes automatically, preventing it from being accidentally left ajar and letting all that precious cold air escape.
- Heavy-Duty Gaskets: Magnetic gaskets create an airtight seal around the entire door frame, locking in the cold. A worn or cracked gasket is a major source of energy loss.
- Inside Safety Release: This is a non-negotiable safety feature. An ISR mechanism allows anyone inside the walk-in to open the door from the interior, even if it's locked from the outside.
These components aren't just for convenience; they are absolutely essential for safety and operational efficiency. Regularly checking your door for a proper seal and smooth operation is one of the easiest things you can do to keep your unit running at its best.
The Groundwork: Flooring Options
Finally, the floor of a walk-in cooler has to be built to handle heavy foot traffic, rolling carts, and the occasional spill. The right flooring provides a safe, durable surface that also adds to the unit's overall insulation. Standard options often include reinforced metal designed to handle significant weight without buckling.
Many units also feature NSF-approved coved corners, where the floor curves up to meet the wall panels. This smooth, seamless transition gets rid of those sharp 90-degree angles where dirt and bacteria love to hide, making cleaning much easier and improving overall sanitation. These seemingly small details are vital for maintaining a hygienic storage environment.
How To Select The Right Size And Temperature
Choosing the perfect walk-in cooler is part science, part foresight. Get it right, and your kitchen workflow will feel seamless. Get it wrong, and you could be staring down daily frustrations, wasted energy, and a purchase you regret. It’s a decision that directly impacts your efficiency, your utility bills, and your ability to grow.
This isn't about guesswork. It’s about having a clear framework to figure out the right size for your current inventory and future plans. At the same time, dialing in the correct temperature is an absolute must for keeping your products safe and top-quality.
Calculating Your Ideal Size
The most common mistake I see businesses make is underestimating how much space they really need. A walk-in that’s too small from day one creates immediate logistical nightmares. On the flip side, an oversized unit is just a drain on your capital and your energy bill. The goal is to find that sweet spot that serves you now and supports your future.
Start by looking at your inventory flow. How much product do you absolutely need to store during your busiest times? Think about the actual dimensions of your boxes, kegs, and containers. A good rule of thumb is to calculate your maximum storage volume and then add at least 20-30% more space.
That extra buffer is critical for a few reasons:
- Proper Airflow: Cramming a cooler full blocks airflow from the evaporator, which leads to hotspots and inconsistent cooling. That’s a recipe for spoiled products.
- Organization and Access: It gives you room for proper shelving and aisles, so your staff can find what they need quickly and safely without playing inventory Tetris.
- Future Growth: That buffer is your room to breathe. It lets you expand your menu, buy in larger quantities, or handle seasonal rushes without needing an immediate, and expensive, upgrade.
The key is to think five years ahead. A slightly larger investment now prevents the massive expense and disruption of replacing a too-small walk in cooler in just a few years.
Determining The Precise Temperature Range
Once you have a size in mind, the next critical decision is temperature. This isn't a one-size-fits-all setting; the perfect temperature depends entirely on what you're storing. Different products have vastly different needs to stay fresh and safe.
For example, fresh produce like leafy greens does best at around 34-38°F with a good amount of humidity. Dairy and meat, however, need a consistently colder environment—typically between 32-35°F—to slow bacterial growth and ensure safety. A walk-in dedicated to beer kegs? That’s often kept a bit warmer, somewhere around 36-40°F, to get that perfect pour.
You really can't overstate the importance of precise temperature control, especially in the food and pharmaceutical industries. A recent market analysis showed that the 20°F – 28°F range, ideal for highly perishable goods, held a huge 35% market share in 2023. This points to a clear industry trend: businesses are investing in specialized, accurate cooling to protect their inventory and operate more efficiently.
If you want to get into the weeds on specific settings for different products, our guide on the optimal walk in cooler temperature is a great resource to make sure you're making the safest choice.
To help you get started, here’s a quick guide matching business types to common sizing and temperature needs.
Walk-In Cooler Sizing and Temperature Guide
This table breaks down typical requirements for different types of businesses, helping you start the planning process with solid numbers in mind.
| Business Type | Typical Size Range (Sq. Ft.) | Recommended Temperature Range (°F) | Key Considerations |
|---|---|---|---|
| Small Café / Coffee Shop | 30 - 60 | 35 - 40°F | Storing milk, cream, syrups, and grab-and-go items. Focus on easy access. |
| Mid-Sized Restaurant | 60 - 150 | 34 - 38°F | A mix of produce, dairy, and prepped ingredients. Shelving organization is key. |
| Butcher Shop / Deli | 80 - 200 | 32 - 35°F | Critical for meat safety. Often requires separate coolers for raw and processed meats. |
| Brewery / Bar | 50 - 120 | 36 - 40°F | Primarily for kegs. Needs to be sized for keg dimensions and rotation. |
| Convenience Store | 100 - 300+ | 35 - 40°F | Bulk beverage and dairy storage. Often combined with glass display doors. |
| Catering Business | 100 - 250 | 34 - 38°F | Needs to accommodate large food pans, sheet trays, and bulk ingredients. |
Remember, these are just starting points. Your specific menu, delivery schedule, and growth plans will determine your final choice.
Factoring in Energy Efficiency
Your walk-in cooler will be running 24/7, making it one of the biggest energy hogs in your building. That's why thinking about its energy efficiency is just as important as its size and temperature. An efficient unit can literally save you thousands of dollars over its lifespan.
Look for models with high R-value insulation panels, energy-efficient fan motors for both the evaporator and condenser, and self-closing door mechanisms. These features all work together to keep the cold in and the heat out, reducing how hard the refrigeration system has to work. To keep things running smoothly, many of the same tips for keeping a fridge cool in hot weather can be adapted for your walk-in.
Making a smart investment in an energy-efficient walk-in cooler isn't just an upfront decision; it’s a long-term strategy that pays dividends on every utility bill.
Navigating Installation and Avoiding Common Mistakes

Buying a walk-in cooler is a major step, but the real make-or-break moment is the installation. The quality of the setup is what truly dictates your cooler's performance and efficiency for years to come. A flawless installation means your unit runs like a dream from day one. A rushed or sloppy job, on the other hand, can trigger a whole cascade of problems, from sky-high energy bills to premature equipment failure. This is one area where cutting corners just isn't an option.
Getting a handle on the key stages and potential pitfalls empowers you to oversee the process and make sure it’s done right. A professional installation isn't just about snapping panels together; it’s about creating a perfectly sealed, efficient, and safe cold storage environment. It’s the final step that protects your investment and ensures you get the reliable performance you paid for.
Preparing Your Site for Success
Long before the first panel is carried in, proper site prep sets the stage for a smooth installation. The single most important factor? A perfectly level floor. An uneven surface will prevent the panels from locking together tightly, creating tiny gaps that compromise the entire structure's integrity and insulation.
Think of it like building a house—a shaky foundation will cause problems all the way up to the roof. A professional installer will verify the site is level and secure before they even begin. Trust me, getting this step right prevents countless headaches down the road.
Another critical piece is airflow, especially for the condenser unit. Whether it's a self-contained or remote system, the condenser needs room to breathe. Boxing it into a tight, unventilated corner will cause it to overheat, forcing the entire refrigeration system to work much harder and dramatically increasing your energy costs.
The Three Most Costly Installation Mistakes
Even with a perfectly prepped site, a few common mistakes during assembly can completely undermine your new cooler's performance. Knowing what these are helps you ask the right questions and ensure your installation team is following best practices.
-
Improperly Sealed Panels: Every single seam—between the wall, ceiling, and floor panels—must be perfectly sealed. Even the tiniest gaps become major sources of air leaks, allowing warm, moist air to seep inside. This leads to condensation, ice buildup, and an overworked compressor, all of which waste energy and can damage your inventory.
-
Incorrect Electrical Work: A walk-in cooler is a powerful piece of equipment that requires its own dedicated electrical circuit. Overloading a circuit or using improper wiring isn't just a serious fire hazard; it can also fry the sensitive electronic components of the refrigeration system. Always, always make sure a licensed electrician handles this part of the job.
-
Poor Door and Gasket Fitting: The door is the most-used part of your cooler, and it's a huge potential point of failure. If it isn't hung perfectly level and the gaskets don't create an airtight seal, you're constantly losing cold air. A properly installed door should swing shut smoothly on its own and seal tightly without any gaps whatsoever.
A professional installation is the best insurance policy for your walk-in cooler. It prevents energy waste, protects against premature breakdowns, and ensures the unit operates at peak efficiency for its entire lifespan, saving you far more in the long run than any initial cost-cutting measures.
By understanding these critical points, you can confidently manage the installation process. Ensuring your site is prepared, the panels are sealed, the electrical work is sound, and the door is perfectly fitted will guarantee your walk-in cooler delivers reliable performance for years to come.
Protecting Your Investment with Proper Maintenance
A walk-in cooler is a serious piece of equipment and a major investment. But its real value isn’t just in the upfront cost—it’s in its ability to perform reliably, day in and day out, for years to come. The single best way to guarantee that performance is with consistent maintenance.
Think of it as a simple wellness plan for your cooler. A small commitment to a straightforward routine is what prevents those costly, middle-of-the-dinner-rush emergencies and keeps your whole operation humming along smoothly. This isn’t just about avoiding breakdowns; it’s about protecting your bottom line. A well-maintained walk-in uses less energy, keeps your valuable inventory from spoiling, and dramatically extends the life of its most important parts.
Your Essential Maintenance Checklist
Breaking down maintenance into a simple schedule makes it easy to stay on top of things. When you get your team involved, you create a culture of care that protects your equipment for the long haul. This checklist covers the most critical tasks to keep your cooler in peak condition.
Daily Tasks (Just 2 Minutes):
- Check and Log Temperatures: Make sure the unit is holding its set temperature. Any big swing is an early warning sign that something’s off.
- Listen for Unusual Noises: A new grinding, clanking, or buzzing sound often means a mechanical issue is brewing. Catching it early can save you a massive headache.
Weekly Tasks (10-15 Minutes):
- Inspect Door Seals: Take a close look at the gaskets for any cracks, tears, or brittleness. A bad seal is a huge energy waster, forcing your system to work way harder than it needs to.
- Test the Safety Release: This is a non-negotiable safety check. Make sure the internal safety release works perfectly every single time to keep your staff safe.
- Clear Debris and Spills: Keep the floor and the area around the cooler clean. It prevents odors, stops slips and falls, and just keeps things professional. For more detailed advice, you can check out our guide on how to maintain commercial refrigerators.
Monthly and Quarterly Deep Dives
While the daily and weekly checks are your first line of defense, some tasks need a bit more focus. These monthly and quarterly jobs are all about caring for the heart of your system, ensuring it can breathe and run efficiently.
A clean condenser coil can improve a refrigeration system's efficiency by up to 30%. Ignoring this simple task is like forcing the system to run a marathon while breathing through a straw—it leads to higher energy bills and potential burnout.
Monthly Tasks (20-30 Minutes):
- Clean Condenser and Evaporator Coils: Dust and grease act like a thick blanket on the coils, trapping heat and making the compressor work overtime. A gentle cleaning with a soft brush and coil cleaner makes a world of difference.
- Check and Clear Drain Lines: Clogged condensation lines can cause water to back up and ice to form where it shouldn’t. Make sure they’re clear and flowing freely.
These maintenance practices aren't just good advice; they're a key reason for the market's growth. Driven by strict food safety regulations, North America has become a leader in the walk-in cooler industry. In 2024, the region accounted for over 40% of global market revenue, with a market size of about USD 4.086 billion. You can discover more insights about the growth of the walk-in cooler market and see just how big a role proper upkeep plays.
Got Questions About Walk In Coolers? We’ve Got Answers
Even after covering the basics, a few specific questions usually pop up. It’s totally normal. Here are some clear, straightforward answers to the questions we hear most often from business owners thinking about a new walk-in.
Can I Just Install a Walk In Cooler Myself?
While the idea of saving a few bucks with a DIY installation is tempting, I strongly advise against it. Honestly, a professional setup is critical. You need to be absolutely sure every panel is perfectly sealed, the refrigeration system is charged just right, and all the electrical work is safe and up to code.
Little mistakes in these areas can snowball into big problems—major energy loss, premature equipment failure, and even serious safety hazards.
Hiring a certified technician isn’t just a cost; it’s protection for your investment. Proper installation is non-negotiable if you want long-term efficiency and want to avoid expensive repairs down the road. A pro makes sure your unit runs like a champ from day one.
How Much Energy Is This Thing Going to Use?
That’s the million-dollar question, and the answer really varies. Energy use depends heavily on the cooler's size, the quality of its insulation (that’s the R-value), how often the door is opened, and the efficiency of the refrigeration system itself. A modern, well-maintained walk-in cooler will always be significantly easier on your utility bill than an older model.
To keep costs down, always look for units with a high R-value, self-closing doors, and energy-efficient fan motors. Also, simple, regular maintenance—like keeping the condenser coils clean—can slash energy use by up to 30%. It’s one of the most effective ways to keep your bills in check.
What’s the Real Difference Between a Walk In Cooler and a Walk In Freezer?
The main difference comes down to one thing: operating temperature.
A walk-in cooler is designed to keep things chilly, typically holding a temperature between 32°F and 40°F. This is the sweet spot for preserving fresh produce, dairy, and drinks.
A walk-in freezer, on the other hand, operates way below freezing, usually at 0°F or lower. It’s built to keep items like meat and pre-made meals frozen solid for long-term storage. To achieve this, freezers need much thicker insulation and a more powerful refrigeration system to handle that intense temperature difference.
Ready to find the perfect walk-in cooler for your business? The Restaurant Warehouse offers a wide selection of top-quality units and flexible financing to fit your budget. Equip your kitchen for success and explore our collection today.
About The Author

Sean Kearney
Sean Kearney is the Founder of The Restaurant Warehouse, with 15 years of experience in the restaurant equipment industry and more than 30 years in ecommerce, beginning with Amazon.com. As an equipment distributor and supplier, Sean helps restaurant owners make confident purchasing decisions through clear pricing, practical guidance, and a more transparent online buying experience.
Connect with Sean on LinkedIn, Instagram, YouTube, or Facebook.