

The Ultimate 2025 Restaurant Kitchen Cleaning Checklist
A spotless restaurant kitchen is non-negotiable. It's the foundation of food safety, the key to passing health inspections with flying colors, and a critical component of operational efficiency. But with countless tasks, surfaces, and pieces of equipment demanding attention, simply "cleaning" isn't enough. A generic list won't cut it. To truly maintain a compliant and safe environment, you need a structured, time-based plan that covers every zone and prevents small issues from becoming major violations.
This definitive restaurant kitchen cleaning checklist is designed to be your operational blueprint. We move beyond basic wiping and sweeping to provide a clear roadmap organized by frequency: daily, weekly, and monthly. This systematic approach ensures that nothing is overlooked, from the daily sanitization of food prep surfaces to the deep monthly maintenance of your exhaust hood system and grease traps.
Following this guide will help you do more than just meet regulatory standards. It provides actionable steps to:
- Protect your customers and your reputation.
- Extend the life of your valuable, expensive equipment.
- Prevent pest infestations and cross-contamination.
- Build a lasting culture of cleanliness and professionalism among your staff.
Consider this your comprehensive resource for transforming the overwhelming job of kitchen maintenance into a series of manageable, scheduled tasks that guarantee a consistently immaculate and inspection-ready facility. Let's dive into the specifics for every area of your kitchen.
1. The Daily Duty Roster: High-Frequency Tasks for Constant Compliance
The daily duty roster forms the bedrock of a safe and sanitary restaurant kitchen. These are the non-negotiable, high-frequency tasks performed every day, often multiple times, to mitigate the immediate risks of cross-contamination and foodborne illnesses. Mastering this daily routine is the single most critical element of any restaurant kitchen cleaning checklist, as it ensures a baseline level of safety during service and prepares the kitchen for more intensive weekly and monthly deep cleans.
This foundational layer isn't just about mopping up at the end of the night; it's a continuous process integrated into the kitchen's workflow. It prevents minor messes from becoming major hazards and keeps health inspectors satisfied.
What to Include in Your Daily Roster
Your daily cleaning tasks should be broken down into three main categories: during service, closing, and opening. This structure ensures accountability and clarity for every shift.
-
Throughout the Shift (As Needed): These tasks prevent the buildup of bacteria and reduce slip-and-fall risks.
- Wipe and Sanitize Surfaces: Immediately clean and sanitize all food-contact surfaces (prep tables, cutting boards, line stations) after each use, especially after handling raw meat, poultry, or seafood.
- Clean Spills: Address spills on floors and counters instantly. Use designated "spill kits" with absorbent material and wet floor signs.
- Change Sanitizer Buckets: Replace sanitizer solutions in buckets at every station at least every two to four hours, or more frequently if they become visibly soiled. Test the concentration with test strips to ensure effectiveness.
- Wash Hands and Change Gloves: This is a constant requirement, especially when switching between tasks.
-
End-of-Day Closing Tasks: These actions reset the kitchen for a clean start the next day.
- Clean Cooking Equipment: Wipe down griddles, grills, ranges, and fryers. Empty and clean fryer baskets.
- Break Down and Clean Slicers/Mixers: Disassemble equipment according to manufacturer instructions, washing, rinsing, and sanitizing all components.
- Sweep and Mop Floors: Use a deck brush on grout lines and a degreasing floor cleaner.
- Empty and Sanitize Trash Cans: Take all trash to the dumpster and wash and sanitize the interior and exterior of all kitchen bins.
Implementation for Success
To effectively implement the daily roster, assign specific tasks to individual roles or team members using a checklist. For example, the line cook is responsible for their station's surfaces and equipment, while the prep cook handles slicers and mixers. A closing manager or shift lead should be responsible for verifying that all tasks on the restaurant kitchen cleaning checklist are completed and signed off on before the team leaves.
Key Insight: A digital checklist app or a laminated, wall-mounted chart can dramatically improve accountability. It creates a visual record of completed tasks and makes it easy for management to spot missed items before they become a problem. This simple system transforms a list of duties into an actionable, trackable process.
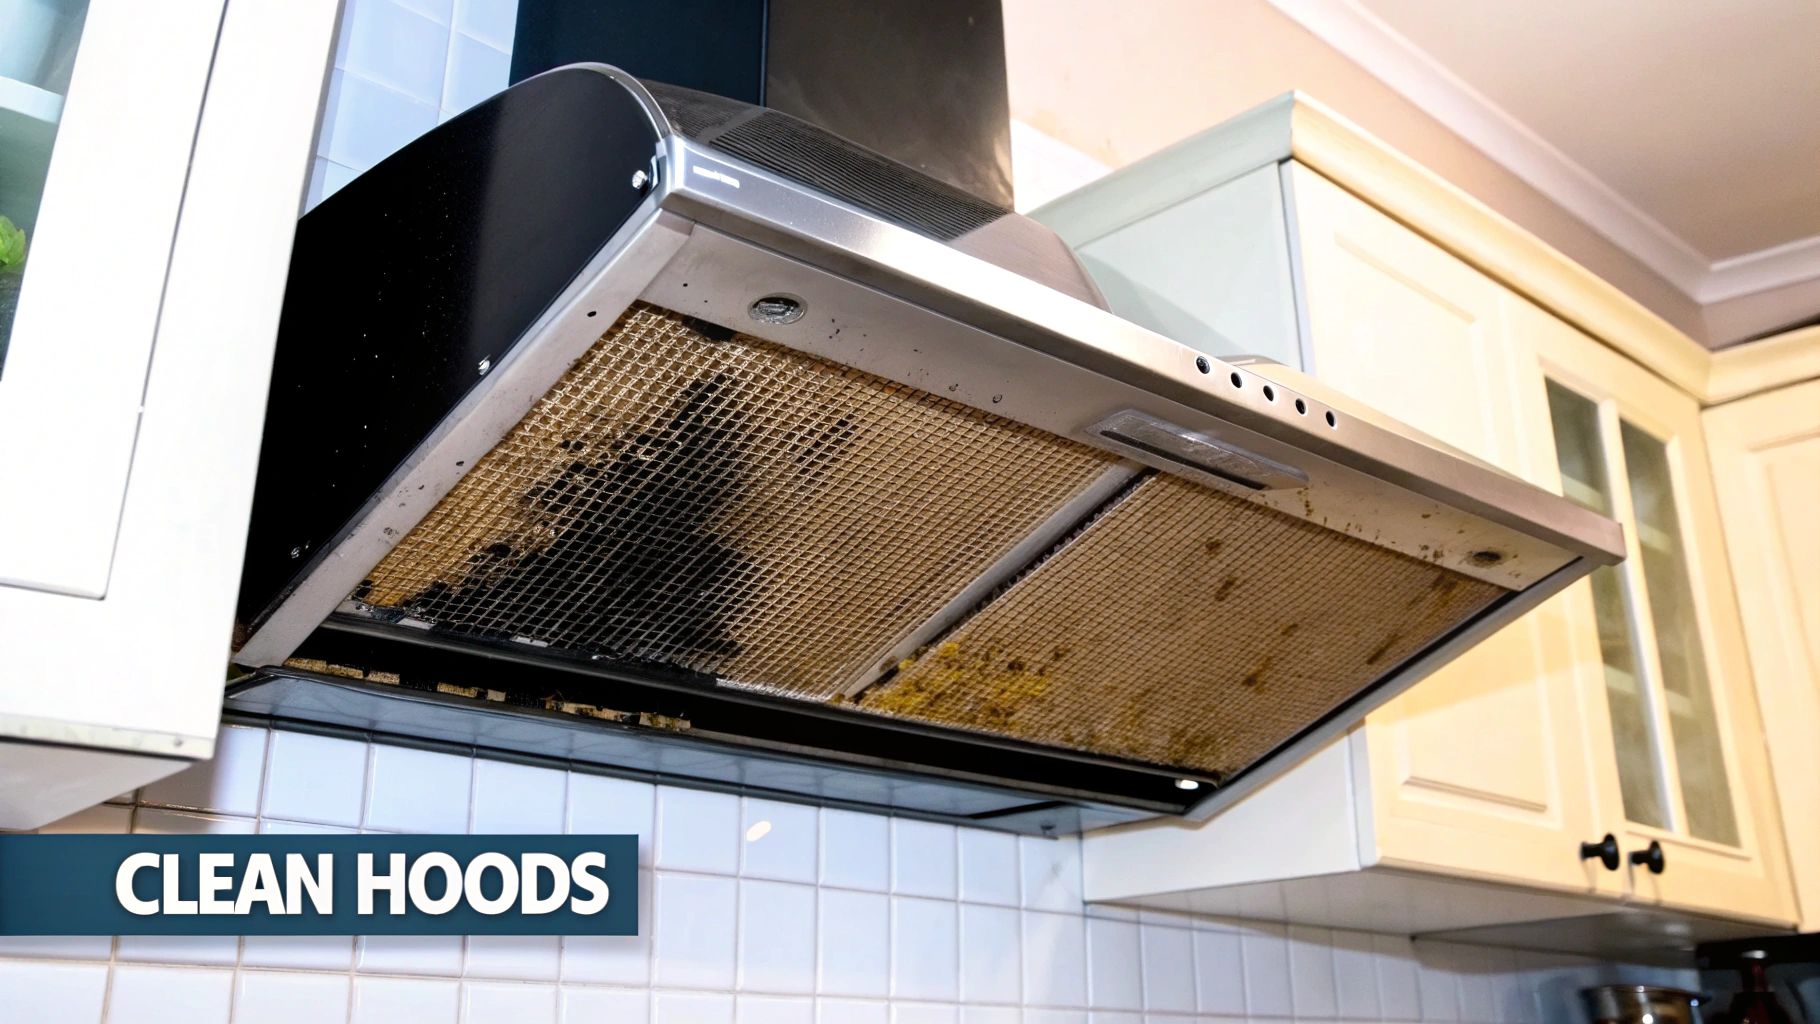
2. Exhaust Hood and Ventilation System Cleaning
Beyond daily surface sanitation, the exhaust hood and ventilation system represent a critical, often overlooked, fire and safety hazard. This system acts as the lungs of the kitchen, pulling grease, smoke, and heat away from the cooking line. Neglecting it allows for a dangerous accumulation of flammable grease residue, compromises air quality, and can lead to catastrophic fires. A thorough hood cleaning protocol is a non-negotiable part of any professional restaurant kitchen cleaning checklist and is mandated by fire codes.
Proper maintenance of this system is not just about cleaning; it is a fundamental safety requirement that protects your staff, your customers, and your investment. Regular, documented cleaning is essential for compliance with NFPA 96 standards and for maintaining your insurance policy.
What to Include in Your Hood & Ventilation Cleaning Plan
Your approach should combine daily staff maintenance with periodic professional deep cleaning. This two-tiered strategy ensures constant upkeep and addresses the less accessible parts of the system.
-
Daily/Weekly Staff Tasks: These tasks are focused on the most accessible components and prevent immediate grease buildup.
- Clean Hood Filters: Remove and clean baffle filters daily. This can be done by soaking them in a degreasing solution and running them through a high-temperature dishwasher.
- Wipe Down Interior/Exterior Surfaces: At the end of each day, wipe down all exposed surfaces of the hood canopy, both inside and out, with a certified food-safe degreaser.
- Empty and Clean Grease Traps: Check and empty the grease collection cups or trays. These can fill up quickly and become a spillage and fire hazard if ignored.
-
Quarterly/Semi-Annual Professional Cleaning: A certified professional is required for the parts of the system you cannot see or safely reach.
- Ductwork Cleaning: Professionals use specialized equipment to scrape and pressure wash the entire length of the ductwork, from the hood to the rooftop fan.
- Exhaust Fan Maintenance: This includes cleaning the fan blades, checking the belt, and ensuring the motor is functioning correctly.
- Plenum and Fire Suppression Links: Cleaning the area behind the filters (the plenum) and ensuring fire suppression system links and nozzles are free of grease buildup.
- Detailed Inspection and Certification: Reputable services like Hoodz or Facilitec provide a detailed report and a certification sticker, which is proof for fire marshals and insurance agents. For a deeper understanding of system types, you can explore this comprehensive commercial kitchen hood guide on therestaurantwarehouse.com.
Implementation for Success
Create a logbook to track daily and weekly filter cleaning, assigning the task to a specific closing-shift position. For professional services, schedule them well in advance, often based on cooking volume. High-volume steakhouse operations like Ruth's Chris may require quarterly services, while a small cafe might only need it semi-annually. In-N-Out Burger famously trains its staff to perform meticulous daily filter cleaning as a core part of its operations.
Key Insight: Always request before-and-after photos from your professional hood cleaning service. This documentation not only verifies the quality of the work but also serves as undeniable proof of compliance for insurance and health inspection purposes. It transforms a service expense into a documented, verifiable safety measure.
3. Walk-in Cooler and Freezer Deep Cleaning
The walk-in cooler and freezer are the hearts of your restaurant's food storage, making their cleanliness a critical factor in preventing foodborne illness and spoilage. A deep clean of these areas goes far beyond a quick daily sweep; it involves a systematic sanitization of every surface to eliminate hidden bacteria, mold, and mildew. Including this task in your restaurant kitchen cleaning checklist is essential for maintaining food safety, maximizing ingredient lifespan, and ensuring the operational efficiency of your refrigeration units.
Neglecting these critical storage zones can lead to cross-contamination, foul odors that can permeate food, and even pest infestations. A thorough, scheduled deep clean protects your inventory, your customers, and your reputation.
What to Include in Your Walk-in Deep Clean
This process should be scheduled weekly or bi-weekly, depending on your kitchen's volume. It requires emptying the unit, either section by section or entirely, to ensure no spot is missed.
-
Preparation and Emptying:
- Schedule During Low Inventory: Plan the deep clean for a time just before a large delivery arrives to minimize the amount of product that needs to be moved.
- Safely Store Food: Temporarily move all food items to another refrigerated unit. If one is not available, use insulated, food-safe containers to maintain temperature.
- Turn Off Unit (If Safe): For extensive cleaning, you can turn off the walk-in cooler to make cleaning easier and prevent ice buildup from an open door. Never turn off a freezer unless you can guarantee food safety.
-
Cleaning and Sanitizing Protocol:
- Remove and Clean Shelving: Take out all removable shelves and dunnage racks. Wash, rinse, and sanitize them outside the unit before allowing them to air dry completely.
- Wash Walls, Ceilings, and Floors: Use a food-safe degreaser and a deck brush to scrub all surfaces, paying special attention to corners and seams where grime accumulates. For freezers, use a low-temperature cleaner or a scraper to remove ice buildup first.
- Clean Fan Guards and Drains: Carefully wipe down fan guards to remove dust that can harbor mold. Clear floor drains of any debris to prevent clogs and standing water.
- Inspect and Clean Door Seals: Wipe down the rubber door gaskets (seals) and inspect them for cracks or tears, which can lead to energy loss and temperature fluctuations.
Implementation for Success
Create a rotating schedule where one walk-in or one section is deep cleaned each week. Assign this task to a specific team or individual to ensure consistency and accountability. Use a detailed checklist that includes checking temperatures before and after cleaning, inspecting door seals, and organizing products upon return using the First-In, First-Out (FIFO) method. For detailed maintenance guidance that complements cleaning, you can learn more about Atosa refrigerator and freezer maintenance instructions.
Key Insight: Use quaternary ammonium sanitizers, as many are effective in cold temperatures and are less corrosive to metal shelving than bleach-based solutions. Always check the manufacturer's label to ensure the cleaner is approved for food-contact surfaces and effective at the temperatures you're working in. This small detail ensures your cleaning efforts are genuinely sanitizing the environment.
4. Grease Trap Cleaning and Maintenance
Often out of sight and out of mind, the grease trap is an unsung hero of kitchen sanitation and environmental compliance. This critical piece of plumbing intercepts fats, oils, and grease (FOG) from wastewater before it enters the municipal sewer system, preventing catastrophic blockages, foul odors, and hefty fines. Overlooking this task can lead to sewer backups, business closures, and serious environmental violations, making it an essential, non-negotiable part of any restaurant kitchen cleaning checklist.
This component of your maintenance plan is less about daily aesthetics and more about long-term operational integrity. Proper grease trap management protects your plumbing, your community's infrastructure, and your restaurant's reputation. Ignoring it is a costly mistake waiting to happen.
What to Include in Your Grease Trap Protocol
Grease trap maintenance involves both regular staff actions and periodic professional servicing. The goal is to minimize FOG entering the trap and ensure the trap itself is cleaned before it reaches capacity.
-
Daily Staff Responsibilities: These tasks reduce the load on the grease interceptor.
- Scrape Plates: Train all staff, especially dishwashers, to thoroughly scrape all food waste and grease from plates, pans, and utensils into a solid waste bin before rinsing or washing.
- Proper Oil Disposal: Never pour used cooking oil down any drain. Collect it in a designated, sealed container for pickup by a certified recycling or rendering company.
- Use Drain Screens: Ensure all sink drains have fine-mesh screens to catch solid food particles, and empty them regularly throughout the day.
-
Scheduled Professional Cleaning: This is typically required by local health and wastewater authorities.
- Regular Pump-Outs: Contract with a licensed and certified waste hauler to pump out and clean the grease trap. The frequency depends on trap size, business volume, and local regulations, often ranging from every 30 to 90 days.
- Inspection and Reporting: The service provider should inspect the trap for damage (baffles, lids) and provide a manifest or report for your records. This documentation is your proof of compliance for health inspectors.
- Log Maintenance: Keep a detailed log of every cleaning service, including the date, the name of the service provider, and the amount of grease removed.
Implementation for Success
Success hinges on a two-pronged approach: consistent staff training and reliable professional partnerships. Educate your entire team on the "why" behind FOG management, explaining the severe consequences of pouring grease down drains. For professional servicing, vet companies carefully. For instance, many restaurant chains rely on specialized companies like Mahoney Environmental for scheduled servicing and used oil collection. This creates a predictable, compliant system.
Cities have strict rules; New York City, for example, mandates cleaning every 90 days, while Los Angeles requires the use of certified haulers for disposal. Check your local municipal codes to ensure your schedule meets legal requirements.
Key Insight: Never try to "clean" a grease trap by flushing it with hot water or chemical degreasers. This doesn't remove the grease; it just liquefies it, pushing the problem further down the sewer line where it will solidify and cause a much larger blockage. Instead, consider using bio-enzymatic treatments between professional cleanings to help break down accumulated FOG and control odors naturally.
5. Commercial Dishwasher Deep Cleaning and Descaling
Your commercial dishwasher is the unsung hero of sanitation, processing hundreds of dishes, glasses, and utensils daily. However, its effectiveness plummets without regular, intensive cleaning. A dedicated deep cleaning and descaling process is essential for removing mineral deposits, food debris, and chemical residue that can compromise sanitization, cause breakdowns, and lead to health code violations. This task on your restaurant kitchen cleaning checklist directly impacts food safety and the longevity of this expensive equipment.
Neglecting this critical maintenance allows limescale to insulate heating elements, preventing the water from reaching legally required sanitizing temperatures. Food particles can clog spray arms, resulting in poorly washed wares that still harbor dangerous bacteria. This process ensures every plate is not just visibly clean, but microbiologically safe.
What to Include in Your Dishwasher Protocol
A robust dishwasher cleaning protocol should include both daily tasks and a more intensive weekly or monthly deep clean, depending on water hardness and usage volume.
-
Daily Maintenance Tasks: These quick actions prevent major buildup.
- Drain and Clean Interior: At the end of each day, drain the machine completely. Remove the filter screens, scrap trays, and spray arms.
- Wash Components: Thoroughly wash all removed components to clear food soil and debris. Use a small brush to unclog any blocked nozzles on the spray arms.
- Wipe Down Interior and Exterior: Wipe the interior walls with a soft cloth. Clean the exterior, paying close attention to handles and control panels.
- Leave Door Ajar: Prop the door open overnight to allow the interior to air dry completely, preventing mold and mildew growth.
-
Weekly/Monthly Deep Cleaning and Descaling: This process tackles mineral buildup.
- Run a Cleaning Cycle: Use a manufacturer-approved deliming or descaling agent. Run the empty dishwasher through a full cycle as instructed by the chemical provider.
- Inspect and Detail Components: After the descaling cycle, perform a detailed inspection of all parts, including heating elements and wash pumps, for any remaining scale or wear.
- Calibrate and Verify Temperatures: Use a calibrated thermometer to check that the wash and final rinse temperatures meet health department standards (e.g., 160°F for wash, 180°F for final rinse in high-temp machines).
- Check Chemical Levels: Ensure detergent and sanitizer dispensers are full and dispensing correctly.
Implementation for Success
Create a log sheet kept near the dishwasher to document all cleaning and maintenance activities. Assign the daily cleaning to the closing dishwashing team and the weekly/monthly descaling to a shift lead or kitchen manager. This documentation is invaluable for troubleshooting and proves due diligence during health inspections. Equipment manufacturers like Hobart and Ecolab provide specific protocols that should be followed closely. For a deeper dive into selecting and maintaining your equipment, you can learn more about the complete commercial dishwasher guide.
Key Insight: Water hardness is your biggest variable. Test your water supply to determine its mineral content. Areas with hard water will require more frequent descaling (weekly), while those with soft water may only need it monthly. Adjusting your cleaning frequency based on local water conditions is key to preventing costly repairs and ensuring consistent sanitization.
6. Floor Cleaning and Sanitizing: The Groundwork for Safety
Kitchen floors bear the brunt of daily operations, from constant foot traffic to inevitable spills and splatters. A comprehensive floor cleaning and sanitizing process is more than just an end-of-night chore; it's a critical safety measure that prevents dangerous slip-and-fall accidents, controls pests, and eliminates a major breeding ground for bacteria. A meticulously maintained floor is a hallmark of a well-run kitchen and a non-negotiable part of any effective restaurant kitchen cleaning checklist.
This multi-step process goes beyond a simple sweep and mop, incorporating degreasing and sanitizing to tackle the unique challenges of a commercial kitchen environment. For high-volume operations like McDonald's, this involves strict protocols with color-coded mops, while fine-dining establishments often perform a deep scrub nightly to maintain pristine conditions.
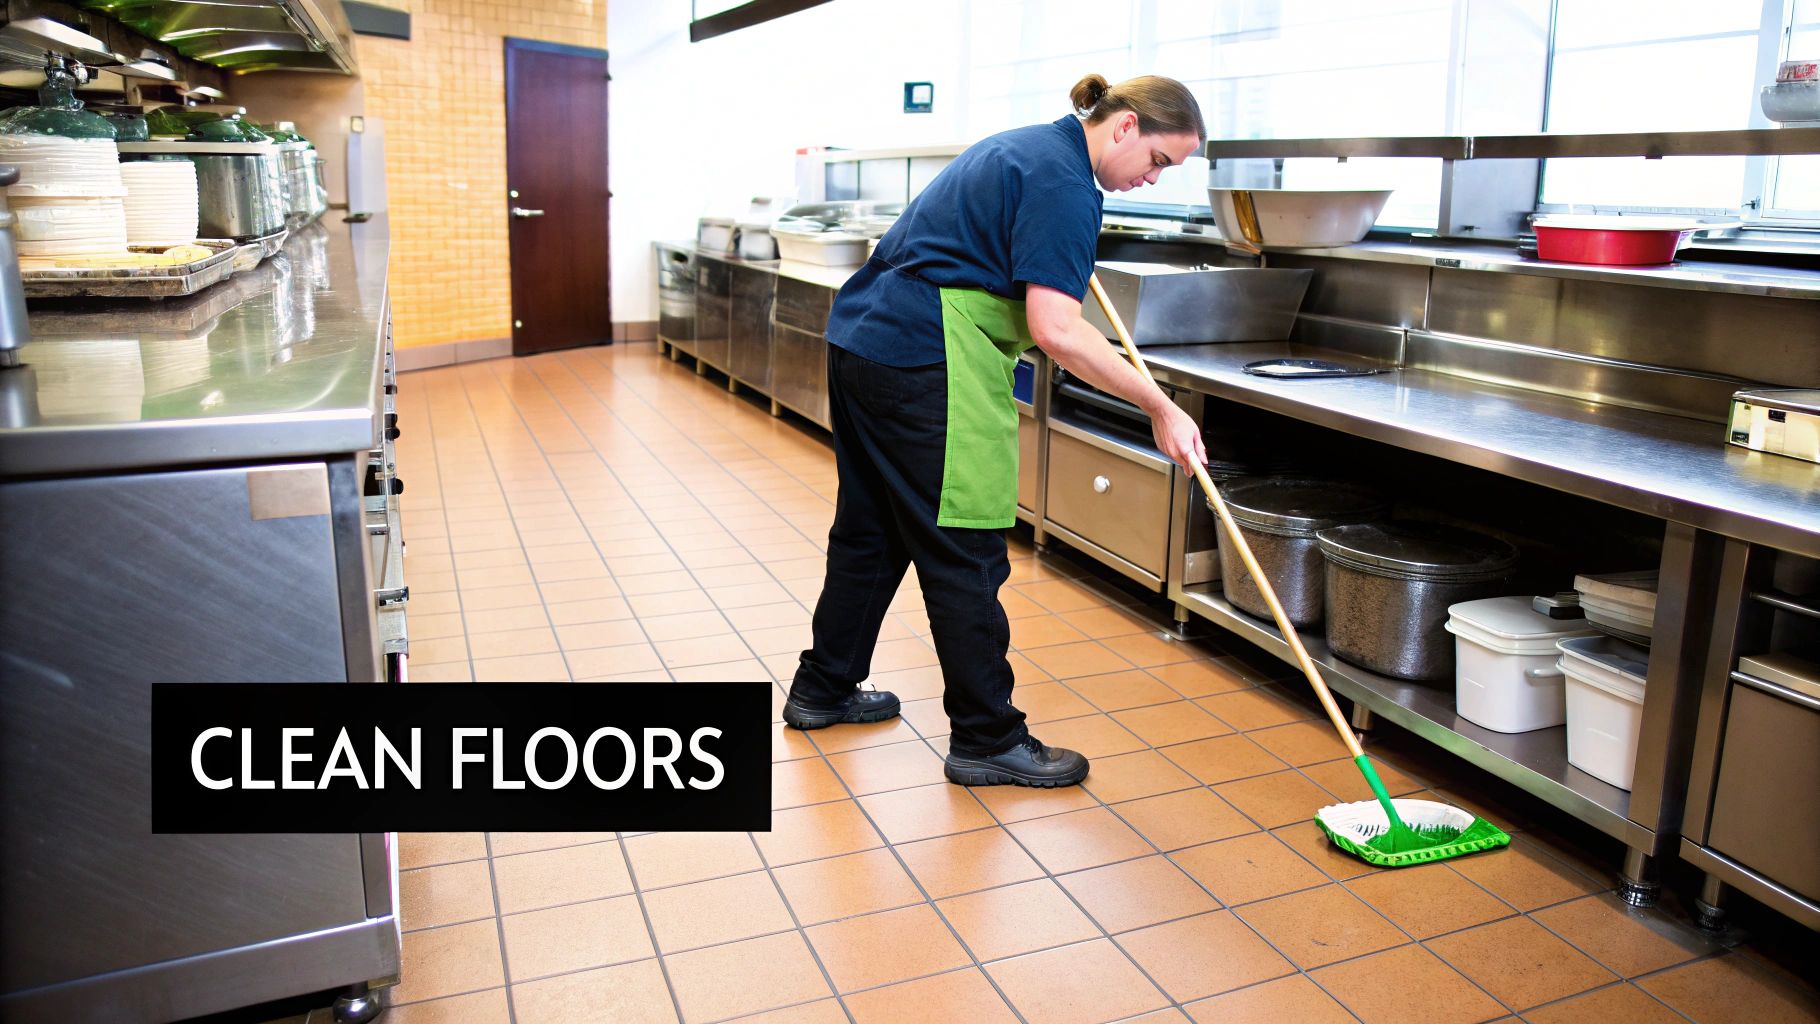
What to Include in Your Floor Cleaning Protocol
An effective floor cleaning procedure should be systematic and thorough, leaving no corner untouched. It must be performed at the end of every single business day after all other cleaning tasks are complete.
-
Initial Dry Sweep and Scraping: The first step is to remove all large, solid debris.
- Sweep Thoroughly: Use brooms and dustpans to gather all loose food particles, paper, and other debris. Pay special attention to areas under equipment, prep tables, and along walls.
- Scrape Caked-On Residue: Use a putty knife or floor scraper to gently remove any food or grease that has hardened and stuck to the floor surface.
- Remove Floor Mats: Take all rubber mats outside or to a designated wash area for separate, intensive cleaning with a deck brush and degreaser.
-
The Wet Cleaning and Degreasing Stage: This step tackles the slippery, hazardous layer of grease that builds up daily.
- Apply Degreasing Solution: Mix a commercial-grade floor degreaser with hot water according to the manufacturer's directions. Apply the solution liberally across the entire floor.
- Scrub the Floor: Use a stiff-bristled deck brush to vigorously scrub the entire floor, focusing on grout lines and high-traffic areas like the cook line and dish pit. This agitation is crucial for breaking down grease.
- Squeegee and Mop: Use a floor squeegee to pull all the dirty water and grease toward a floor drain. Follow up with a clean mop and hot water to rinse the floor of any remaining cleaning solution.
Implementation for Success
Consistency and proper technique are vital for floor safety. To ensure floors are cleaned correctly every time, assign this task to a specific closing team member or rotate it among the BOH staff. All staff involved must be trained on the correct chemical dilutions and the proper order of operations. Using separate, color-coded mops and buckets for the kitchen versus the front-of-house is a simple but highly effective way to prevent cross-contamination.
Key Insight: Always work from the farthest corner of the kitchen back toward the exit. This prevents re-contaminating areas you have just cleaned. Crucially, place "Wet Floor" signs at all entrances to the kitchen before you begin mopping and leave them in place until the floor is completely dry to prevent accidents. This simple C.Y.A. (Cover Your Assets) step is essential for liability and staff safety.
7. Equipment Cleaning and Sanitizing: The Mechanical Heart of Kitchen Hygiene
Beyond general surfaces, the systematic cleaning and sanitizing of kitchen equipment is a critical, non-negotiable component of any food safety program. Appliances like slicers, mixers, ovens, and fryers are the workhorses of the kitchen, but their complex parts and food-contact surfaces also make them prime locations for hidden bacteria and allergen cross-contamination. A detailed protocol for this task is a cornerstone of an effective restaurant kitchen cleaning checklist.
This process goes far beyond a simple surface wipe-down. It often requires disassembly, meticulous cleaning of individual components, and correct reassembly, all while adhering to manufacturer specifications and safety procedures. Proper equipment hygiene directly impacts food quality, extends the lifespan of expensive machinery, and is a major focus during health inspections.
What to Include in Your Equipment Cleaning Protocol
Your equipment cleaning schedule should be detailed and specific to each piece of machinery, with tasks divided by frequency. This ensures that high-contact items are addressed daily while more intensive deep cleans are performed regularly.
-
Daily Tasks (Post-Service): These tasks target equipment used frequently throughout the day.
- Break Down, Clean, and Sanitize Slicers/Mixers: Disassemble slicers and mixers as per manufacturer guidelines. Wash, rinse, and sanitize every removable part, including blades, guards, and bowls. Allow to air dry completely before reassembly.
- Clean Cooking Surfaces: Thoroughly clean griddles, grills, ranges, and flattops. Boil out deep fryers, filter the oil, and clean the fryer wells and baskets.
- Wipe Down Exterior Surfaces: Clean the exterior of all equipment, including ovens, microwaves, and holding cabinets, paying attention to handles, knobs, and control panels.
-
Weekly/Monthly Tasks (Deep Cleaning): These more intensive actions prevent long-term buildup and maintain performance.
- Delime Dishwashers and Ice Machines: Run a deliming cycle to remove mineral deposits that can harbor bacteria and reduce efficiency.
- Calibrate Ovens and Thermometers: Ensure temperature accuracy for food safety.
- Clean Behind and Underneath Equipment: Move movable equipment to clean the floors and walls behind it, removing grease and food debris.
- Disassemble and Clean Fryer Components: Go beyond the daily boil-out by thoroughly cleaning heating elements and drainage pipes.
Implementation for Success
Training is paramount for safe and effective equipment cleaning. Staff must be trained on the specific disassembly and cleaning procedures for each machine, as outlined by manufacturers like Rational or Vulcan. For potentially hazardous equipment like slicers or grinders, implement strict lockout/tagout procedures to prevent accidental activation during cleaning.
Documenting these activities in a dedicated log is crucial. This creates a record of compliance and helps troubleshoot maintenance issues. Chains like Subway, with their specific slicer cleaning mandates, and Starbucks, with daily espresso machine protocols, demonstrate how standardized procedures ensure consistency and safety across all locations.
Key Insight: Create equipment-specific "cleaning cards" for each major appliance. Laminate these cards, which should include step-by-step instructions with pictures, the required cleaning agents, and safety warnings. Attaching these directly to or near the equipment empowers any staff member to perform the task correctly and safely, turning manufacturer manuals into accessible, actionable guides.
7-Point Restaurant Kitchen Cleaning Checklist Comparison
| Item | Implementation Complexity 🔄 | Resource Requirements 💡 | Expected Outcomes 📊 | Ideal Use Cases 💡 | Key Advantages ⭐ |
|---|---|---|---|---|---|
| Deep Cleaning and Sanitizing Food Prep Surfaces | Moderate (multi-step, sanitizer contact times) | Multiple cleaning products and tools, trained staff | High reduction in pathogens, cross-contamination prevention | Food prep areas with raw and cooked foods | Prevents foodborne illness, mandatory for safety |
| Exhaust Hood and Ventilation System Cleaning | High (specialized equipment and safety) | Specialized degreasers, tools, professional services | Fire hazard prevention, improved air quality | Commercial kitchens with heavy cooking smoke and grease | Prevents grease fires, lowers insurance risk |
| Walk-in Cooler and Freezer Deep Cleaning | Moderate to High (temperature control challenges) | Food-safe low-temp cleaners, cold chain management | Prevents spoilage, pest infestations, maintains efficiency | Refrigerated storage areas, vulnerable food storage | Maintains food safety, reduces energy costs |
| Grease Trap Cleaning and Maintenance | Moderate (messy, regulatory compliance) | Specialized tools, proper waste disposal, trained staff | Prevents sewer backups, lowers plumbing costs | Operations with grease-producing kitchens | Environmental compliance, odor control |
| Commercial Dishwasher Deep Cleaning and Descaling | Moderate (technical knowledge needed) | Specific chemicals, inspection tools | Ensures sanitization, extends equipment life | High-volume dishwashing operations | Maintains health code compliance, saves repairs |
| Floor Cleaning and Sanitizing | Moderate (multi-step, safety required) | Multiple cleaning products, safety gear | Slip hazard reduction, pest deterrence | All kitchen floors, high-traffic areas | Enhances workplace safety, regulatory required |
| Equipment Cleaning and Sanitizing | High (complex, equipment-specific) | Specialized cleaning agents, disassembly tools | Prevents cross-contamination, maintains equipment | All kitchen appliances and equipment | Extends equipment life, maintains food quality |
Integrating Your Checklist: From Paper to Practice
Navigating the extensive list of cleaning duties, from deep cleaning food prep surfaces to maintaining your grease trap, can feel overwhelming. However, a comprehensive restaurant kitchen cleaning checklist is not merely a set of instructions; it is the blueprint for operational excellence, food safety, and long-term success. The true power of this guide is unlocked when you move it from a static document into a dynamic, living system embedded within your kitchen's daily rhythm. The difference between a kitchen that simply meets standards and one that truly excels lies in consistent, detail-oriented implementation.
This detailed breakdown of daily, weekly, and monthly tasks for every critical zone, from the exhaust hood system down to the floor drains, provides the foundation. Now, the crucial work begins: transforming this knowledge into ingrained habits for your entire team.
From Checklist to Culture: Making Cleanliness a Core Value
A checklist on a clipboard is passive. A cleaning culture is active, self-sustaining, and contagious. The goal is to evolve beyond simply telling staff what to clean and instead cultivate an environment where every team member understands why it matters and takes personal ownership of their role in the process.
Actionable Steps for Successful Implementation:
- Assign and Delegate with Clarity: Don't leave tasks open to interpretation. Assign specific duties from your restaurant kitchen cleaning checklist to specific roles or individuals. For example, the closing line cook is always responsible for cleaning the flattop and fryers, while the lead prep cook oversees the weekly walk-in cooler organization. This eliminates confusion and creates direct accountability.
- Integrate into Daily Workflows: Weave cleaning tasks directly into your opening, shift change, and closing procedures. Instead of being a separate, dreaded activity, cleaning becomes a natural part of the operational flow. For instance, "Wipe and sanitize all prep surfaces" should be a non-negotiable step before and after any new food preparation begins.
- Visible and Accessible Checklists: Print, laminate, and post your daily and weekly checklists in their relevant zones. The dish pit should have its own list for the commercial dishwasher. The prep station should have its list for surfaces and smallwares. This constant visual reinforcement makes it impossible for staff to say they "didn't know" and empowers them to stay on track.
Key Insight: The ultimate goal is to create a system so robust that cleanliness becomes a reflex, not a chore. When your team instinctively reaches for a sanitized cloth or addresses a small spill immediately, you have successfully built a culture of excellence.
The Ripple Effect of a Pristine Kitchen
Mastering your kitchen cleaning protocol is not just about passing health inspections, although that is a critical benefit. The value extends far beyond compliance, creating a positive ripple effect throughout your entire operation. A meticulously maintained kitchen directly impacts everything from your finances to your brand reputation.
Broader Benefits of a Systematized Approach:
- Enhanced Food Safety: This is the most significant benefit. A systematic cleaning schedule drastically reduces the risk of cross-contamination and foodborne illnesses, protecting your customers and your business from catastrophic liability.
- Improved Staff Morale and Efficiency: No one enjoys working in a dirty, disorganized environment. A clean kitchen is a safer, more pleasant, and more efficient workspace, which can boost morale, reduce employee turnover, and improve productivity.
- Extended Equipment Lifespan: Regular cleaning and maintenance of expensive equipment like combi ovens, dishwashers, and ventilation systems prevent grease buildup and mechanical failures. This saves you thousands of dollars in costly repairs and premature replacements.
- Solidified Brand Reputation: In the age of online reviews, a reputation for cleanliness is priceless. Customers associate a clean dining room and spotless open kitchen with high-quality food and professional management, building trust and encouraging repeat business.
Your restaurant kitchen cleaning checklist is your primary tool for building this foundation of success. Use it not as a rigid rulebook but as a customizable guide. Adapt it to your specific layout, menu, and equipment. Review and refine it with your team quarterly. By embracing this document as an essential component of your operational strategy, you are making a clear statement about your commitment to quality, safety, and excellence. A clean kitchen isn't an expense; it's an investment in the health of your customers, the well-being of your staff, and the enduring legacy of your brand.
Equipping your team for success starts with having the right tools for the job. For all your commercial-grade cleaning supplies, sanitizers, and durable kitchen equipment that makes following your restaurant kitchen cleaning checklist easier, visit The Restaurant Warehouse. We provide the high-quality, reliable products you need to maintain a spotless kitchen and uphold the highest standards of safety and excellence.
About The Author

Sean Kearney
Sean Kearney is the Founder of The Restaurant Warehouse, with 15 years of experience in the restaurant equipment industry and more than 30 years in ecommerce, beginning with Amazon.com. As an equipment distributor and supplier, Sean helps restaurant owners make confident purchasing decisions through clear pricing, practical guidance, and a more transparent online buying experience.
Connect with Sean on LinkedIn, Instagram, YouTube, or Facebook.