

A Practical Guide to Cleaning Restaurant Equipment
Having a solid system for cleaning restaurant equipment isn't just about passing the next health inspection—it's a core part of running a smart, profitable restaurant. This process isn't a one-and-done deal; it's a constant rhythm of daily, weekly, and monthly tasks, each with its own specific procedures and cleaning agents. Getting this right directly impacts your food safety, how long your expensive equipment lasts, and your overall bottom line.
Why a Clean Kitchen Is Your Greatest Asset

Let's be real—a meticulously clean kitchen is the engine that drives a successful restaurant. It’s about more than just appeasing the health inspector; it’s an operational standard that translates directly into financial stability and growth.
When you invest in a serious program for cleaning restaurant equipment, you’re not just scrubbing down surfaces. You’re making a strategic business decision that pays off in big ways. It's your best defense against foodborne illness, protecting both your customers and the reputation you've worked so hard to build.
Boost Efficiency and Protect Your Investments
Consistent cleaning does more than just sanitize; it prevents the slow, expensive death of your machinery. We've all seen it: grease buildup, caked-on food particles, and mineral deposits force equipment to work harder, suck up more energy, and break down way too soon. A degreased fryer heats oil more efficiently. A clean oven holds its temperature accurately.
Think of it like this: neglecting your equipment is like driving a car and never changing the oil. Sure, it'll run for a while, but a catastrophic—and expensive—failure is just around the corner. Regular cleaning is preventative maintenance.
A well-maintained piece of equipment not only lasts longer but also produces a better, more consistent product. Food cooked on a clean griddle simply tastes better than food cooked on a carbon-caked surface, eliminating flavor transfer and ensuring even cooking.
This renewed focus on hygiene is a huge deal. The commercial kitchen cleaning services market, recently valued at around USD 385.7 million, is expected to skyrocket to USD 732.15 million by 2033. This isn't just a trend; it's a response to stricter safety regulations and a greater awareness of contamination risks.
Making Cleaning Part of Your Kitchen's DNA
Building a culture of cleanliness takes more than just hanging a checklist on the wall. It’s about getting every single team member to understand their role and why it matters.
For some outside perspective on what goes into keeping a commercial space spotless, this general commercial cleaning checklist offers some useful insights that apply beyond just the kitchen.
Developing these habits from day one ensures your kitchen is always ready for service. A great starting point is to check out our comprehensive commercial kitchen cleaning tips to help you build a solid foundation. https://therestaurantwarehouse.com/blogs/restaurant-equipment/commercial-kitchen-cleaning-tips
Ultimately, investing time and effort into cleanliness pays you back in spades—better food quality, higher staff morale, happier customers, and a healthier bottom line.
Restaurant Cleaning Schedule At-a-Glance
To help you get organized, it's useful to break down your cleaning tasks by how often they need to happen. Having a clear schedule ensures nothing falls through the cracks and that your kitchen stays in top shape.
| Frequency | Key Equipment & Areas | Primary Goal |
|---|---|---|
| After Each Shift / Daily | Griddles, grills, fryers, slicers, prep surfaces, floors | Prevent immediate cross-contamination and grease buildup. |
| Weekly | Ovens, walk-in coolers, sinks, drains, microwaves | Tackle slower-building grime and sanitize less-used areas. |
| Monthly | Ice machines, freezer coils, exhaust hoods, walls | Deep clean and perform preventative maintenance on key systems. |
| Annually / As Needed | Behind equipment lines, pilot lights, professional hood cleaning | Perform major deep cleaning and essential safety checks. |
This table provides a high-level overview, but remember to tailor your specific checklists to the equipment you use and your kitchen's unique workflow. A consistent routine is your best tool for maintaining a safe and efficient kitchen.
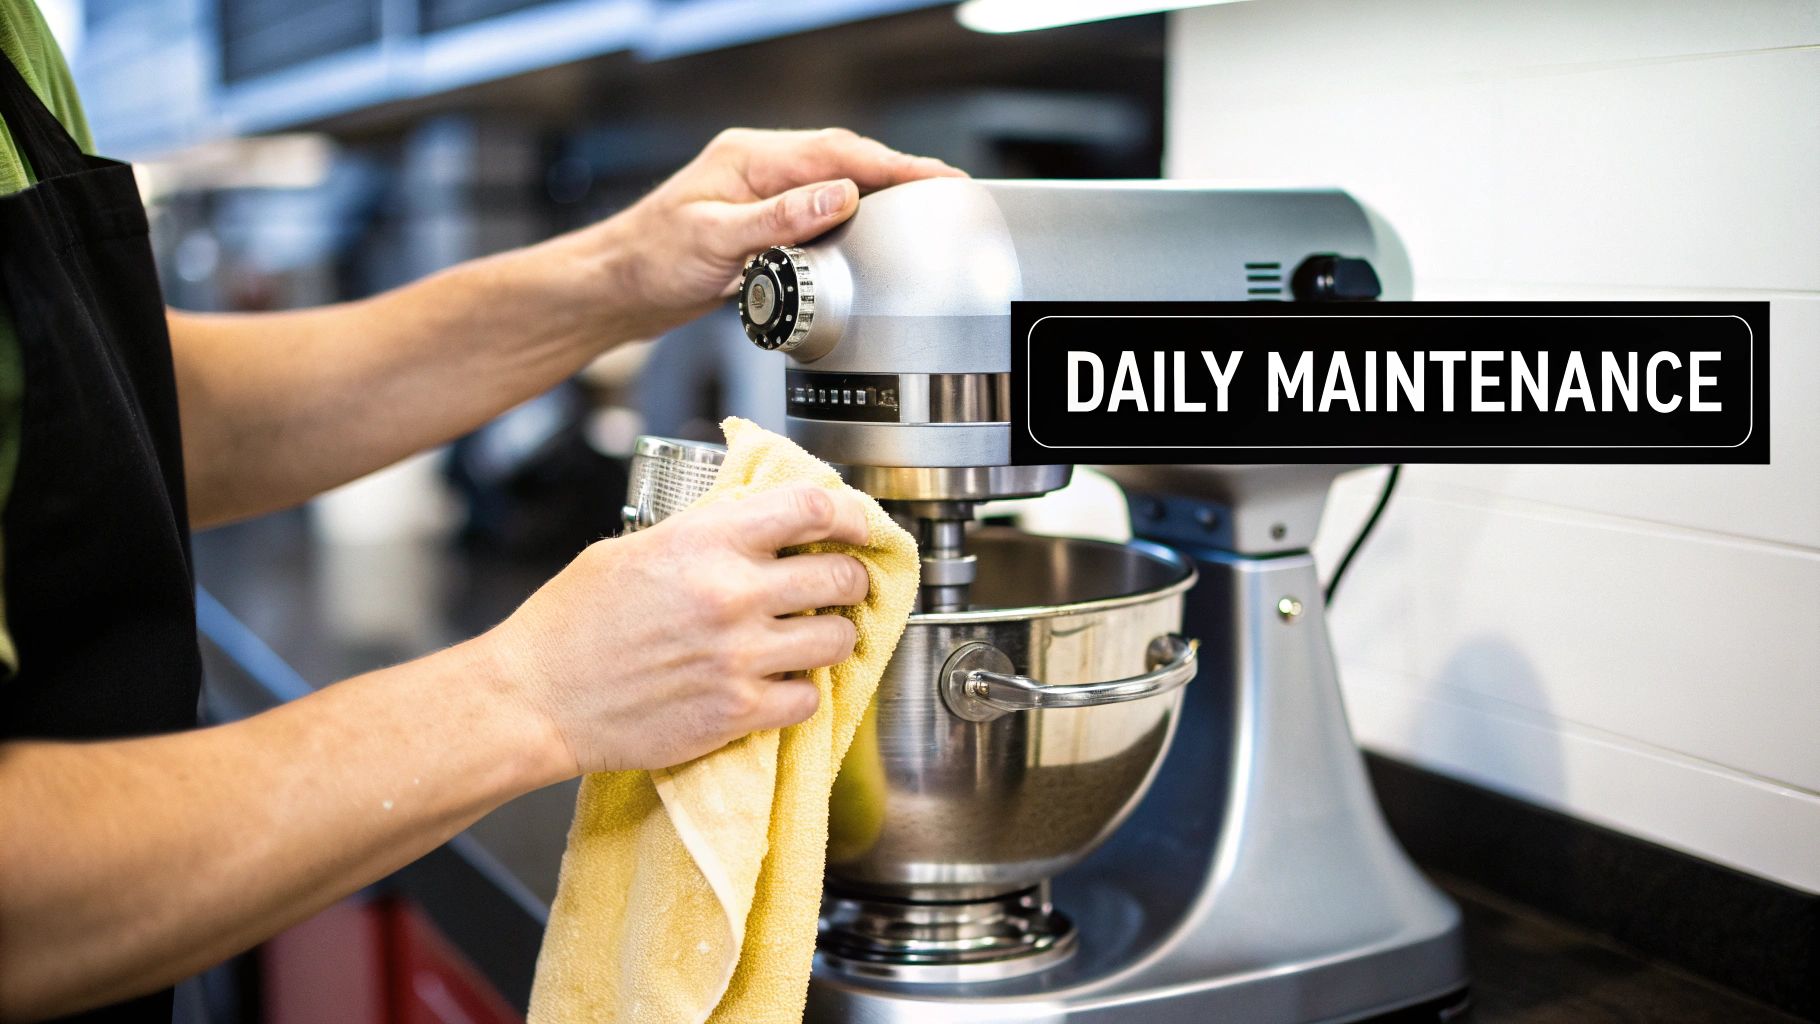
Your Daily Cleaning Playbook for High-Use Equipment
The daily grind in a restaurant kitchen is relentless, and your high-use equipment definitely bears the brunt of it. Grills, flattops, fryers, and slicers are the front-line soldiers of your operation. Taking care of them every day isn't just a chore; it's a critical process that ensures food safety, keeps flavors clean and consistent, and helps you dodge costly breakdowns.
A "clean-as-you-go" mindset, combined with a solid end-of-shift routine, is what separates a smooth-running kitchen from a chaotic one. This isn't about some generic checklist. It's about mastering the specific techniques for each piece of gear. Knowing the little details—like why you should never dump ice on a hot griddle—is the key to extending the life of these valuable assets.
Tackling Grills and Flattops
Your griddle is likely a workhorse, and its surface material dictates the entire cleaning process. Whether you have a classic steel, a sleek chrome, or a modern composite plate, the goal is always the same: get rid of food debris and grease without damaging that precious cooking surface.
For the common steel griddle, the process really starts while it's still warm, somewhere around 300-350°F.
- First, grab a griddle scraper and get off any large debris.
- Carefully pour some room-temperature water onto the surface. This helps loosen any remaining grime, which you can then scrape into the grease trough.
- Finally, apply a thin layer of oil and use a griddle brick, rubbing with the grain of the metal to polish the surface. This re-seasons the griddle, getting it ready for the next service.
A quick but crucial tip: never, ever use a griddle brick on a chrome surface. It will cause permanent damage. This daily cleaning prevents that nasty, carbonized grease from building up, which can create hot spots, mess with your food's taste, and tank your cooking efficiency.
Perfecting Fryer and Slicer Sanitation
Deep fryers and meat slicers are high-risk areas for cross-contamination if they aren't handled with extreme care. For these pieces of equipment, proper daily cleaning is absolutely non-negotiable.
For Your Deep Fryer: After service, once the oil has cooled to a safe temperature, it's time to filter. Filtering the oil every single day removes those tiny food particles that burn and degrade the oil's quality. This simple step saves you a surprising amount of money and dramatically improves the taste of your fried foods. Don't forget to wipe down all the exterior surfaces, the backsplash, and the fryer baskets with a good degreaser.
For a complete walkthrough, you can find our essential daily cleaning guide for commercial fryers to make sure you're hitting every step. https://therestaurantwarehouse.com/blogs/restaurant-equipment/essential-daily-cleaning-guide-for-commercial-fryers
For Your Meat Slicer: A slicer needs to be completely broken down and sanitized daily. Start by unplugging the machine. Then, remove the blade guard, product tray, and the blade itself (always using cut-resistant gloves). Wash, rinse, and sanitize each of these components individually. Finally, wipe down the entire body of the slicer with a food-safe sanitizer and let all the parts air dry completely before you put it back together.
A critical yet often overlooked step is cleaning behind the blade. Food particles can easily get trapped here, creating a serious breeding ground for bacteria. This small detail is a cornerstone of responsible slicer sanitation.
Maintaining Prep Counters and Surfaces
Stainless steel prep counters are the unsung heroes of any kitchen. While they're incredibly durable, they require specific care to stay sanitary and look their best. The secret is to always clean with the grain of the steel. This helps you avoid creating tiny scratches where bacteria love to hide.
For daily wipe-downs, use a mild detergent and a soft cloth or a non-abrasive pad. If you have some stuck-on food, a plastic scraper is your best bet. Always finish with a food-safe sanitizer, making sure you let it sit for the proper contact time specified by the manufacturer before wiping it dry or letting it air dry.
The value of this equipment is immense, not just to your restaurant but to the entire industry. The global foodservice equipment market, which includes all these essential items, was recently valued at USD 4.6 billion. It's projected to climb to USD 7.3 billion by 2035, highlighting just how central well-maintained, clean equipment is to the industry's success. You can learn more about the foodservice equipment market findings on futuremarketinsights.com to see the bigger picture.
Making these daily cleaning habits part of your kitchen's DNA is a direct investment in your future, safeguarding your operations one shift at a time.
Mastering the Weekly Deep Clean
While your daily wipe-downs are essential for keeping the kitchen moving, the weekly deep clean is where you truly win the long game. This is your dedicated time to go after the grime that builds up slowly and perform the kind of preventative maintenance that keeps equipment from failing and prevents serious hygiene problems from taking root.
Think of it as a necessary reset for your most critical assets. These weekly rituals for cleaning restaurant equipment aren't just about looking clean; they're about functioning cleanly, ensuring everything from your ovens to your walk-ins operates at peak efficiency. This is how you protect your major investments.
Restoring Your Convection Ovens
Your convection oven is a kitchen powerhouse, but its performance depends on more than just the heating element. A weekly deep clean is absolutely crucial for maintaining consistent cooking temperatures and keeping your energy bills in check.
First, take a close look at the door gaskets. Food bits and grease love to bake onto these seals, causing them to get brittle and eventually fail. A bad gasket means heat is escaping, forcing the oven to work overtime and guzzle more energy. Give the gaskets a gentle scrub with a soft brush and a mild detergent, then wipe them clean. It’s a simple task that can make a huge difference in your oven's performance and the gasket's lifespan.
Next, it's time to tackle the interior. Pull out the racks so you can give them a good soak and scrub separately. Then, get to work on any spills or carbon buildup on the oven walls. A non-abrasive pad paired with a commercial oven cleaner is your best bet for those stubborn, baked-on spots.
Pro Tip: Whatever you do, never spray cleaner directly onto the convection fan or the heating elements. Apply the cleaner to a cloth first and then carefully wipe down the surfaces. This simple precaution prevents damage to sensitive electrical parts and will help your oven last for years.
Finally, if your restaurant is in an area with hard water, running a weekly or bi-weekly delimeing cycle for your combi-ovens is non-negotiable. Limescale buildup can clog up water lines and spray nozzles, crippling the steam function and bringing a key piece of equipment to a standstill.
Safeguarding Walk-In Coolers and Freezers
Your walk-in units are the heart of your inventory system. How clean they are directly impacts food safety and can make or break your spoilage rates. A weekly deep clean is your best defense against mold and mildew, which can easily thrive in those cool, damp conditions.
Start by emptying the shelves, tackling one section at a time. This gives you a chance to inspect all your inventory and toss anything that's expired or spoiled. Once a section is clear, it's time for a thorough cleaning:
- Wash and Sanitize: Get scrubbing. Use a food-safe detergent on all shelves and walls, then rinse everything well. Follow that up with a sanitizer, making sure to leave it on for the proper contact time before wiping it dry.
- Check and Clear Drain Lines: The condensate drain line is a magnet for slime and mold. If it gets clogged, you’ll end up with water pooling on the floor—a huge slip hazard. Flush the line weekly with hot water or a specialized drain cleaner to keep it clear.
- Sweep and Mop Floors: Debris on the walk-in floor gets tracked all over the kitchen. Finish the job with a thorough sweep and a mop using a good sanitizer.
Getting these tasks organized into a consistent routine is what makes it all work. To build a system that sticks, you can use our restaurant kitchen cleaning checklist as a great starting point for your own weekly schedule. https://therestaurantwarehouse.com/blogs/restaurant-equipment/restaurant-kitchen-cleaning-checklist
Winning the Battle for Clean Floors
Kitchen floors face a relentless assault from grease, spills, and non-stop foot traffic. A weekly deep degreasing isn't just about appearances; it's a fundamental part of kitchen hygiene and safety. Pay special attention to high-traffic areas, especially the lanes around the fry station and the main cookline.
Use a high-quality, commercial-grade degreaser and let it sit for several minutes to really break down the built-up grease. Then, grab a stiff-bristled deck brush and give the tile and grout a vigorous scrub. Squeegee the dirty solution towards a floor drain and rinse with clean water. This process tackles the slippery film that daily mopping just can't touch, drastically cutting down the risk of slips and falls.
The demand for professional cleaning is on the rise, with the restaurant cleaning services market projected to grow from USD 7.5 billion to USD 12.5 billion by 2033. A big piece of this growth is in floor care, where new tech is making a real difference. For instance, AI-powered robotic floor scrubbers are becoming more common, offering a way to maintain floor hygiene consistently with less labor. You can explore the full report on restaurant cleaning services at verifiedmarketreports.com for a deeper dive into these trends.
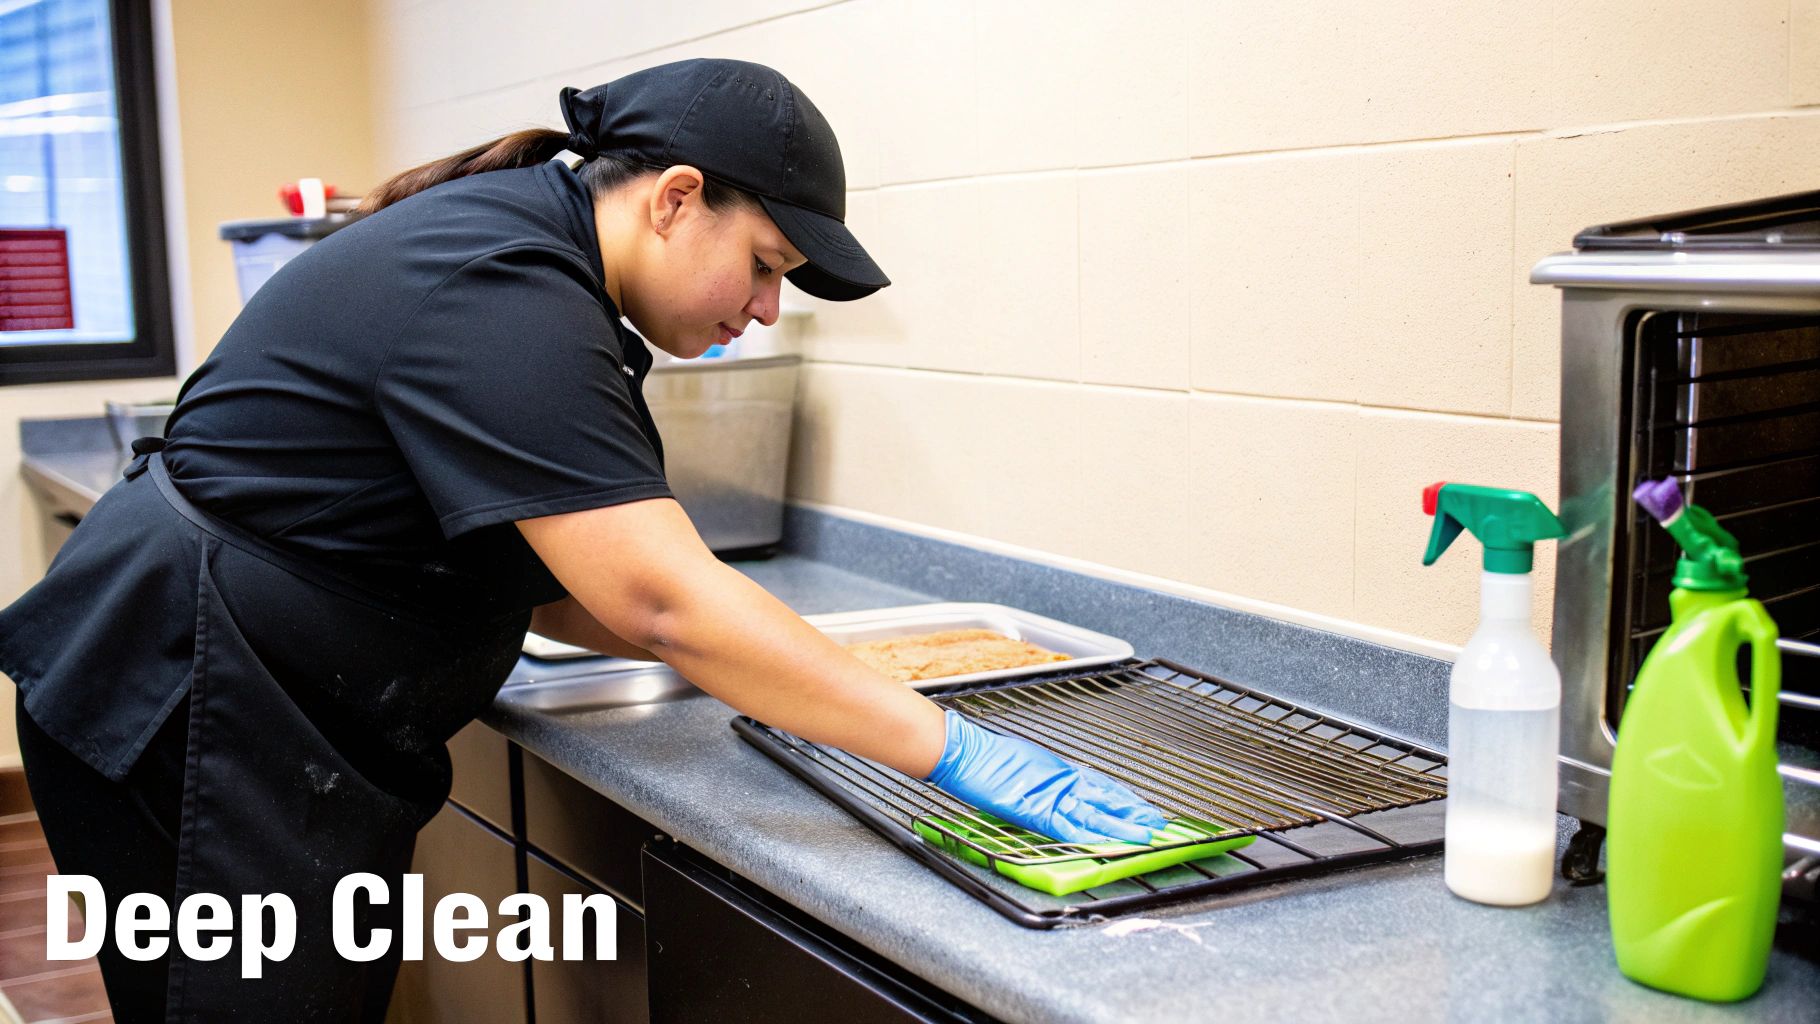
Getting to the Grime: Monthly and Big-Ticket Cleaning Jobs
Daily and weekly wipe-downs are great for handling the surface-level stuff, but your monthly and periodic cleaning tasks are what really save you from equipment breakdowns and serious safety issues. This is the deep-clean, heavy-duty work that hits the spots you might not see every day but are absolutely critical. Getting these procedures right is what protects your biggest investments from an early grave and keeps your kitchen running smoothly for the long haul.
These bigger jobs are where you'll see the most dramatic improvement in kitchen hygiene. Just look at how a multi-layered cleaning plan comes together to knock down bacteria levels.
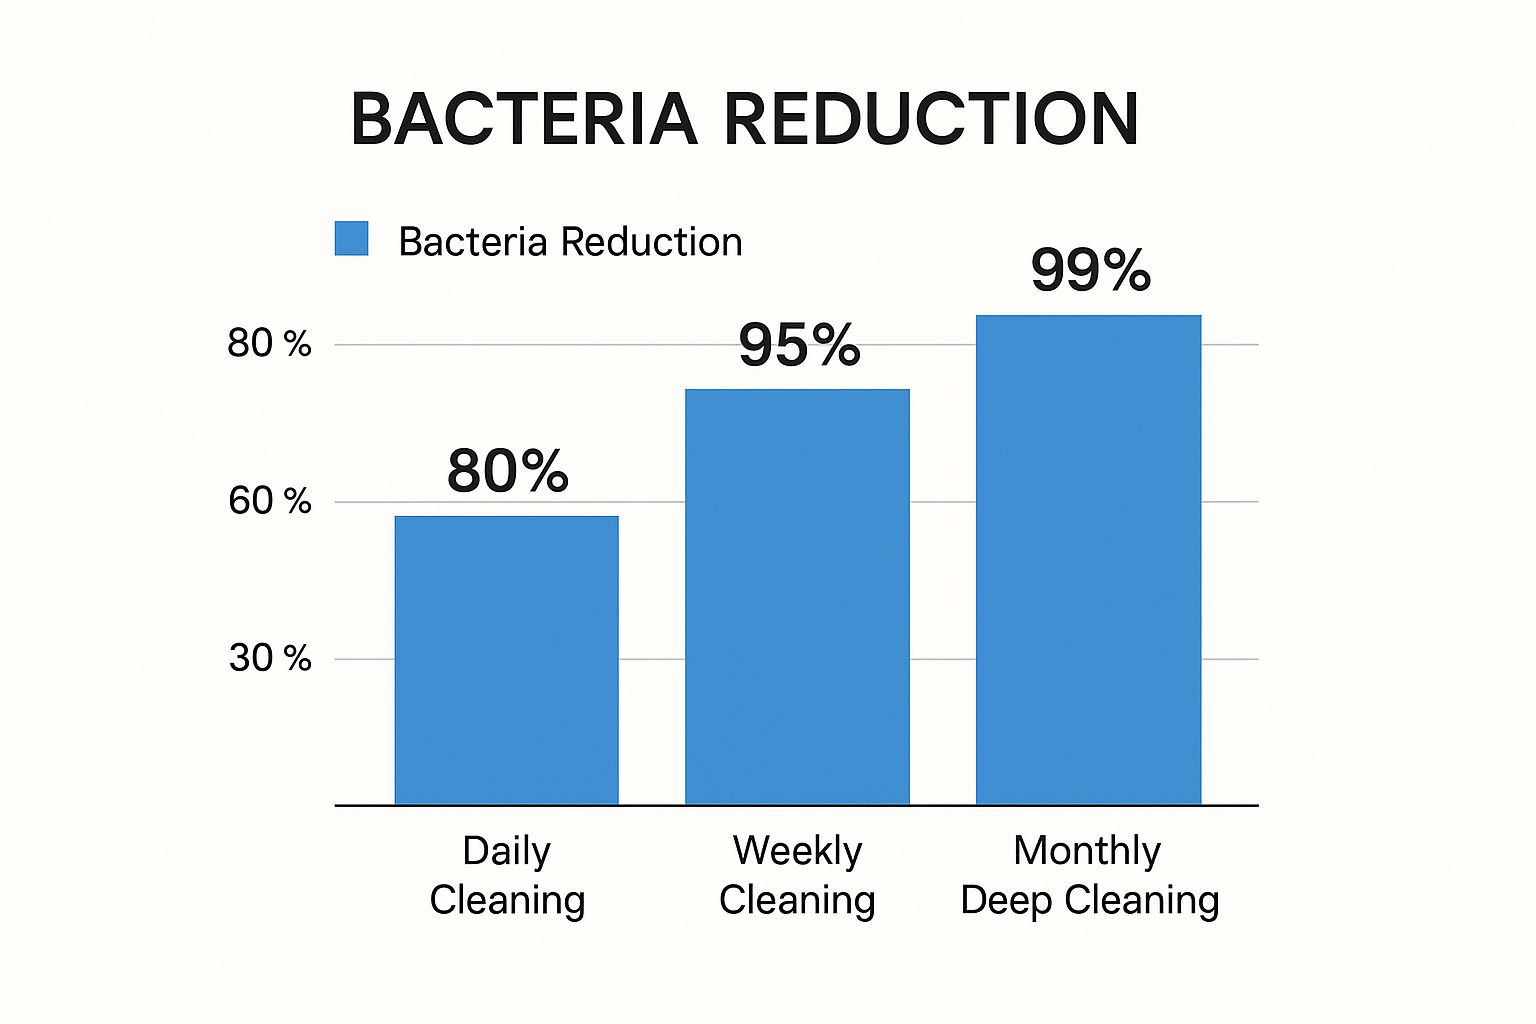
As you can see, the daily and weekly cleanups make a difference, but it's that monthly deep clean that really gets the job done, hitting a 99% reduction in bacteria. It’s clear proof that less frequent but more intense cleaning is essential for a truly sanitary kitchen.
Servicing Your Exhaust Hood and Grease Trap
Your exhaust hood and grease trap are two of the most critical areas to maintain, mostly because of the serious fire risk from grease buildup. A hood thick with grease is just waiting for a spark. That's why professional cleaning is often required by law and your insurance, usually on a quarterly or semi-annual schedule, depending on how much frying you do.
Even with the pros coming in, you should be doing your own monthly checks. Take a look at the baffle filters—you can pull these out and run them through the dishwasher or let them soak in a good degreaser. Give all the reachable surfaces of the hood, inside and out, a solid wipe-down to stop any gross drips.
For the grease trap, regular professional pumping (typically every 1-3 months) is something you just can't skip. It’s the only way to prevent nasty clogs, foul smells, and—worst of all—sewage backing up into your kitchen.
Deep Cleaning Your Dishwasher
Your commercial dishwasher is a sanitation beast, but it can't do its job if it's dirty. Over time, limescale, caked-on food bits, and chemical gunk can build up, making it less effective and leaving your dishes looking dull.
A monthly deep clean is a must. Start by turning off the power and unplugging the machine. Drain it completely, then pull out the spray arms, scrap trays, and curtain. Scrub each of these parts on their own with a deliming solution or a stiff brush and degreaser.
Next, get inside the machine. Use a good deliming agent to break down mineral deposits, focusing on the heating elements and wash jets. Clear any gunk from the drain, put all the parts back, and run an empty cycle to flush everything out. This regular maintenance ensures your machine hits those crucial sanitizing temperatures and keeps running like a champ.
A classic rookie mistake is forgetting about the wash arms. If those little jet holes get clogged with food or limescale, your water pressure tanks. Dishes on the outer edges of the rack won't get cleaned or sanitized properly. Keeping those jets clear is a simple step, but it’s absolutely vital.
Purging Your Ice Machine
This is one of the most overlooked pieces of equipment, but an ice machine can quickly become a breeding ground for slime, mold, and bacteria if you neglect it. This kind of contamination is a direct health risk to your customers. You should perform a full cleaning and sanitizing cycle at least every six months, but a quick monthly check-up is a smart move.
Here's the rundown:
- Empty all the ice out of the bin and shut off the machine’s water and power.
- Take out all the removable parts you can, like the water curtain, distribution tube, and ice thickness sensor.
- Wash these components with a nickel-safe ice machine cleaner, then rinse them really well.
- Run a cleaning cycle using the solution your manufacturer recommends, and then follow it up with a sanitizing cycle.
- Wipe down the entire inside of the storage bin with a sanitizer and let it air dry completely before turning it back on.
This process ensures the ice you're serving is clean, safe, and doesn't have any funky tastes or smells. If you skip this, you're not just risking a health code violation; you're putting your restaurant's reputation on the line.
When choosing your cleaning supplies, it’s crucial to match the agent to the equipment. Using the wrong chemical can damage surfaces or be ineffective. Here’s a quick guide to help you choose the right tool for the job.
Recommended Cleaning Agents for Restaurant Equipment
| Cleaning Agent | Best For | Avoid Using On | Key Benefit |
|---|---|---|---|
| Alkaline Cleaners | Baked-on grease, carbon buildup on ovens, grills, and fryer surfaces. | Aluminum, painted surfaces, soft metals. | Powerfully cuts through tough, cooked-on grease and organic soil. |
| Acidic Cleaners | Removing mineral deposits, limescale, and rust from dishwashers, steamers. | Natural stone (marble), concrete, colored grout. | Excellent at dissolving inorganic deposits (aka "deliming"). |
| All-Purpose Cleaner | General surface cleaning on stainless steel, countertops, floors, walls. | Specialized equipment requiring specific pH. | Versatile and safe for most everyday cleaning tasks. |
| Degreasers | Exhaust hoods, filters, backsplashes, and greasy floors. | Non-greasy surfaces (it's overkill). | Specifically formulated to break down and dissolve heavy grease buildup. |
| Glass Cleaner | Display cases, sneeze guards, windows, and glass doors. | Electronic screens, finished wood. | Provides a streak-free shine for customer-facing transparent surfaces. |
Ultimately, having a solid arsenal of cleaners and knowing when to use each one is just as important as the cleaning schedule itself. These periodic tasks are the backbone of a kitchen that's not just clean, but safe, efficient, and built to last.
Building a Culture of Cleanliness with Your Team
You can have the most detailed cleaning schedules in the world and stock the best supplies, but none of it matters if your team isn't on board. A truly sparkling kitchen doesn’t happen because one manager is a stickler for rules; it’s the result of everyone sharing a sense of responsibility. This is where we move past just handing out checklists for cleaning restaurant equipment and start building a real, lasting culture of cleanliness.
It all starts with training that actually explains the why behind the work. When a new line cook understands that a properly cleaned flattop prevents flavors from bleeding into the next dish and creates a perfect sear, the task stops being a chore. Suddenly, it's part of the craft of cooking.
Training That Truly Sticks
Your training has to be hands-on and practical. Let's be honest, nobody learns how to properly break down and sanitize a meat slicer by reading a binder. Good training sessions need to be something you can see, do, and repeat.
Think visually. A laminated guide with photos showing each step of the ice machine cleaning process, taped right to the machine itself, is a thousand times more effective than a paragraph buried in a manual. These visual aids are absolute lifesavers during a slammed service or for getting new hires up to speed. They take the guesswork out of the equation and set a clear standard for everyone.
For example, when training someone on fryer maintenance, don't just tell them to filter the oil. Show them how to safely operate the hot filtering machine. Point to the exact filters that need changing and explain how doing this every day can double the oil's lifespan, which directly saves the restaurant money. When you connect tasks to real results, you build buy-in.
A huge mistake I see in kitchen training is a lack of follow-up. It’s not enough to tell someone to do something; you need a system to make sure it was done right. This isn't about micromanaging—it's about holding the line on your standards and offering feedback.
A simple sign-off sheet where the closing manager or shift lead does a quick final walkthrough can work wonders. This five-minute check confirms that critical jobs, like sanitizing prep surfaces or cleaning every part of the slicer, were actually completed correctly. It’s also the perfect moment for immediate, constructive feedback if a step was missed.
Fostering Ownership and Motivation
Getting your team to take personal ownership of cleanliness is about more than just instructions; it’s about motivation. And one of the best motivators? Pride.
Try creating "station ownership." The grill cook is responsible for the condition of the grill. The prep cook owns the state of their worktables and the slicer. This simple shift in mindset fosters a sense of personal accountability. When a team member feels like a piece of equipment is theirs to maintain, their attention to detail just naturally goes up.
Here are a few ways to build that sense of ownership:
- Lead by Example: If the manager won't grab a brush to scrub a stubborn spot, why would anyone else want to? When leadership jumps in and helps clean, it sends a powerful message: this matters, and we’re all in this together.
- Provide the Right Tools: Nothing crushes motivation faster than being asked to do a tough job with bad tools. Make sure your team has sharp scrapers, clean cloths, full spray bottles of the right chemicals, and proper personal protective equipment (PPE).
- Recognize and Reward: A little appreciation goes a long way. A simple, "Hey, the walk-in looks fantastic, great job today," can be a huge morale booster. Some kitchens even have a little friendly competition for the cleanest station of the week.
Creating a System That Lasts
At the end of the day, a strong culture of cleanliness makes everyone's job easier and less stressful. It cuts down on the need for constant supervision because the team starts holding itself and each other accountable. The standards become part of the daily rhythm, not just a list of rules that have to be enforced.
This kind of system is built on clear communication, consistent reinforcement, and leading from the front. When every single person on your team understands their role in keeping the kitchen spotless, the whole process of cleaning restaurant equipment changes. It shifts from a dreaded chore to a shared professional standard. That's the foundation of a kitchen that isn't just clean, but is also safe, efficient, and ready to put out amazing food.
Got Cleaning Questions? We’ve Got Answers.
Even with the best daily, weekly, and monthly cleaning checklists, some questions always seem to pop up. Running a kitchen means facing tricky situations and unique messes every day. Getting a straight, practical answer can save you a ton of time, prevent expensive mistakes, and make sure your sanitation game is truly on point.
Let's dive into some of the most common questions I hear from restaurant managers and owners.
How Often Should I Hire Professional Cleaners?
Relying solely on your in-house team isn't always enough. While your staff is perfect for handling the day-to-day and week-to-week grind, some jobs demand specialized expertise and equipment to meet safety and legal standards.
Think of it this way: your team handles the routine maintenance, but pros perform the major overhauls.
- Exhaust Hoods: This one is non-negotiable. Professional hood cleaning is required by fire codes like NFPA 96 to prevent dangerous grease fires. Depending on how much you cook, this needs to be done anywhere from quarterly to annually.
- Grease Traps: To dodge foul odors, nasty clogs, and serious health hazards, your grease trap needs professional service every 1 to 3 months.
- Full Kitchen Deep Clean: It’s a smart move to bring in a professional service once or twice a year. They have the tools and know-how to tackle those hard-to-reach spots your team might miss—like behind heavy equipment lines—effectively hitting the reset button on your kitchen's hygiene.
What Are the Most Common Cleaning Mistakes to Avoid?
It's surprisingly easy for simple errors to undo all your hard work or even cause permanent damage to your expensive gear. Just being aware of these common slip-ups is the first step toward preventing them in your own kitchen.
The biggest mistake I see? Using the wrong tool for the job. Pouring a harsh, abrasive chemical on a delicate stainless steel surface can leave it with permanent scratches and pitting. In the same way, taking a wire brush to a non-stick coating will ruin it instantly.
Another frequent problem is inconsistent scheduling. When cleaning tasks are only done "when someone has time," they're really tasks that get forgotten. This leads to a gradual but serious buildup of grime. Finally, a critical safety mistake is forgetting to unplug electrical equipment before cleaning. It’s a simple step that prevents serious injury.
One of the most counterproductive mistakes is improper rinsing and sanitizing. If you leave chemical residue behind, it can taint your food. And if a surface isn't properly sanitized for the required contact time, bacteria can regrow almost immediately, making the whole effort pointless.
Are Eco-Friendly Cleaning Products Actually Effective?
Absolutely. The world of "green" cleaning has come a long way. Many modern eco-friendly products are just as powerful as their traditional chemical counterparts, offering a fantastic way to boost your restaurant's sustainability without sacrificing cleaning muscle.
When you’re shopping for them, look for certifications from trusted names like Green Seal or the EPA's Safer Choice program. These labels guarantee the products use plant-based solvents, are biodegradable, and meet strict performance standards. For anything that will touch a food-prep surface, just double-check that it’s certified as food-safe.
Just remember, "green" doesn't mean "no training needed." Your staff still has to learn the ropes, as dilution ratios and contact times can be different from the chemicals they're used to.
What’s the Best Way to Get Rid of Baked-On Grease?
Tackling that stubborn, carbonized grease is a real battle. It takes more than a quick wipe-down; you need a smart combination of heat, chemistry, and a little elbow grease to win.
Start by gently warming up the equipment. This helps loosen the grime's death grip on the metal. Next, apply a commercial-grade degreaser or a specialized carbon remover, and let it sit for the time recommended on the label. Patience is your best friend here.
Once the chemical has worked its magic, use a non-abrasive tool like a grill brick or a sturdy plastic scraper to lift off the softened gunk. For those incredibly stubborn spots that just won't budge, a simple paste of baking soda and water left on overnight can work wonders. Always finish the job by rinsing the surface thoroughly with clean water and then hitting it with a food-safe sanitizer.
Whether you're setting up a new kitchen or upgrading your current one, having the right equipment is the first step toward building a clean and efficient operation. The Restaurant Warehouse offers a massive selection of commercial-grade ovens, refrigeration, worktables, and everything in between to help you succeed. Equip your team with reliable, easy-to-clean gear and explore flexible financing options to get started today.
About The Author

Sean Kearney
Sean Kearney used to work at Amazon.com and started The Restaurant Warehouse. He has more than 10 years of experience in restaurant equipment and supplies. He graduated from the University of Washington in 1993. He earned a BA in business and marketing. He also played linebacker for the Huskies football team. He helps restaurants find equipment at a fair price and offers financing options. You can connect with Sean on LinkedIn or Facebook.
Leave a comment