

A Complete Guide to Buying and Sizing Walk In Coolers
Walk-in coolers are more than just big refrigerators; they are the command center for your entire inventory. Think of them as the unsung hero of your kitchen—the central hub that quietly protects your ingredients, ensures food safety, and keeps your operations running smoothly. For any commercial kitchen, this isn't just a piece of equipment; it's a cornerstone investment in quality and profitability.
The Critical Role of Walk-In Coolers in Your Kitchen

Beyond simple cold storage, your walk-in cooler is the heart of your kitchen's preservation system. It's the silent partner working around the clock to protect your most valuable assets: your ingredients. For any foodservice business, from a bustling restaurant to a high-volume catering company, getting this piece of equipment right is absolutely fundamental to your success.
The main job of a walk-in cooler is to hold a precise, stable temperature. This is crucial for stopping bacterial growth and meeting food safety compliance. A well-maintained unit keeps everything from fresh produce to dairy and meats locked in the safe zone, drastically cutting down the risk of spoilage and foodborne illness. That reliability protects your customers, and it protects your reputation.
More Than Just a Cold Box
Beyond safety, these units are vital for your operational workflow and profitability. Having ample storage space lets you take advantage of bulk purchasing, which means better pricing and fewer deliveries interrupting your day. This organized, accessible storage streamlines kitchen prep, minimizes food waste, and makes sure your team always has the ingredients they need, right when they need them.
Investing in the right walk-in cooler isn't just an expense; it's a strategic move that directly supports:
- Inventory Quality: Holding onto the freshness, flavor, and texture of your ingredients for much longer.
- Operational Efficiency: Cutting down on clutter in the kitchen and making inventory management faster and simpler.
- Financial Health: Lowering food costs through smart bulk buying and minimizing losses from spoilage.
The demand for these systems is growing, and for good reason. The global market for walk-in cooler equipment was valued at USD 4.868 billion in 2024 and is expected to hit USD 7.672 billion by 2035, with North America leading the charge. To get a better sense of this trend, you can explore the full report on Market Research Future. This guide is here to help you navigate the important decisions ahead and make the right choice for your operation.
How to Choose the Right Size and Capacity
Picking the right size for your walk-in cooler is one of the most important calls you'll make, and it’s about a lot more than just measuring floor space. Think of it like packing for a long trip. If the suitcase is too small, you’re leaving essentials behind. If it’s too big, you’re just lugging around empty space. The goal is to hit that sweet spot between what you need today and where your business is headed tomorrow.
An undersized cooler quickly turns into a nightmare of cramped storage, bad airflow, and spoiled food, forcing you into more frequent and costly deliveries. On the flip side, an oversized unit is a constant energy hog, burning cash every month to cool empty air. Getting the size right from the start is an investment in both your daily efficiency and your long-term profitability.
Calculating Your Required Storage Volume
First things first, let’s move past thinking in square feet and start talking cubic feet. A solid rule of thumb for most foodservice spots is to plan for about 28-30 pounds of food storage per cubic foot. This gives you a realistic baseline for how much product your cooler can actually hold.
To get started, you’ll need to take a hard look at a few key parts of your operation:
- Menu Complexity: How deep does your menu go? A restaurant juggling fresh seafood, produce, and different proteins is going to need way more cold storage than a small café that focuses on coffee and pastries.
- Delivery Frequency: Are you getting drops daily, or just a couple of times a week? Fewer deliveries mean you’re holding more inventory at once, which demands a bigger cooler.
- Inventory Turnover: How fast do you burn through ingredients? High-turnover items might not sit long, but anything you buy in bulk—from proteins to produce—needs a place to live.
Figuring out these details will help you paint a much clearer picture of your ideal storage volume. For a deeper dive, our guide on determining commercial refrigerator and freezer space can help you refine these calculations for your specific business.
A Quick Sizing Guide for Different Businesses
To give you a head start, we've put together a reference table. This isn't a substitute for doing your own math, but it provides a great starting point based on what we typically see in the industry.
| Walk In Cooler Sizing Guide by Business Type | |||
|---|---|---|---|
| Business Type | Typical Daily Covers/Volume | Estimated Cooler Size (sq. ft.) | Key Considerations |
| Small Café / Coffee Shop | 50-100 Covers | 25 - 40 sq. ft. | Primarily for milk, cream, sandwiches, and pastries. Limited bulk storage needed. |
| Quick-Service Restaurant (QSR) | 200-400 Covers | 50 - 80 sq. ft. | High turnover of prepped ingredients. Needs space for both produce and proteins. |
| Casual Dining / Family Restaurant | 150-300 Covers | 80 - 120 sq. ft. | Diverse menu requires organized storage for various food categories. Space for bulk purchases is key. |
| Fine Dining Restaurant | 75-150 Covers | 100 - 150 sq. ft. | Requires space for high-value proteins, specialty produce, and delicate ingredients. Organization is critical. |
| Bar / Tavern | 100-200 Covers | 40 - 60 sq. ft. | Primarily for kegs, bottled beverages, and bar fruit/mixers. Less food inventory. |
| Catering Operation | Varies (by event size) | 120 - 200+ sq. ft. | Needs significant space for bulk ingredients, prepped items, and finished dishes. Flexibility is crucial. |
Use this table to get a ballpark idea of where you might land, then fine-tune it based on your menu, delivery schedule, and growth plans. Every operation is unique, so what works for the pizza place down the street might not be the right fit for your farm-to-table concept.
Planning for Airflow and Shelving
Once you have a rough idea of your needed cubic footage, you have to account for the space you can't actually use for storage. A rookie mistake is to pack a walk-in to the gills. That’s a recipe for disaster because it chokes off airflow, creates dangerous hot spots, and forces your refrigeration system to work itself to death.
You should always plan for at least 20-30% of your total cubic footage to be open space. This is dedicated to air circulation and walkways. Without that buffer, your unit can't hold a consistent temperature, putting your food safety on the line.
The right shelving is a big part of this equation. Wire shelving is the industry go-to for a reason—it lets cold air move freely from top to bottom. Solid shelves, on the other hand, act like roadblocks that disrupt that flow and lead to uneven cooling. Map out your shelving to create clear aisles and make sure nothing is pushed directly against the walls or ceiling vents.
Don't Forget Future Growth
Finally, look down the road. Where do you see your business in the next three to five years? If you’re planning to expand the menu, add more seats, or launch a catering arm, your storage needs are going to grow right along with you.
Sizing your walk-in cooler with a little cushion for growth is a forward-thinking move. Adding an extra 15-20% to your calculated capacity now can save you from the massive headache and expense of ripping out and replacing an undersized unit later. It’s far cheaper to plan for growth from day one than to be forced into a major overhaul when you’re already swamped running a successful business.
Decoding Refrigeration System Options
Choosing the right refrigeration system for your walk in cooler is a lot like picking the engine for a car. It’s the powerhouse that does all the heavy lifting, and the best choice really boils down to your specific needs—where you're setting it up, how much cooling power you need, and what you’ve budgeted for installation and upkeep. Get this part right, and your cooler will hum along efficiently for years.
The system you go with determines more than just cooling power. It dictates where heat and noise get vented, how complex the installation will be, and what your long-term energy bills will look like. Let's break down the three main types of "engines" you'll come across.
Self-Contained Systems The All-In-One Solution
Think of a self-contained system as a window air conditioner for your walk-in. The whole shebang—the condenser and evaporator that generate cold and vent heat—is packaged into one single unit. It usually sits right on top or on the side of the cooler, making it a pretty straightforward plug-and-play solution.
This all-in-one design makes installation incredibly simple and often cheaper upfront. But there's a trade-off. Because the entire system is inside your building, it pumps all its exhaust heat and noise directly into your kitchen. In a small or poorly ventilated space, this can quickly create a stuffy, uncomfortable work environment and make your HVAC system work overtime.
- Best For: Businesses with plenty of indoor space and good ventilation, or anyone looking for the simplest, most affordable initial setup.
- Key Consideration: Just be ready for the extra indoor heat and noise, which can affect staff comfort and drive up the ambient temperature in your kitchen.
Remote Systems The Quiet Performer
A remote system works more like the central air conditioning in a house. The noisy, heat-producing condenser gets installed outside your building—often on the roof or behind the restaurant—while the quiet evaporator unit sits inside the cooler. The two parts are connected by refrigerant lines that are run through your walls or ceiling.
The main advantage here is obvious: you move all the heat and noise outside. This keeps your kitchen cooler, quieter, and a much more pleasant place to work. While the initial installation is more involved and costs more due to needing a certified tech to run and charge the lines, the long-term benefits are huge, especially in a high-volume kitchen.
By moving the heat-generating components outdoors, remote systems not only improve the kitchen environment but can also operate more efficiently, as the condenser isn't fighting against high indoor temperatures.
Pre-Assembled Remote Systems The Hybrid Approach
Offering a nice middle ground, the pre-assembled (or "remote-ready") system gives you the perks of a remote setup with a slightly simpler installation. The evaporator and condenser are still separate pieces, but they show up from the factory already pre-charged with refrigerant and connected by insulated lines.
This design cuts down on the on-site work for your technician, which can lower installation time and costs compared to a traditional remote system. You still get the core benefit of moving the heat and noise outside, making it an excellent compromise between convenience and performance. For a deeper dive, you can check out our complete guide on choosing the right commercial refrigeration system for your restaurant.
Understanding these options is a crucial step, just like planning for your day-to-day operational needs. This decision tree infographic helps visualize how things like menu complexity, delivery frequency, and growth plans all factor into your sizing decisions.

As you can see, a business with a complex menu and less frequent deliveries is going to need a larger initial capacity, which also influences which refrigeration system can handle that cooling load most efficiently.
The global market for walk-in coolers is booming, and it's projected to jump from USD 11.2 billion in 2025 to USD 19.6 billion by 2035. A big driver for this growth is the push for better efficiency. In fact, modern units using natural refrigerants can deliver 30-40% better energy performance than older systems. This industry shift really highlights how important it is to pick a system that's not just powerful, but also sustainable and affordable to run over its entire lifespan.
Why Insulation, Doors, and Flooring Matter
While the refrigeration system gets all the glory, the real unsung heroes of a walk-in cooler are its bones—the insulation, doors, and flooring. These are the fortress walls protecting the cold, stable environment inside from the heat and chaos of your busy kitchen.
Investing in quality structural components isn't just a minor upgrade; it's a direct investment in lower energy bills and a much longer life for your equipment. Think of it this way: a powerful refrigeration system in a poorly built box is like running the AC in your car with the windows down. It just doesn't make sense.
The Power of High-Quality Panel Insulation
The walls and ceiling of a walk-in cooler are built from insulated panels, and their effectiveness is all about the R-value. This number simply tells you how well the material resists heat transfer. The higher the R-value, the better the insulation, and the less your refrigeration system has to work.
Most modern coolers use foamed-in-place polyurethane insulation because it's fantastic at its job. For a cooler, you'll want to look for panels with an R-value of at least R-25. This is the industry standard for a reason—it creates a strong thermal barrier that keeps the heat out and the cold in, saving you money every single day.
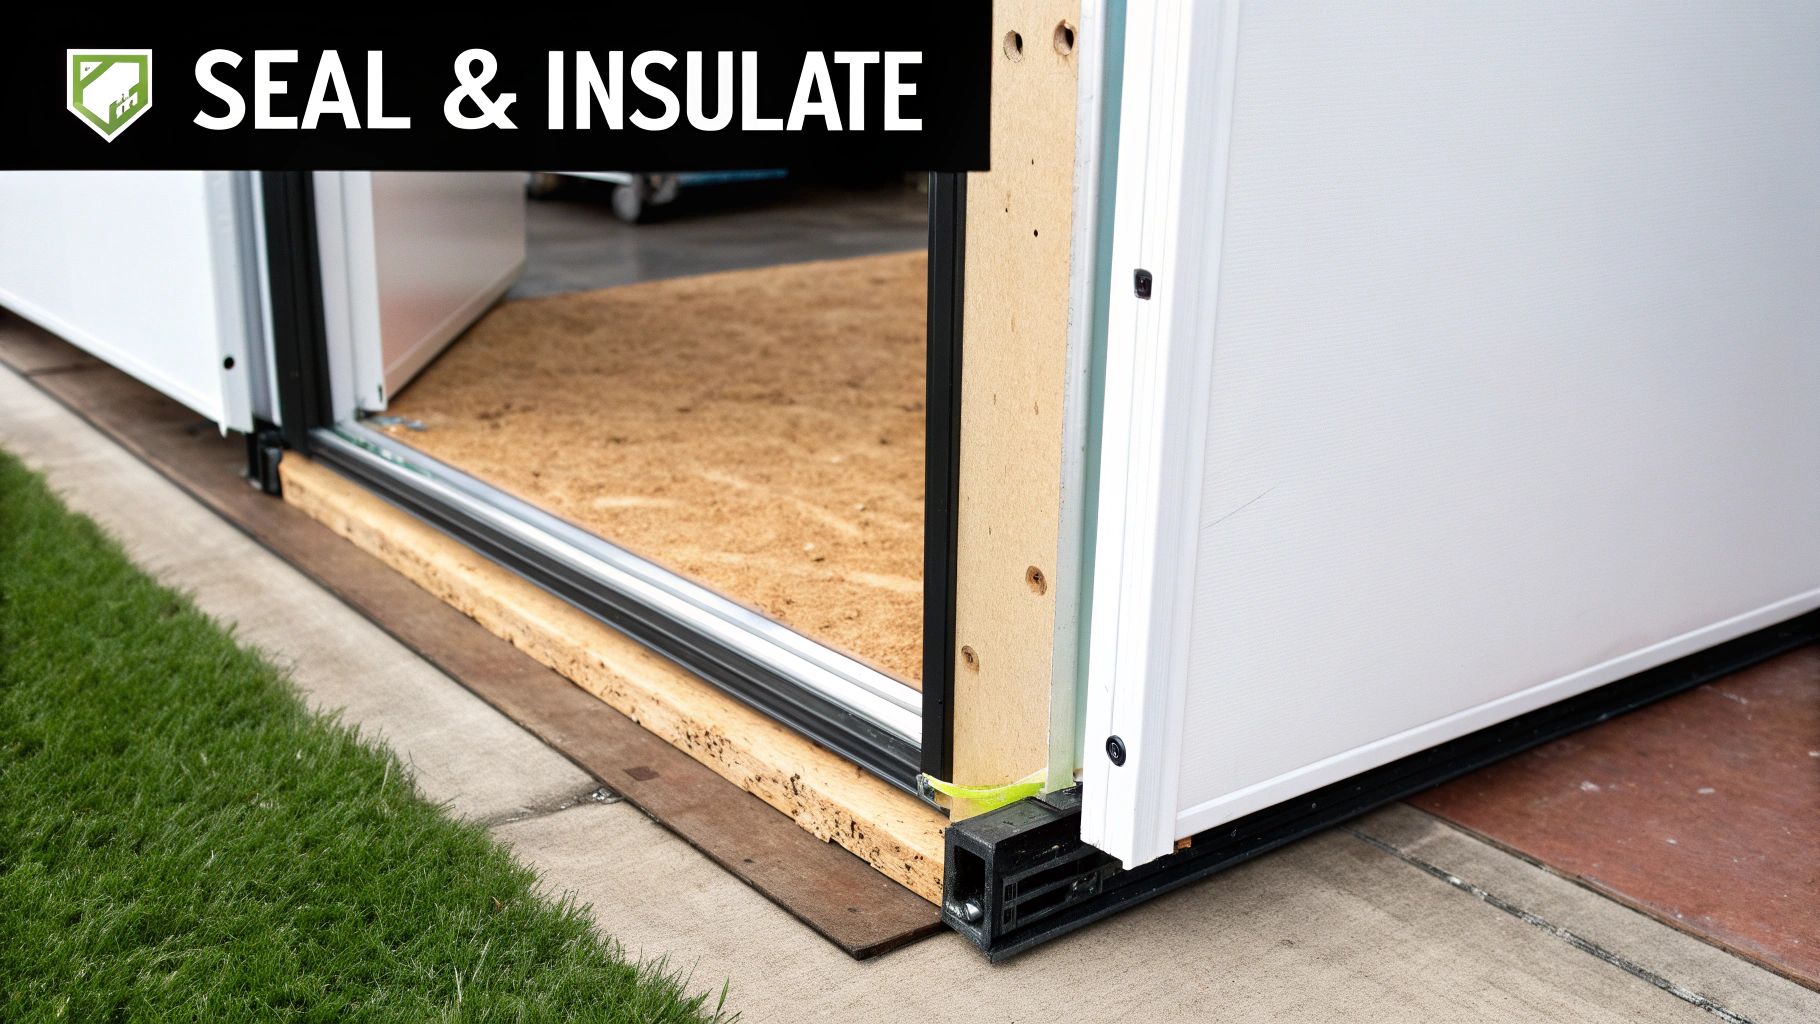
Why Your Cooler Door is So Critical
A walk-in door is more than an entry point; it's the biggest weak spot for energy loss. Every time that door swings open, cold air rushes out and warm, humid air floods in. That's why the door's construction and features are so important for keeping your cooler efficient.
Look for doors with these key features:
- Strong Gaskets: These create an airtight seal when the door is closed. A cracked or worn-out gasket is one of the most common—and costly—sources of energy waste.
- Automatic Closers: This simple mechanism ensures the door is never accidentally left ajar. It’s a powerful defense against temperature swings.
- Strip Curtains: These flexible vinyl strips act as a secondary barrier, minimizing cold air loss when the main door is open during busy service times.
These add-ons might seem small, but their impact is huge. In the U.S. walk-in cooler market, valued at USD 701.9 million in 2024, strip curtains alone make up over 65% of the market share for curtain types. That tells you just how effective they are.
The Foundation: Your Flooring Choices
Flooring is another structural element that can make or break your cooler's performance. While many walk-ins can be installed right on an existing concrete slab, this isn't always the best move, especially if you're in a humid climate or on an upper floor.
Without an insulated floor, condensation can form underneath the cooler. Over time, this moisture can damage the building's foundation, lead to mold growth, and create hazardous, slippery conditions inside the unit.
An insulated floor adds another layer of thermal protection, preventing the ground temperature from messing with your cooler's internal climate. It's an absolute must for walk-in freezers and a highly recommended upgrade for coolers in any moisture-prone environment.
The floor also needs to be tough. For a walk-in cooler floor that has to stand up to constant moisture and temperature swings, picking the right material is paramount. We recommend checking out an ultimate guide to waterproof flooring to explore durable and compliant options. A reinforced floor is also non-negotiable if you plan on rolling heavy carts and shelving loaded with inventory in and out.
Your Site Prep and Installation Checklist
A successful walk-in cooler installation doesn’t start when the delivery truck pulls up—it begins weeks, sometimes even months, in advance. Getting your site properly prepared is probably the single most important thing you can do to ensure a smooth, on-schedule, and budget-friendly setup.
Think of it like laying the foundation for a house. If you cut corners here, you're just setting yourself up for headaches down the road. This checklist will walk you through the essentials, helping you sidestep the common mistakes that throw projects off track and drive up costs. Getting these details right means your installation crew can get in, do their job efficiently, and get your new unit running without any nasty surprises.
Verifying the Foundation and Location
First things first: you have to be absolutely sure your chosen spot is ready to handle the unit. A walk in cooler needs a perfectly level and stable foundation—this is completely non-negotiable. An uneven floor can keep the panels from sealing correctly, which leads to air leaks and forces your refrigeration system to work way harder than it should.
Before that delivery truck is even scheduled, take these critical steps:
- Check for Levelness: Grab a contractor's level and check the floor. If it’s not perfectly flat, you might need to have a concrete pad poured or use shims to create a solid, level base.
- Measure and Mark the Area: Use tape or chalk to clearly mark the cooler's final footprint on the floor. This visual guide helps you confirm there’s enough clearance on all sides for the crew to work and for future maintenance access.
- Confirm Clear Pathways: Measure every single doorway, hallway, and corner on the delivery path from the loading dock to the final spot. A classic, costly mistake is realizing way too late that the panels or the refrigeration unit itself can't fit through a tight turn.
Planning for Utilities and Hookups
Your walk-in cooler is a serious piece of machinery, and it needs dedicated utility connections. You can't just plug this thing into a standard wall outlet. This means you need to get licensed electricians and plumbers involved well before installation day to avoid expensive delays.
A certified electrician will need to install a dedicated circuit with the correct voltage and amperage for your specific cooler. At the same time, most walk-ins require a drain line for condensation, and a licensed plumber should handle that to make sure it meets local health codes.
Work with your contractors to get the following ready before the cooler even shows up:
- Electrical Rough-In: The power supply needs to be installed and ready, located close to where the refrigeration unit will sit.
- Drainage Line: A floor drain or a dedicated condensate line must be in place and ready for the final hookup.
- Sufficient Ventilation: If you went with a self-contained refrigeration system, the room it’s in has to have enough ventilation to handle the heat it will generate.
The Installation Process: What to Expect
Once your site is prepped and ready, the actual installation can finally get started. Hiring certified professionals isn't just a suggestion; it’s absolutely crucial for protecting your warranty and ensuring the unit runs safely and efficiently. A typical installation follows a pretty clear, logical sequence.
Installation Day Timeline
- Panel Assembly: The crew kicks things off by assembling the wall, ceiling, and floor panels (if you have an integrated floor), locking them together to create the insulated box.
- Door Installation: Next, the door is hung and sealed. They'll make sure it closes tightly with no gaps, creating an airtight seal.
- Refrigeration System Setup: The evaporator coil gets mounted inside the box, and the condensing unit is placed in its final home (either on top of the cooler or in a remote location).
- Final Connections: This is when the electrician and plumber step in to make the final connections to the power supply and drainage line.
- System Startup and Testing: Finally, the technician will fire up the system, check the refrigerant levels, and calibrate the thermostat to make sure it hits and holds your target temperature.
A standard installation can take anywhere from one to three days, depending on the size of your cooler and the complexity of the refrigeration system. By doing all that prep work ahead of time, you give the pros a clean, ready-to-go workspace, which is the best way to guarantee your investment is installed right from the very start.
Long-Term Care and Maintenance for Peak Efficiency
Your walk-in cooler is a massive investment and, like any piece of high-performance machinery, it needs consistent care to keep doing its job right. Protecting this asset is the key to getting the most value out of it, keeping your energy bills down, and cutting your daily operating costs. Thinking about maintenance proactively isn't a chore—it’s a smart strategy to head off expensive emergency repairs and give your unit a long, reliable life.
A simple, consistent preventative maintenance schedule is your best defense against unexpected downtime and sky-high energy bills. By breaking tasks down into quick daily, weekly, and monthly checks, you can catch common issues before they spiral into major headaches.
Your Preventative Maintenance Schedule
Getting into a routine is the first step toward long-term efficiency. The good news is, many of these tasks are simple enough for your kitchen staff to handle, turning maintenance into a shared team effort.
Daily Checks (Less than 5 minutes):
- Listen for Odd Noises: Get in the habit of listening for any unusual grinding, clanking, or buzzing coming from the refrigeration unit. You know what it should sound like.
- Check for Spills: Wipe up spills right away. This prevents slips and, just as importantly, keeps your drain lines from getting gunked up.
- Monitor the Temperature: A quick glance at the external thermometer is all it takes. Make sure it's holding steady. For a deeper dive, check out our blog post on ideal walk-in cooler temperature settings.
Weekly Tasks (15-20 minutes):
- Inspect Door Seals: Take a close look at the gaskets for any cracks, tears, or signs of brittleness. A tight seal is absolutely critical for stopping energy loss.
- Test the Door Closer: Make sure the door is closing and latching securely all by itself. A door left ajar is an energy-sucking nightmare.
- Clear Debris: Sweep around the exterior of the unit, especially near the condensing unit if it’s accessible. Good, clear airflow is essential.
Monthly Responsibilities (30-45 minutes):
- Clean Evaporator and Condenser Coils: Dust, grease, and grime are the enemies of an efficient cooler. Gently clean the coils with a soft brush or a specialized coil cleaner to keep them breathing easy.
- Check and Clear Drain Lines: You’ll want to ensure condensation drain lines are flowing freely and aren't getting clogged with slime or debris. A simple flush can prevent a messy backup.
When to Call a Professional Technician
While you and your team can handle the day-to-day stuff, some jobs absolutely require an expert. You should plan on having a professional service your unit at least once or twice a year for a comprehensive system checkup. To get a sense of how important this is, it's helpful to understand maintenance schedules for similar equipment; for example, learning the recommended frequency for servicing HVAC systems offers great insight into preventative care.
Warning Signs: Don't wait. Call a technician immediately if you notice persistent temperature swings, loud or unusual noises that don't go away, significant frost buildup on the evaporator coils, or if the unit runs constantly without ever cycling off.
Smart Organization for Better Airflow
Believe it or not, the way you organize your inventory has a direct impact on your cooler’s performance. When you organize for airflow, you reduce the strain on the refrigeration system and help maintain a consistent temperature throughout the entire box.
Follow these best practices for smarter inventory management:
- Use Wire Shelving: Solid shelving is a brick wall for cold air. Wire shelving is the only way to go, as it allows cold air to circulate freely from top to bottom.
- Leave Space: Never, ever stack boxes directly against the walls or ceiling. You need to maintain at least a 4-6 inch gap all around to let the air move properly.
- Avoid Overloading: Packing a cooler to the brim is a recipe for disaster. It restricts airflow and creates warm spots, forcing the system to work overtime. A good rule of thumb is to keep your cooler no more than 75% full.
Of all the big-ticket items you’ll buy for your kitchen, a walk-in cooler is one that brings up a ton of practical questions. It’s a major investment, so you want to feel completely confident you’re making the right call. We’ve been there.
To help you cut through the noise, I’ve pulled together some of the most common questions we hear from operators just like you, with straightforward answers that build on what we’ve already covered.
What’s the Real Cost of a Walk-In Cooler?
The price tag on a walk-in can swing pretty wildly depending on its size, the features you need, and the type of refrigeration system you choose. A smaller, basic box might start in the $6,000 to $9,000 range. But for larger, custom-built units with remote refrigeration and professional installation, it's not uncommon to see costs climb well over $25,000.
When you're building your budget, don't forget to factor in the "hidden" costs:
- Delivery and Installation: This isn't a DIY job. Professional setup is a must and can add a few thousand dollars to your final bill.
- Site Prep: Your space needs to be ready. This could involve concrete work, upgrading your electrical panel, or running new plumbing for drainage.
- Permits: Your local health and building departments will likely require permits for the installation, and those come with their own fees.
Because the upfront cost is significant, a lot of operators look into financing or leasing. It’s a smart way to get the equipment you need while keeping your working capital free for things like inventory and staff.
What's the Main Difference Between a Walk-In Cooler and a Freezer?
At their core, the difference is all about temperature and what you're storing. Think of a cooler as a massive refrigerator and a freezer as, well, a massive freezer. That temperature gap dictates everything about how they’re built and used.
A walk-in cooler is designed to hold a temperature somewhere between 35°F and 41°F. This is the sweet spot for keeping fresh produce, dairy, meat, and prepped ingredients safely out of the temperature "danger zone" where bacteria love to grow.
A walk-in freezer, on the other hand, runs at 0°F or below. It's built for the long haul, deep-freezing everything from proteins to bulk-prepped sauces. To handle that intense cold efficiently, freezers need much thicker insulation (a higher R-value) and more powerful refrigeration systems to keep those sub-zero temps locked in.
Do I Absolutely Need a Floor for My Walk-In Cooler?
While a floor isn't always mandatory for a cooler, it's something I highly recommend in almost every situation. Many standard walk-ins can be installed right on top of an existing, level concrete slab. But skipping an insulated floor can create some serious headaches down the road.
An uninsulated floor is an invitation for trouble. Condensation can form underneath the unit, leading to mold, damage to your building's structure, and dangerously slippery surfaces inside the cooler. An insulated floor acts as a crucial thermal break, boosting your energy efficiency and stopping these problems before they start.
For any walk-in freezer, an insulated floor is 100% non-negotiable. It’s also a must-have for any cooler you're installing on an upper floor or in a humid climate.
How Often Should I Get My Walk-In Cooler Professionally Serviced?
You’ll want to have a certified technician give your walk-in cooler a thorough check-up at least once or twice a year. While your team can handle the daily and weekly tasks like cleaning coils and checking door seals, a pro performs a much deeper dive into the system's health.
During a professional service call, a technician will:
- Check refrigerant levels and hunt for any potential leaks.
- Test all the electrical components and connections.
- Calibrate thermostats to make sure they’re accurate.
- Give the entire refrigeration system a deep clean and inspection.
This kind of preventative care is the single best thing you can do to catch small issues before they turn into catastrophic failures. It keeps your unit running efficiently and reliably for years to come.
At The Restaurant Warehouse, we know that outfitting your kitchen is a huge decision. We offer top-quality walk-in coolers from leading brands, plus flexible financing to help you get the equipment you need without tying up your cash. Explore our selection of walk-in coolers and find the perfect storage solution for your business.
About The Author

Sean Kearney
Sean Kearney is the Founder of The Restaurant Warehouse, with 15 years of experience in the restaurant equipment industry and more than 30 years in ecommerce, beginning with Amazon.com. As an equipment distributor and supplier, Sean helps restaurant owners make confident purchasing decisions through clear pricing, practical guidance, and a more transparent online buying experience.
Connect with Sean on LinkedIn, Instagram, YouTube, or Facebook.