

A Practical Guide to Commercial Ice Maker Maintenance
Let’s be honest, cleaning the ice machine is one of those tasks that always seems to find its way to the bottom of the to-do list. It’s usually ignored until a health inspector shows up unannounced or the machine dies during a sweltering Saturday dinner rush. That reactive approach is a gamble that rarely pays off.
Why Proactive Ice Maker Maintenance Matters

Viewing commercial ice maker maintenance as a proactive strategy rather than a reactive chore is a fundamental shift in mindset. It’s about preventing problems before they can cause chaos in your operation. A consistent routine is your single best defense against costly surprises and operational headaches.
The Real Costs of Neglect
Imagine a bustling downtown café on a hot summer morning. Suddenly, the ice machine sputters to a halt, crippled by months of unchecked scale buildup. The result? Unhappy customers, lost sales on iced coffees, and an expensive emergency service call. This scenario is incredibly common and entirely preventable.
When you neglect your machine, it quietly drains your resources in several ways:
- Inflated Energy Bills: A dirty condenser coil or a scale-encrusted evaporator forces the compressor to work much harder, consuming significantly more electricity just to produce the same amount of ice.
- Expensive Emergency Repairs: Most catastrophic failures don't happen overnight. They’re the result of small, ignored issues—like a clogged water filter or mineral buildup—that escalate into major component breakdowns.
- Failed Health Audits: Health inspectors are trained to look specifically for signs of mold, slime, and biofilm inside ice machines. A failed inspection can seriously damage your reputation and even lead to a temporary closure.
"The FDA classifies ice as a food. Just like any other food, it is susceptible to bacterial growth and contamination. Regular cleaning isn't just about machine health; it's about customer safety."
From Chore to Business Strategy
Shifting your perspective is the key. A well-maintained ice machine is a reliable asset that supports your business; a neglected one is a liability just waiting to happen.
Proactive care protects your revenue, your reputation, and your peace of mind. For more insights into how scheduled upkeep benefits a business, these commercial HVAC preventive maintenance tips highlight similar cost savings and efficiency gains. This guide will walk you through exactly how to build that protective routine for your ice maker.
Building Your Maintenance Schedule
Let’s be honest: consistency is the secret weapon for keeping a commercial ice maker running smoothly. An erratic, “we’ll get to it when we can” approach is a surefire recipe for surprise breakdowns and eye-watering repair bills. The most successful kitchens I’ve seen all have one thing in common: a structured maintenance schedule that turns these essential tasks into second-nature habits for the whole team.
This isn't about piling on more work. It’s about doing the right work at the right time to head off bigger, messier problems. Think of it as a workout plan for your machine—short daily efforts, weekly check-ins, and deeper monthly sessions keep it in peak condition and ready for the dinner rush.
Daily Habits For Lasting Health
The most impactful maintenance often comes down to the simplest, quickest tasks. These daily checks take just a minute or two but act as your first line of defense against contamination and developing issues. Tacking them onto your opening or closing procedures is the best way to make sure they never get skipped.
First, give the exterior a quick wipe-down with a food-safe cleaner. This removes spills and dust, keeping your machine looking professional and preventing grime from finding its way inside. Next, take a look at the ice bin. Is the scoop stored properly in its holder? It should never be left in the ice itself—that’s a classic health code violation just waiting to be written up.
Finally, just listen. Does the machine sound the way it always does? Any new clanking, grinding, or unusually loud whirring can be an early warning sign of a mechanical problem. Catching these sounds early can be the difference between a minor adjustment and a major component failure.
Weekly Inspection Routines
Once a week, it’s time to dig a little deeper with a focused look at a few critical components. These inspections are all about the systems that feed your machine: air and water. Clogs in either can slash your ice production and put a serious strain on the equipment.
Start with the air filter and condenser coils.
- Air Filter: If your machine has a removable air filter, slide it out and hold it up to a light. If it's caked with dust or grease, give it a good wash with warm, soapy water. Just be sure it’s completely dry before you put it back.
- Condenser Coils: Grab a flashlight and peek at the condenser coils. A light dusting is normal, but a thick, blanket-like buildup is a major red flag. This gunk acts like an insulator, forcing the compressor to work overtime and sending your energy bills through the roof.
Next up is the water filter. Many systems have a date marker or a color-changing indicator that lets you know when a replacement is due. If your ice production has slowed down or the cubes look cloudy, a clogged water filter is the most likely culprit. Most manufacturers recommend changing it every six months, but if you're in an area with hard water, you might need to do it more often.
One study of service calls found that an estimated 60% of commercial ice maker issues are tied to scaling and water quality problems. That really drives home how critical regular filter checks are for the machine's overall health.
This infographic breaks down the core rhythm of a successful maintenance schedule.
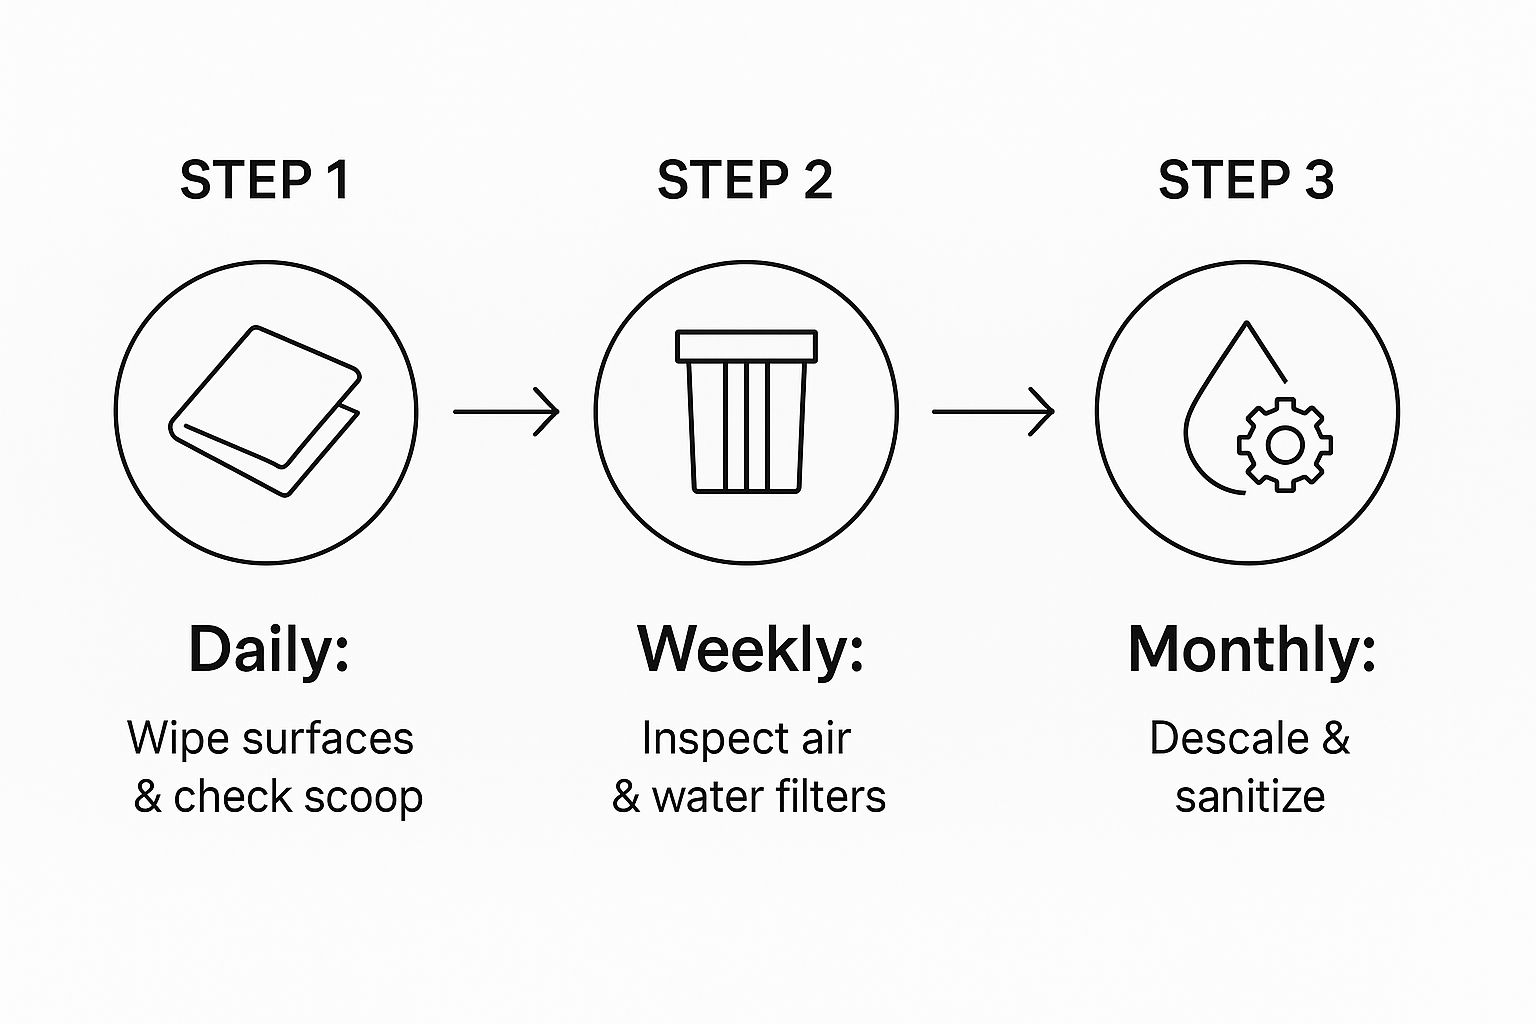
As you can see, the simple, frequent tasks build a solid foundation, making the less frequent, more intensive cleaning cycles far more effective.
Monthly and Semi-Annual Deep Dives
While your daily and weekly tasks prevent the immediate problems, deeper cleaning is what tackles the slow, silent threat of internal buildup. Limescale, slime, and biofilm are pretty much inevitable, but a regular deep-cleaning schedule keeps them from compromising your ice quality and your machine’s health.
Here's a straightforward schedule that breaks down these essential, less-frequent tasks to keep your ice maker running like new.
Scheduled Maintenance Tasks for Your Commercial Ice Maker
| Frequency | Task | Purpose and Key Details |
|---|---|---|
| Monthly | Run a Cleaning Cycle | Use a nickel-safe ice machine cleaner to descale the internal water system. This removes mineral deposits (limescale) that can clog lines and damage sensitive components. It's a non-negotiable step for machine longevity. |
| Semi-Annually (Twice a Year) | Perform Full Sanitization | This is a more involved process. You’ll need to disassemble key internal components and use a food-grade sanitizer to eliminate bacteria, mold, and algae. This is absolutely critical for food safety and preventing biofilm buildup. |
| Quarterly (in certain conditions) | Increase Sanitization Frequency | In high-use kitchens or areas with particularly hard water, bump up your full sanitization schedule to once every three months. The extra effort will pay off by preventing severe scale and slime issues. |
This table maps out a robust plan, but remember to always consult your machine’s specific manual for any manufacturer-recommended variations.
To really build a bulletproof maintenance program, consider applying the structured approach found in a general commercial-grade maintenance checklist. Adopting that kind of systematic plan ensures no task, big or small, ever falls through the cracks.
The Complete Deep Cleaning and Sanitizing Process
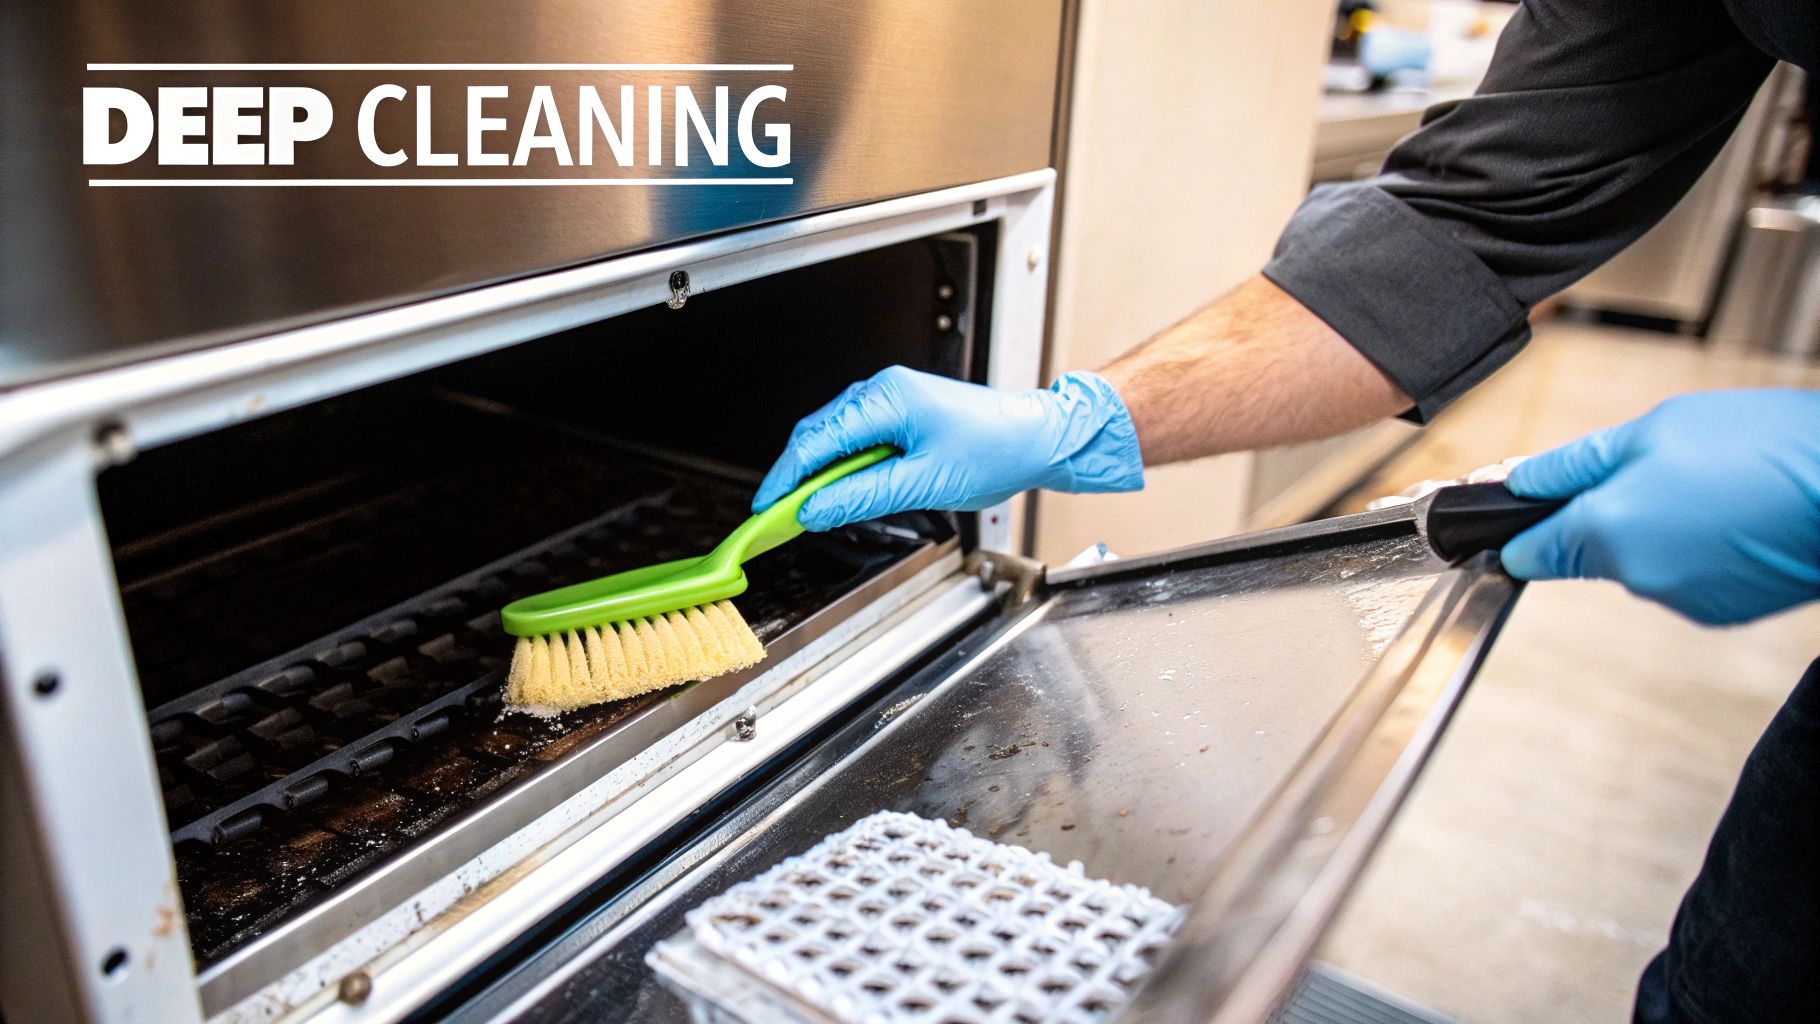
This is where the real work happens. While your daily wipe-downs and weekly checks are important, the deep cleaning and sanitizing cycle is what truly knocks out the unseen threats—limescale, biofilm, and bacteria—that will inevitably build up inside your machine. This isn't just a quick rinse; it’s a full-system reset for your machine's hygiene.
Think of it like this: daily upkeep is like brushing your teeth, but this deep clean is the professional dental appointment that gets rid of stubborn plaque and prevents bigger problems down the road. Without it, even the best ice maker will eventually start producing cloudy, off-tasting ice and suffer from premature component failure.
Preparing for a Safe and Effective Clean
Before you even think about touching a bottle of cleaner, proper prep is non-negotiable. This step is all about ensuring the safety of your team and making the entire process effective. First things first, completely empty the ice bin. All of it. Don't even think about saving it—that ice could be contaminated with gunk dislodged during shutdown.
Once the bin is empty, power the machine down completely. This means switching it off at the unit, then unplugging it from the wall or flipping the breaker. This is a critical safety measure to prevent any risk of electrical shock or the machine accidentally kicking on while your hands are inside.
Finally, get your gear together. You’ll need:
- Personal Protective Equipment (PPE): Always wear rubber gloves and safety goggles. The chemicals used for cleaning and sanitizing are no joke and can irritate your skin and eyes.
- Cleaning and Sanitizing Solutions: Make sure you have both a nickel-safe descaler (the cleaner) and a food-grade sanitizer. They are two different products for two different jobs.
- Brushes and Cloths: Use soft-bristle brushes, non-abrasive cloths, and sponges that are designated only for cleaning the ice machine to avoid cross-contamination.
Descaling the Heart of the Machine
The first chemical step is descaling, which is all about tackling mineral buildup—mostly limescale—that chokes your water system. This chalky deposit is like cholesterol in your machine’s arteries; it constricts water flow, insulates the evaporator plates, and forces the whole system to work way harder than it should.
Most modern machines have an automated "Clean" or "Wash" cycle. Go ahead and start that cycle according to your manufacturer's instructions. The machine will usually drain its water and then prompt you to add the cleaning solution.
Pay close attention here: you absolutely must use a nickel-safe ice machine cleaner. Standard descalers can contain harsh acids that will eat away at the nickel plating on the evaporator grid, causing expensive and irreparable damage. Carefully measure and pour in the solution as directed—using too little won't be effective, and using too much can leave behind residue. Let the automated cycle run its full course, which usually takes anywhere from 20 to 45 minutes.
A Deep Dive Into Component Cleaning
With the internal water lines now free of scale, it's time to manually clean all the removable components. After the cleaning cycle finishes and you’ve unplugged the machine again, carefully take out the internal parts as shown in your owner's manual.
This usually includes parts like:
- The water curtain or splash shield
- Ice thickness and water level sensors
- The water distribution tube
- The water trough or pump assembly
Submerge these parts in a properly diluted cleaning solution. Use your soft-bristle brushes to get into every nook and cranny, paying extra attention to the corners and small openings where slime and biofilm love to hide. This hands-on scrubbing is something an automated cycle just can't do, and it’s essential for a truly hygienic machine.
A common mistake is assuming the "clean" cycle handles everything. Manual scrubbing of disassembled parts is what removes the stubborn biofilm that automated flushing often leaves behind. This step separates a decent clean from a professional one.
After scrubbing, rinse every component thoroughly with clean water to get rid of every trace of the descaling solution. Any cleaner left behind could neutralize the sanitizer in the next step, making it useless.
The Final Sanitization and Rinse
Cleaning and sanitizing are two totally different but equally vital steps. Cleaning removes dirt and minerals, but sanitizing is what kills microorganisms like bacteria, mold, and algae. If you skip this, you’re just leaving the door wide open for rapid re-contamination.
Prepare your food-grade sanitizer according to the package directions—it will be a different dilution than the cleaner. Using a spray bottle or a dedicated container, thoroughly coat all the components you just cleaned and rinsed. An important note here: most sanitizers are designed to be air-dried and should not be rinsed off with water. This lets the solution do its job effectively.
While the parts are air-drying, use a cloth soaked in sanitizer to wipe down the entire interior of the ice bin and the machine itself. Once all the components are dry, carefully put them back together.
The last step is to run a sanitizing rinse through the whole system. Power the unit back on and start another "Clean" or "Wash" cycle. When prompted, add the right amount of sanitizer to the water trough. This will circulate the solution through all the internal lines, making sure every part of the water system is sanitized.
After this cycle is done, let the machine run two full ice-making cycles and discard all the ice it produces. This flushes out any leftover solution, ensuring the first batch served is fresh, clean, and safe. Neglecting these steps is a huge reason why improperly maintained machines can see ice production drop by over 20% while energy use spikes by up to 15% in just a few months.
For a more detailed breakdown, our guide on comprehensive ice machine cleaning offers even more tips and visuals to help you nail the process.
How to Troubleshoot Common Ice Maker Issues
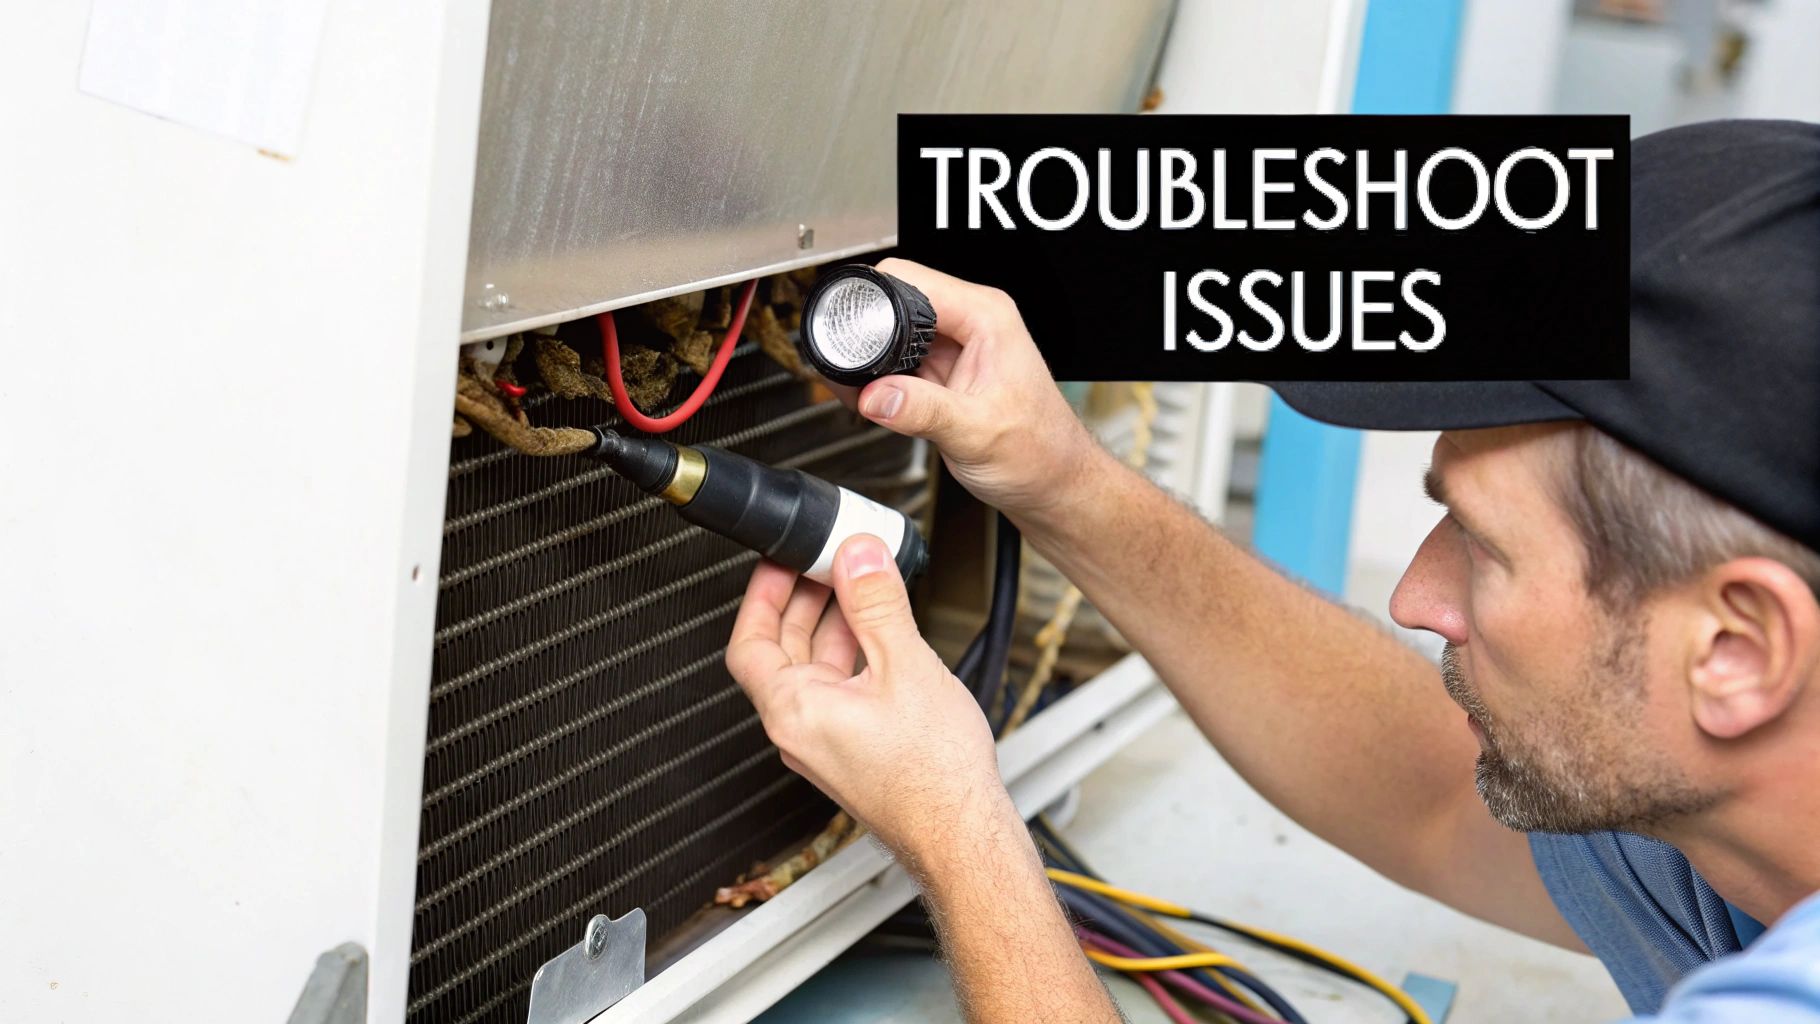
Even with a perfect maintenance schedule, your commercial ice maker is going to have an off day eventually. Before you pick up the phone for an expensive emergency service call, taking a few minutes to diagnose the issue yourself can often lead to a simple, fast fix. Many of the most common problems have surprisingly straightforward causes.
This troubleshooting guide is your first line of defense. By understanding what to look for, you can tell the difference between a minor hiccup you can solve in five minutes and a serious mechanical failure that requires a professional. This approach to commercial ice maker maintenance not only saves money but also minimizes costly downtime during a busy service.
Problem One: The Machine Isn't Making Any Ice
This is the most alarming issue, but it's often the easiest to resolve. Before assuming the worst, run through a quick checklist of the most common culprits. The problem is frequently related to the machine's environment or its essential inputs—water and power.
Start with the absolute basics: Is it plugged in? Is the power switch on? It sounds obvious, but you’d be surprised how often equipment gets accidentally unplugged or switched off during routine kitchen cleaning. Also, take a quick look at your circuit breaker to make sure it hasn't tripped.
Next, let's look at the water supply.
- Check the Water Line: Make sure the water supply valve is fully open and the line isn’t kinked or pinched behind the machine. A simple pinch can stop everything.
- Inspect the Water Filter: A heavily clogged water filter can slow water flow to a trickle, effectively starving the machine. If it's been more than six months since the last change, this is a likely suspect.
- Review the Bin Sensor: Most machines have a little arm or sensor that stops ice production when the bin is full. Make sure this mechanism isn't stuck in the "full" position or blocked by a stray ice cube.
Finally, think about the machine's environment. An ice maker is a refrigeration unit, and it needs to breathe. If the room temperature is too high (above 90°F) or the condenser coils are choked with dust, the machine can't effectively cool itself down to produce ice.
Technicians report that the majority of service calls—an estimated 60%—relate directly to scaling and water quality issues. This highlights just how important water treatment and filtration are in your regular maintenance plan. Industry surveys also show that proactive maintenance can cut unexpected failures by over 40%, preventing chaotic downtime.
Problem Two: The Ice Cubes Are Small, Cloudy, or Hollow
The quality of your ice says a lot about the health of your machine. If you start seeing cubes that are smaller than usual, look cloudy, or are hollow in the center, it's a clear signal that something is amiss with the water system.
Poor ice quality is almost always a water issue. The first thing to check is, once again, the water filter. A partially clogged filter reduces the water pressure and flow rate, meaning not enough water is getting to the evaporator grid during the freezing cycle. This is what leads to those undersized or incomplete cubes.
Another common cause is mineral buildup, or scale, on the evaporator plates. These mineral deposits insulate the freezing surface, leading to an uneven freeze. This is why you might get hollow or "white" ice—the minerals in the water are being frozen into the cube instead of being flushed away. Running a full descaling cycle is the immediate fix for this.
For a deeper dive into diagnosing these and other issues, our detailed guide on ice machine troubleshooting can provide additional steps and solutions.
Problem Three: The Machine Is Making Strange Noises
Commercial ice makers make a predictable series of sounds: the hum of the compressor, the click of the solenoid valve, and the cascade of ice dropping into the bin. When you hear a new, unfamiliar noise, it’s time to pay attention.
Let's break down what different sounds could mean:
- Loud Grinding or Squealing: This often points to a problem with a motor, either the fan motor or the water pump. It could be a sign of worn-out bearings.
- Constant Clicking: If you hear rapid, continuous clicking, it might be the water valve trying to open but failing due to low water pressure or a blockage.
- Unusual Vibration or Rattling: This could be as simple as a loose panel or a sign that the machine isn't level. However, it can also indicate a problem with the fan blades or compressor mounts.
By learning to recognize these common symptoms, you empower yourself to handle minor maintenance issues quickly. Knowing when to check a filter versus when to call for professional help is a skill that directly protects your bottom line.
Optimizing Performance With Water Filtration
Let's be honest, great ice seems simple—it's just frozen water, right? But the quality of that water is the single biggest factor that dictates your ice maker's health, how good your ice tastes, and how many maintenance headaches you'll have down the road. Once you've got your cleaning routine down, mastering your water supply is the next big step in proactive commercial ice maker maintenance.
The main enemy here is limescale. It's that chalky, white gunk left behind when hard water—water with a lot of calcium and magnesium—evaporates. Inside an ice machine, this happens over and over, creating a destructive buildup on every single surface the water touches.
Think of limescale as cholesterol for your machine's arteries. It clogs up water lines, messes with sensors, and puts a mineral coating all over the evaporator grid. This layer acts like an insulator, forcing the compressor to work longer and harder just to get things cold enough to freeze. That means higher energy bills and a ton of strain on your most expensive parts.
Choosing the Right Water Filtration System
Not all water is the same, so a one-size-fits-all filter just won't cut it. The right filtration system for your place depends entirely on the quality of your local water. Figuring this out is the first step to preventing those frustrating scale-related breakdowns.
You can usually get a water quality report from your local municipality to see how hard your water is. Once you know what you're up against, you can pick the right defense:
- Sediment Filters: These are your basic first line of defense. They're great at catching bigger stuff like sand, dirt, and rust, but they do absolutely nothing to fight scale.
- Carbon Filters: Perfect for making your ice taste better. Carbon filters remove chlorine and other chemicals that can create off-flavors or odors, but they offer very limited scale prevention on their own.
- Scale Inhibitor Filters: A very popular and effective choice for areas with moderate water hardness. These systems use polyphosphates to keep mineral ions from clumping together and forming hard scale deposits on your machine's internal parts.
- Reverse Osmosis (RO) Systems: If you're in an area with extremely hard water, an RO system is the ultimate weapon. It pushes water through a special membrane, stripping out almost all of the dissolved solids and minerals. The result is exceptionally pure water.
Investing in the right filtration system from the get-go isn't an expense; it's a direct investment in your machine's lifespan. It seriously cuts down on how often you need to do a labor-intensive descaling and protects your equipment from the #1 cause of component failure.
For a deeper dive, check out our in-depth article on selecting the best water filtration for restaurants. It breaks down everything you need to know to make the smartest choice.
How Modern Features Reduce Maintenance Work
The good news is that ice machine manufacturers get it. They understand the maintenance grind and are constantly adding new features designed to make your life easier. When you're shopping for a new machine, keeping an eye out for these modern advancements can slash your long-term workload and operating costs.
Features like digital touchscreens, UV sanitization, and smart diagnostics are becoming more common, and they really do ease the maintenance burden. For instance, new energy-efficient commercial ice makers use about 30% less energy than older models, a trend driven by both environmental concerns and a sharp focus on operational costs. As you can see from these insights on the commercial ice machine market, this push for efficiency is shaping how equipment is designed.
Look for machines that offer:
- Antimicrobial Components: Some brands infuse key plastic parts with silver ions or other antimicrobial agents. This helps stop the growth of bacteria, slime, and mold between your regular cleanings.
- Automated Cleaning Cycles: While it's no substitute for a good manual scrubbing, a one-touch cleaning and sanitizing cycle helps streamline the chemical descaling process, ensuring it gets done correctly and consistently.
- Smart Diagnostics: Newer models can give you a heads-up about potential problems—like a filter that's getting clogged or a part that needs attention—before they cause a complete shutdown.
When you pair a smart equipment choice with the right external water filtration, you build a powerful defense against the most common ice machine problems, making sure your unit runs efficiently for years to come.
Of course, even with the best guide in hand, some questions always pop up when it comes to keeping your commercial ice maker in fighting shape. Let's go through a few of the most common ones we hear from restaurant owners to clear up any confusion.
How Often Do I Really Need a Pro to Service My Ice Machine?
While you and your team can definitely handle the day-to-day and monthly cleaning, it's a smart move to have a professional technician look at your machine at least twice a year. They do a lot more than just the cleaning you’re already doing. A pro will check refrigerant levels, inspect all the electrical connections, and calibrate sensors that are way beyond the scope of routine upkeep.
Think of it like a check-up for your most valuable player. This preventive service lets an expert catch and fix the small stuff—like a worn-out bearing or a tiny leak—before it blows up into a catastrophic failure that shuts you down in the middle of a Friday night rush.
What's the Real Difference Between Cleaning and Sanitizing?
This is a big one, and it’s a critical distinction that a lot of people miss. People often use the terms interchangeably, but in the world of ice machine maintenance, they are two separate and equally essential steps.
- Cleaning: This is the part where you use a descaling solution. Its job is to physically break down and remove mineral deposits (that chalky limescale) and any other grime from the machine's internal parts. Basically, it tackles all the visible gunk.
- Sanitizing: This is the second punch. You use a food-grade sanitizing solution to kill the invisible threats that cleaning leaves behind—think bacteria, mold, slime, and algae.
You can’t have one without the other. Cleaning removes the buildup, but sanitizing is what makes the machine truly hygienic and food-safe. Skipping the sanitizing step is like washing your hands with just water. They might look clean, but the germs are still throwing a party.
Can I Just Use Bleach to Clean My Ice Machine?
Please, no. This is one of the most damaging mistakes you can possibly make. Bleach is extremely corrosive and will absolutely destroy the sensitive nickel plating on your evaporator grid and other metal components.
Once that damage is done, it’s irreversible. You'll end up with metal flaking into your ice (a huge health hazard) and an eventual, very expensive replacement of the entire evaporator. Always, always use a dedicated, nickel-safe ice machine cleaner and a food-grade sanitizer that are specifically made for this equipment.
Why Are My Ice Cubes Coming Out Cloudy or Soft?
When you start seeing cloudy or soft ice, your first thought should be "water." This is almost always a symptom of a water-related issue. The number one culprit is usually a clogged water filter that’s strangling the water flow to the evaporator.
It could also be a sign of a serious limescale buildup on the freezing surfaces, which messes with the freezing process and keeps the ice from forming into solid, clear cubes. Before you pick up the phone to call for service, the first things you should do are replace the water filter and run a complete cleaning cycle to descale the machine.
At The Restaurant Warehouse, we know that having reliable equipment is the backbone of your business. From ice makers to ovens, we provide the durable, high-performance gear you need to succeed. Explore our extensive catalog and financing options to equip your kitchen for less.
About The Author

Sean Kearney
Sean Kearney used to work at Amazon.com and started The Restaurant Warehouse. He has more than 10 years of experience in restaurant equipment and supplies. He graduated from the University of Washington in 1993. He earned a BA in business and marketing. He also played linebacker for the Huskies football team. He helps restaurants find equipment at a fair price and offers financing options. You can connect with Sean on LinkedIn or Facebook.
Leave a comment