

A Guide to Gas Stove Conversion From Natural Gas to Propane
Thinking about a gas stove conversion from natural gas to propane? It’s a technical but totally necessary job when you want to run a stove built for a city gas line on a portable propane tank instead. This is way more than just swapping out a hose; it involves changing out some key internal parts to make sure the stove works correctly and, most importantly, safely.
It's a common project for folks in rural areas, food trucks, or anyone living off-grid.
Why Convert Your Stove to Propane?
Before you even think about picking up a wrench, it’s really important to understand why a gas stove conversion is a must-do in certain situations. This isn't just about personal preference; it’s a practical requirement dictated by where you are and what fuel you have access to.
The number one reason is simple: you don't have a natural gas pipeline running to your property.
This scenario comes up all the time in a few key places:
- Rural Homes: Lots of properties outside of city limits depend on propane tanks for both heating and cooking. It's just a part of country living.
- Food Trucks: These mobile kitchens need a fuel source they can take with them, and propane has become the go-to standard for the industry.
- Off-Grid Living: For cabins, tiny homes, or remote workshops, propane is a reliable way to stay powered up and independent.
Understanding the Fuel Difference
The whole reason you need a conversion kit comes down to the fundamental differences between the two gases. Propane is packed with more energy and gets delivered at a much higher pressure than natural gas.
Here's a good way to think about it: trying to run a natural gas stove on pure propane without converting it first is like trying to fill a bicycle tire with an industrial air compressor. The pressure is just dangerously mismatched.
The stove's original parts—specifically the orifices, which are small brass fittings with a tiny hole drilled through them—are sized for the lower pressure of natural gas. Hooking up high-pressure propane would blast way too much fuel through them, creating huge, out-of-control flames, a ton of soot, and a serious safety risk.
This is exactly why a gas stove conversion from natural gas to propane is a precise, technical job. The new, smaller propane orifices are designed to restrict the gas flow, making sure you get a flame that’s the right size and burns clean.
This reliance on transportable fuels like propane isn't just a niche thing; it's global. In fact, back in 2013, the residential sector was responsible for nearly 46% of the 267 million tonnes of global LPG consumption, mostly because it can be easily delivered where pipelines can't go. You can read more about the global role of LPG in household energy.
Making sure your situation genuinely calls for propane is the first real step toward a safe and successful setup.
Why You Can't Just Hook Up a Propane Tank to a Natural Gas Stove
Before you start swapping out any parts, it’s absolutely critical to understand why a gas stove conversion from natural gas to propane isn't just a suggestion—it's a non-negotiable step for safety and performance. These two fuels might seem pretty similar, but they behave in completely different ways once they're inside your stove.
Simply connecting a propane tank to a stove designed for natural gas is a recipe for disaster. Think of it like trying to run a diesel engine on regular gasoline. It just won’t work right, and you'll cause serious damage. The stove is calibrated for a specific fuel, and the differences between propane and natural gas are too big to ignore.
Pressure and Energy: A Tale of Two Gases
The biggest difference comes down to pressure. Propane is delivered to your stove at a much higher pressure than natural gas—we're talking around 10 to 11 inches of water column (W.C.) for propane, compared to just 3 to 4 inches W.C. for natural gas. Every component in your stove was originally designed for that much lower pressure.
Then there's the energy content. Propane is way more energy-dense. A single cubic foot of propane packs about 2,516 BTUs (British Thermal Units), while the same amount of natural gas has only about 1,030 BTUs. That means propane delivers more than double the energy punch in the same volume of gas.
When you put these two facts together, you can see why the conversion is so essential.
- Orifice Size: The small brass fittings, called orifices, that feed gas to the burners are drilled to a very specific size. Natural gas orifices are much larger to let enough of the low-pressure fuel through for a proper flame.
- The Danger: If you force high-pressure, high-energy propane through that big opening, you'll get dangerously large, uncontrollable flames. This creates a massive fire hazard and produces a lot of soot, which is a sign of incomplete combustion and carbon monoxide production.
A proper conversion kit gives you new, smaller orifices that are precisely drilled for propane. This smaller opening restricts the fuel flow, perfectly balancing out the higher pressure to give you the safe, efficient, and controllable blue flame your stove was designed for.
For a quick look at how these fuels stack up, here’s a simple comparison of their core properties.
Natural Gas vs Propane Key Differences
| Property | Natural Gas (Methane) | Propane (LPG) |
|---|---|---|
| Energy Density (BTU/cubic ft) | ~1,030 BTU | ~2,516 BTU |
| Delivery Pressure (W.C.) | 3-4" | 10-11" |
| Relative Density (to Air) | Lighter than air | Heavier than air |
| Orifice Size Required | Larger | Smaller |
Understanding these differences makes it clear why a direct hookup is impossible and why the conversion process is so important for safe and reliable operation.
Know Your Fuel Source
Really getting a handle on the fuel you’re working with is a key part of any installation. Propane has unique properties that make it a great choice, especially when you compare it to other gases used in different applications. If you want to go a bit deeper, you can learn more about the differences when choosing Propane vs. Butane for marine LPG installations.
This foundational knowledge is crucial as you prepare for the hands-on steps of the conversion. And if you're interested in learning more about the different types of stoves out there, you might want to check out our complete commercial gas stoves guide.
https://therestaurantwarehouse.com/blogs/restaurant-equipment/commercial-gas-stoves-guide
Get Your Tools and the Right Conversion Kit Lined Up
Let's be real: a successful gas stove conversion from natural gas to propane comes down to having every single part and tool ready to go before you start. Trying to wing it is a recipe for frustration, stripped parts, and some serious safety risks. Taking a few minutes to get organized is honestly the most important thing you can do.
The absolute first thing you need is the conversion kit itself. This is not the time to grab a generic, one-size-fits-all kit from the local hardware store. For the safety of your kitchen and the performance of your stove, you absolutely must use the OEM (Original Equipment Manufacturer) kit made specifically for your stove's model.
Using a generic kit is a huge safety gamble. Those tiny brass fittings—the orifices—are precision-drilled for a specific burner's BTU rating. The wrong size can create dangerously high flames or, even worse, produce carbon monoxide.
How to Find Your Model and Serial Number
Before you can order that kit, you've got to find your stove’s model and serial number. This info is usually on a small metal plate or sticker tucked away somewhere.
Here are the usual hiding spots:
- Inside the oven door frame, right where you can see it when you open the door.
- On the side or back of the bottom storage drawer.
- On the back of the stove, usually near where the gas line connects.
Once you find it, just snap a quick, clear photo with your phone. This little trick saves you from guessing games and guarantees you order the exact parts you need. Having that photo handy makes searching online or talking to a parts supplier a whole lot easier.
Your Must-Have Tool Checklist
With the right kit on its way, you can round up your tools. You probably have a lot of this stuff already, but a few specific items are crucial for doing this job right without breaking anything.
Here’s your game plan:
- Nut Driver Set: A 1/4-inch and 9/32-inch nut driver, or a ratchet with those socket sizes, is essential for getting the old orifices out and the new ones in.
- Open-End Wrenches: You’ll need a 1/2-inch and 5/8-inch wrench for the pressure regulator and the bell orifice. Using the right size here is key to not stripping the soft brass fittings.
- Pipe Thread Sealant: Make sure you grab sealant specifically rated for propane. It’s usually yellow, not the white Teflon tape you use for plumbing.
- Screwdrivers: Have both a Phillips and a flat-head on hand. You'll need them for removing panels and making small adjustments.
- Work Gloves: A good pair will save your hands from the surprisingly sharp metal edges inside the oven cavity.
Having everything laid out and ready to go makes the whole process smoother and safer. For a deeper dive into what to expect from these appliances, our propane cooking stove guide offers some great additional insights.
https://therestaurantwarehouse.com/blogs/restaurant-equipment/propane-cooking-stove-guide
Getting Hands-On With the Conversion Process
This is where the real work begins. A gas stove conversion from natural gas to propane is a methodical process that requires patience and a sharp eye for detail. Instead of thinking of it as one long, intimidating list of steps, it’s much easier to break it down into distinct stages. You'll want to make sure each part of the job is done correctly and safely before you even think about moving on to the next.
First things first: safety is not optional. Before a single screw is turned, you absolutely must shut off the gas supply to the stove. Find the shut-off valve on the wall behind the appliance and turn it to the off position. Just as important, unplug the stove from its electrical outlet to get rid of any risk of sparks or electrical shock.
Swapping Out the Cooktop Burner Orifices
With the stove safely disconnected from power and gas, you can get started on the most critical part of the conversion: replacing the orifices on the cooktop. These are the small, thimble-shaped brass fittings that control the flow of gas to each burner.
To get to them, you’ll need to remove the burner grates, the burner caps, and then lift off the burner heads themselves. This will expose the orifices sitting right at the base.
Using a nut driver—usually a 9/32-inch size—carefully unscrew each of the existing natural gas orifices by turning them counter-clockwise. Here’s a little pro-tip I’ve picked up: stick a small piece of masking tape inside the socket of your driver. This gives it just enough grip to hold onto the tiny orifice and keep it from falling down into the stove's interior, which can be a real headache to retrieve.
Once the old ones are out, you’ll install the new propane orifices from your conversion kit. You'll immediately notice they have much smaller holes, which is necessary to restrict the flow of the higher-pressure propane. Gently thread each new orifice into place by hand first to make sure you don't cross-thread it, then tighten it snugly with the nut driver until it stops. There's no need to crank on it; just snug is perfect.
Tackling the Oven and Broiler Components
Next up, you’ll turn your attention to the oven and broiler. This part often feels a bit more involved, but it’s just as straightforward if you take your time. You’ll need to remove the oven door, the racks, and the bottom panel to get access to the burner assembly. This usually just involves removing a few screws with a 1/4-inch nut driver.
Once you’re inside, you'll find the oven burner's orifice. It's often a larger, bell-shaped fitting. Using a 1/2-inch open-end wrench, you'll tighten this orifice down. Usually, one full turn clockwise is all it takes. This simple action closes a small bypass opening, adjusting the fuel flow for propane. If your stove has a separate broiler, you'll repeat this exact same process for the broiler burner.
This stage is where a magnetic parts tray becomes invaluable. You'll be handling several small screws and components, and having a designated spot to keep them organized prevents them from getting lost inside the appliance.
Adjusting the Gas Pressure Regulator
The gas pressure regulator is another key piece that needs a quick adjustment. You'll typically find it where the main gas line connects to the back of the stove. The regulator has a cap, often secured with a 5/8-inch wrench, that needs to be flipped over.
Unscrew the cap, and you'll see a small pin or plunger underneath it. For natural gas, this pin is usually set facing up. To convert it, you'll remove the cap, flip it over so the pin now faces down into the regulator body, and then screw it back on. This simple change adjusts the internal spring tension, setting the regulator to handle the higher pressure of propane gas.
The image below really helps visualize the core changes in pressure and orifice size that make this conversion necessary.
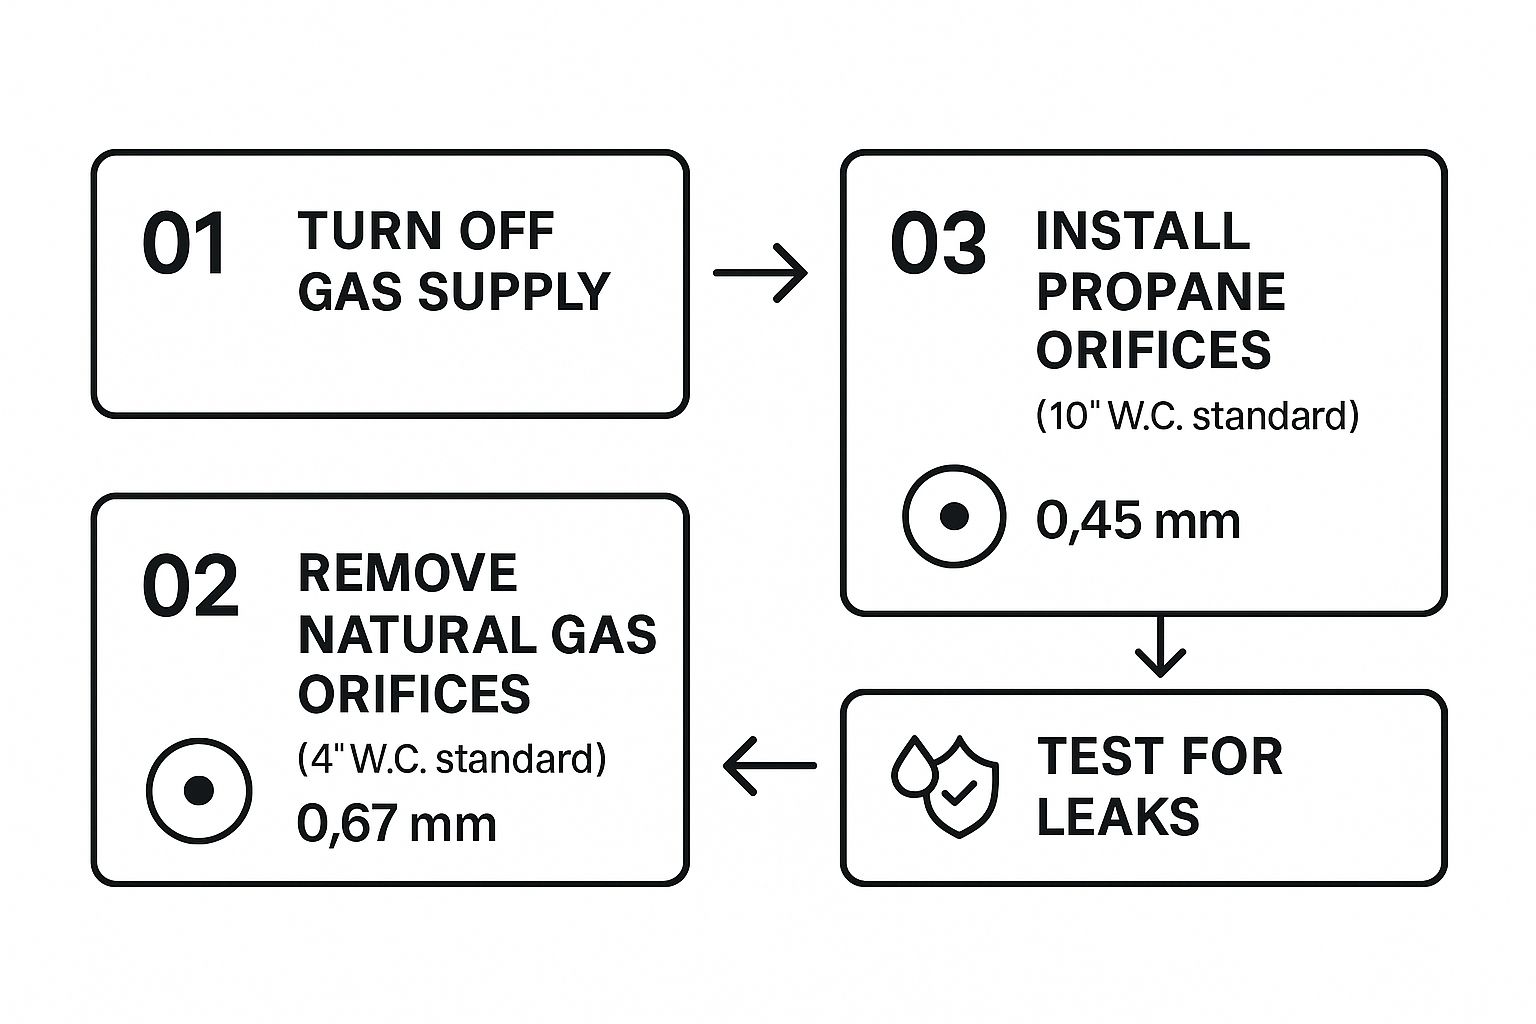
This visual shows the significant jump in pressure from 4" W.C. to 10" W.C. and the corresponding decrease in orifice diameter. These are the fundamental reasons you have to be so meticulous with a conversion.
Setting the Burner Air Shutters for a Perfect Flame
The final hands-on adjustment is setting the air shutters. Both the cooktop burners and the oven burner have an adjustable collar or plate that controls how much air mixes with the gas. Getting the right air-to-fuel ratio is what gives you that clean, efficient blue flame.
For the cooktop, you may need to loosen a small screw on the burner tube to rotate the shutter, opening or closing it slightly. For the oven burner, the shutter is usually located at the front of the burner tube. You'll loosen its screw and rotate it to adjust the opening.
The goal here, once you eventually test the stove, is to achieve a stable, mostly blue flame that has just a slight yellow tip. Nailing this adjustment ensures complete combustion and prevents that messy soot buildup.
Alright, you’ve swapped the orifices and adjusted the regulator. The heavy lifting of your gas stove conversion from natural gas to propane is done, but don't get ahead of yourself. What comes next is hands-down the most critical part of the job: making sure everything is sealed up tight and working safely.
This is where you double-check your work to ensure a safe, efficient appliance. Let’s get it done right.
The All-Important Leak Test
First things first, you have to do a leak test. This isn't optional—it's the golden rule anytime you work on a gas line. You don’t need any high-tech gear for this, just a simple spray bottle filled with a mix of dish soap and water.
Go ahead and turn the gas supply back on. Now, spray down every single connection you touched during the conversion. I’m talking about the main gas line fitting, both sides of the regulator, and every single orifice connection at the burners. Get a good look at each one.
What you're watching for are bubbles.
- Small, slow-forming bubbles mean you have a minor leak that still needs to be fixed immediately.
- Rapid, frothy bubbling indicates a serious leak.
If you spot any bubbles, shut the gas off right away. Grab your wrench, give the leaky connection a slight tighten—usually no more than a quarter-turn is needed—and then test it again. Do not move on until every connection is completely bubble-free.
Dialing in the Perfect Flame
Once you're 100% sure there are no leaks, it's time to fine-tune the flames. This is a two-part process: adjusting the low-flame setting and tweaking the air shutter. A poorly adjusted flame is not only inefficient but can also produce dangerous carbon monoxide.
Start with the low-flame, or simmer, setting. Light one of the cooktop burners and turn the knob to its lowest position. On most stoves, you'll find a tiny adjustment screw right in the center of the valve stem, hiding behind the knob. Use a small flat-head screwdriver to turn this screw until the flame is as low as it can go without sputtering out or flickering.
What are you looking for? The perfect propane flame should be stable, quiet, and mostly blue with just a hint of yellow at the very tips. A noisy, lifting flame means too much air. A lazy, yellow flame means not enough air and incomplete combustion.
Next, you’ll adjust the air shutter on each burner tube to get that ideal blue flame. Loosen the screw holding the shutter in place and slowly rotate it while watching the flame. You’ll see the color and behavior change as you adjust it. This step is all about ensuring your stove is burning fuel cleanly and efficiently. For more in-depth guidance, our complete propane gas stove guide is a great resource.
Getting the combustion right isn't just about efficiency; it's about the air quality in your home. With around 50 million homes in the U.S. using gas stoves, proper adjustment is crucial. Studies have shown that both natural gas and propane stoves can emit nitrogen dioxide (NO2) based on how well they burn fuel, directly impacting indoor pollutant levels.
As a final wrap-up for any conversion, I always recommend brushing up on essential tips to keep you safe with gas appliances. Taking these final checks seriously is what turns a good conversion into a great, and safe, one.
Got Questions About Your Conversion?
When you’re tackling a gas stove conversion, a few questions always seem to pop up. Getting straight answers is key to doing the job right, staying safe, and feeling confident you haven't missed a crucial step. Let’s walk through some of the most common ones I hear from folks in the field.
Can I Just Reuse the Old Natural Gas Orifices?
This is probably the number one question, and the answer is a hard no. It's all about the size of the opening. Natural gas orifices are drilled with a much larger hole to accommodate the lower pressure of NG. If you try to push higher-pressure propane through them, you'll end up with massive, out-of-control flames. It's not just inefficient; it's a serious fire and carbon monoxide hazard.
Is a Generic Conversion Kit Good Enough?
I get why people ask this—generic kits often look like a great way to save a few bucks. But you should always, always use the OEM (Original Equipment Manufacturer) kit that’s specifically designed for your stove's model number. A generic kit might have parts that look right, but they aren't calibrated for your stove's specific BTU ratings. This can lead to poor performance, incomplete combustion, and other safety issues you just don't want to mess with.
Your stove’s model number is the key to everything. Use it to order the exact conversion kit from the manufacturer. This guarantees every part, especially the new orifices, is perfectly sized for safe and efficient operation.
What if the Flame Doesn't Look Right After I'm Done?
Seeing a perfect blue flame is the goal, but sometimes it needs a little tweaking. Here’s how to read the flame and make the right adjustment:
- Is the flame yellow and sooty? That means it’s not getting enough air. You’ll need to find the air shutter on the burner tube and open it up just a tiny bit to let more oxygen mix with the gas.
- Is the flame noisy and lifting off the burner? This is the opposite problem—too much air in the mix. Gently close the air shutter a little at a time until the flame settles down and burns quietly against the burner head.
And a final common question: can you switch the stove back to natural gas later on? Absolutely. Just be sure to keep all the original natural gas parts—the orifices and the regulator cap—in a clearly labeled bag. When the time comes, you’ll just follow these same steps in reverse.
For all your commercial kitchen needs, from high-performance ranges to essential supplies, The Restaurant Warehouse has you covered. Explore our extensive catalog and find the right equipment to keep your kitchen running smoothly at https://therestaurantwarehouse.com.
About The Author

Sean Kearney
Sean Kearney used to work at Amazon.com and started The Restaurant Warehouse. He has more than 10 years of experience in restaurant equipment and supplies. He graduated from the University of Washington in 1993. He earned a BA in business and marketing. He also played linebacker for the Huskies football team. He helps restaurants find equipment at a fair price and offers financing options. You can connect with Sean on LinkedIn or Facebook.
Leave a comment